LT Security LTD2408-2416 Скачать руководство пользователя страница 86

Digital Video Recorder User Manual 

80 


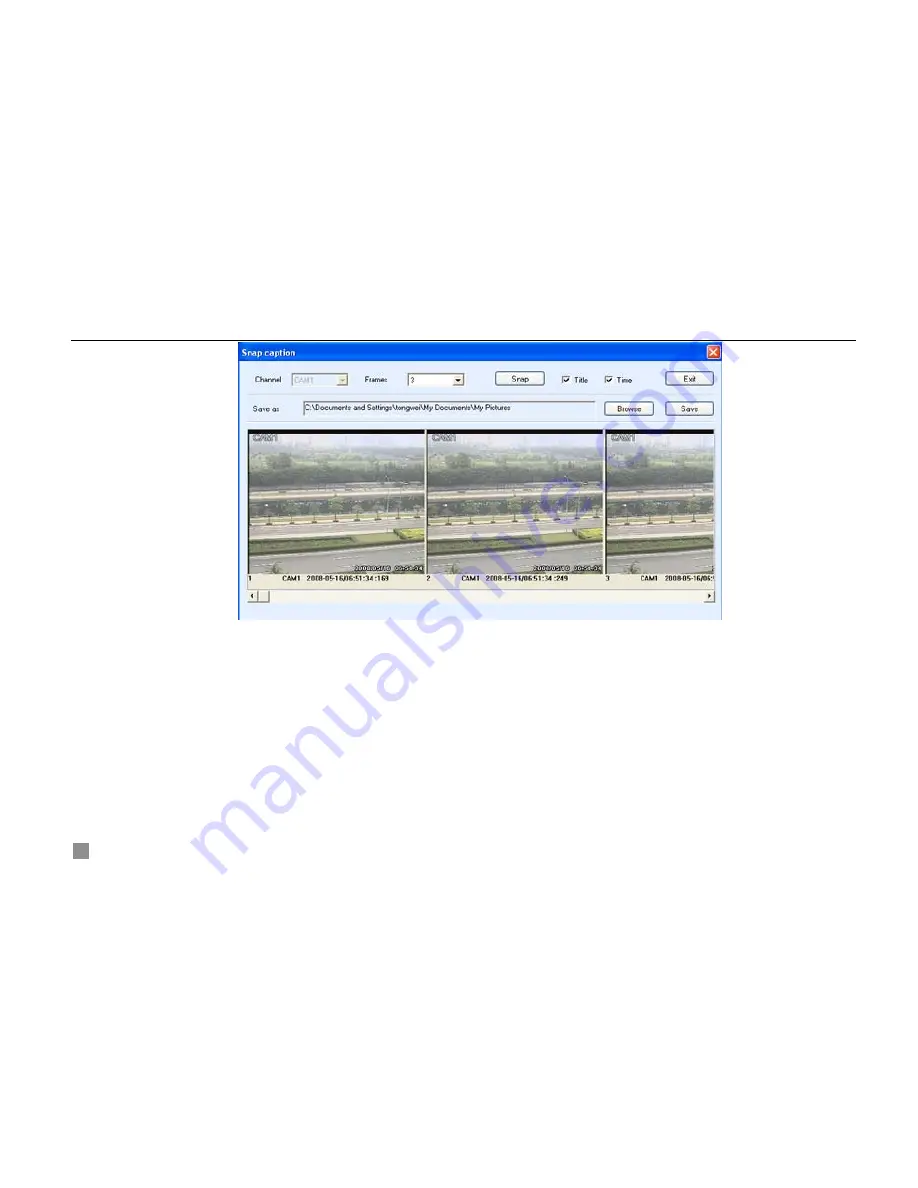
Fig 6.3 Preview Snap 


STEP2 

Select frames captured one time. Enable Title and Time, it will capture title and time simultaneously. 

STEP3 

Click Snap to capture pictures. 

STEP4 

Click Browse to set saving path. Click 

Save

 to save pictures to HDD on the computer. And the saving folder 

window will pop up. 

STEP5 

Click Exit to return to live preview interface. 

Color adjustment:


Click on a channel to choose. Drag the slide bar to adjust Brightness, Contrast, Hue, and Saturation. Click Default to 

reset them to original value. 

Содержание LTD2408-2416

Страница 1: ...Digital Video Recorder User Manual i DVR User Manual For H 264 4 channel 8 channel 16 channel Digital Video Recorder All rights reserved...

Страница 2: ...r any heat sources such as radiators heat registers stoves or other device that produce heat z Do not install this device near water Clean only with a dry cloth z Do not block any ventilation openings...

Страница 3: ...s 5 2 3 Rear Panel Instructions 7 2 3 1 Rear Panel Interface 7 2 3 2 Install Sensor Alarm 12 2 4 Remote Controller 14 2 5 Control with Mouse 16 2 5 1 Connect Mouse 16 2 5 2 Use Mouse 16 CHAPTER 3 Basi...

Страница 4: ...8 P T Z Configuration 60 4 2 9 User Configuration 62 4 2 10 Tools Configuration 63 CHAPTER 5 Manage DVR 65 5 1 Format Hard Disk 65 5 2 Update Firmware 66 5 3 Load Default Setup 66 5 4 Check System In...

Страница 5: ...eillance 94 7 1 By Phones with WinCE 94 7 2 By Phones with Symbian 98 Appendix A FAQ 102 Appendix B Calculation of Recording Capacity 108 Appendix C Compatible Devices 110 Appendix D DVR Specification...

Страница 6: ......

Страница 7: ...mote control mobile view by phones etc which ensure its powerful functions and high stability Due to these distinctive characteristics it is widely used in banks telecommunication transportation facto...

Страница 8: ...rd search mode time search and event search Support single and 4 screen playback Support deleting and locking the recorded files one by one Support remote playback in Network Client through LAN or int...

Страница 9: ...ltaneously Support dual stream Network stream is adjustable independently to fit the network bandwidth and environment Support picture snap and color adjustment in remote live Support remote time and...

Страница 10: ...VD Writer 2 1 1 Install Hard Drive Notice 1 Support three SATA hard disk drives Please use the hard disk drive the manufacturers recommend specially for security and safe field 2 Please calculate HDD...

Страница 11: ...s we recommend Please refer to Appendix C Compatible Devices 2 This device is only for backup STEP1 Unscrew and Open the top cover STEP2 Connect with the power and data cables Put DVD Writer into the...

Страница 12: ...e 3 Digital button Input digitals or choose camera 4 Multi screen button Change screen display like single 4 and 8 screens 5 Direction Direction buttons Move cursor in setup or pan title PTZ 6 Enter b...

Страница 13: ...p mode in live 15 MENU Enter menu in live 16 REC Record manually 17 SEARCH Enter search mode 18 PLAY Enter playback interface 19 REW Rewind 20 FF Fast forward 21 STOP Quit playback mode 22 IR receiver...

Страница 14: ...Name Description 1 Video out Connect to monitor 2 Audio in Audio of channel from 1 to 8 3 Audio out Audio output connect to the sound box 4 S video S Video output connect to monitor 5 PS 2 port Connec...

Страница 15: ...to external alarm Please refer to 2 3 2 Install Sensor Alarm 12 FAN For cooling the device 13 POWER PORT Connect with power cable 14 LOOP OUT For outputting each channel s image independently 15 POWE...

Страница 16: ...se 6 RJ45 PORT Connected to internet 8 VGA port VGA output connect to monitor 9 COM port For debug 10 ALARM IN Connect to external sensor1 8 Please refer to 2 3 2 Install Sensor Alarm 11 ALARM OUT Rel...

Страница 17: ...o output connect to monitor 4 Audio out Audio output connect to the sound box 5 Audio in Audio input 6 PS 2 port Connect to PS 2 mouse 8 USB MOUSE Only for USB mouse 9 RJ45 PORT Connected to internet...

Страница 18: ...nstall Sensor Alarm The DVR has eight channel alarm input and four channel alarm output Alarm Input The alarm input is triggered by electric level High 5V Low 0V Users can connect external sensors lik...

Страница 19: ...ive on off signal to external alarm The status of these pin are illustrated as Fig 2 7 N O COM N C N O COM N C Before alarm After alarm Fig 2 8 Relay Output Status Users need connect their alarm accor...

Страница 20: ...lace batteries Please take care the poles and STEP3 Replace the battery cover Notice Frequently defect checking as following 1 Check batteries poles 2 Check the remaining charge in the batteries 3 Che...

Страница 21: ...efore power off 2 INFOR Button Get information about the DVR like firmware version HDD information 3 REC Button To record manually 4 Digital Button Input digital or choose camera 5 Multi Screen Button...

Страница 22: ...anel please refer to Fig 2 10 Remote Controller Notice If mouse is not detected or doesn t work check as below 1 Unplug re plug several times 2 Power off on several times 3 Change a mouse to try 2 5 2...

Страница 23: ...and drag to set motion detection area Set schedule hold left button and drag to set schedule time In playback Click left button to choose the options Click right button to return to searching mode In...

Страница 24: ...the source power switch on the power button near the power port in the rear panel and the system will be loaded The other is to start by the Power button on the front panel this method will be used on...

Страница 25: ...Digital Video Recorder User Manual 19 Fig 3 2 Preview...

Страница 26: ...ecord red Alarm record HDD Current working HDD Space Size of current HDD Free Free space of current USB devices connected HDD full 3 1 2 Close When you close the system please strictly obey normal clo...

Страница 27: ...wn STEP3 Click OK to enter on the pop up window The unit will power off automatically after a while STEP4 Disconnect the power 3 2 Login User Management Users can logout and login the DVR system Users...

Страница 28: ...ord modification Click Password the window will appear as Fig 3 5 Change Password Fig 3 5 Change Password STEP2 Input the old password Then input new password 2 times STEP3 Press OK button to change A...

Страница 29: ...ase see Fig 3 6 Add User Fig 3 6 Add User STEP2 Input user name and password Choose the user group STEP3 Click OK button to add a new user STEP4 Choose a user a symbol will display at the end of the u...

Страница 30: ...tters or symbols The number of characters must be one or above 3 3 Recording 3 3 1 Record Setup Users need install and format a HDD and set all the recording parameters before recording It has four re...

Страница 31: ...t alarm recording STEP6 Enable Recycle It covers old video once HDD full If you have it unchecked it will stop recording auto once HDD full STEP7 Click OK to finish Notice The more space is used per h...

Страница 32: ...one day you can use Holiday function STEP1 Enter SCHEDULE configuration Select Channel and Schedule please see Fig 3 8 Schedule Setup Fig 3 8 Schedule Setup STEP2 The volume means the 7 days of one we...

Страница 33: ...tton STEP5 Click OK button to finish Then the DVR will auto record once it goes to the time you set 3 3 4 Motion Detection Recording This unit supports recording channels and PTZ linking This means it...

Страница 34: ...st Enter Area to set Sensitivity and detection Area In detection area red means unchecked transparence means available see Fig 3 10 Motion Detection Area Setup Due to the sensitivity is influenced by...

Страница 35: ...Digital Video Recorder User Manual 29 Fig 3 10 Motion Detection Area Setup STEP3 Enter Trigger configuration see Fig 3 11 Alarm Out Setup Fig 3 11 Alarm Out Setup...

Страница 36: ...us motion If a second motion is detected after hold time this motion and the previous are recognized as two different motion events STEP7 Click OK to save settings STEP8 Enter SCHEDULE configuration S...

Страница 37: ...out hold time and Buzzer hold time Click OK to save settings STEP6 Enter SCHEDULE configuration Select Sensor and relative cameras to set referring to 3 3 3 Timer Recording Notice About preset and aut...

Страница 38: ...h STEP1 Enter Search configuration select Time search A window will appear as Fig 3 14 Calendar Search If it recorded in a day the date will show highlight Fig 3 14 Calendar Search STEP2 Choose a day...

Страница 39: ...STEP4 If want to change the date press Date button Set hour and minutes of start time If it recorded at that time the boxes will show green STEP5 Click Play button It will play from the time point you...

Страница 40: ...Digital Video Recorder User Manual 34 Fig 3 16 Playback Event search STEP1 Enter Search Event search The calendar window will appear as that of time search...

Страница 41: ...o file to play 3 5 Backup View This unit supports backup by built in SATA DVD Writer with USB Flash through the USB port on the front panel Users can also make backup by IE browser via internet referr...

Страница 42: ...and end time Click Date button to change the date STEP3 Enable Attach record player it will save a special player simultaneously when backup With this player users can make time search and event sear...

Страница 43: ...n DVD writer and USB device it will show USB device in previous It will show CD ROM even though users install DVD writer STEP5 Press OK button It will begin to write video from HDD inside DVR to backu...

Страница 44: ...e third software like realplay windows media player directly Users can also check with the special software attached when backup Below are the steps of view the backup with the special software STEP1...

Страница 45: ...er User Manual 39 Fig 3 20 Backup Player Search area video display area Video data area Control area AVI converting STEP2 Click Browse to choose the folder which contains the video backup as Fig 3 21...

Страница 46: ...ith green light at the bottom as shown in Fig 3 22 Backup Data Search Fig 3 22 Backup Data Search If using event search it will list event files at the bottom of area STEP4 Drag the slide bar to the s...

Страница 47: ...kup Files Index Definition Index Definition Index Definition Index Definition Play Pause Stop Next frame Forward Rewind Snap Volume Screen mode Tab 3 1 Backup View Control STEP5 It supports AVI conver...

Страница 48: ...utton It will show backup files in the file display area as Fig 3 24 AVI Converter Fig 3 24 AVI Converter STEP7 Select the files Click Change button it will start converting the files and show the pro...

Страница 49: ...d set the parameters according to its manual STEP1 Press right mouse to show the control bar Enter Menu System P T Z see Fig 3 25 Fig 3 25 PTZ Setup STEP2 Set protocol baud rate address according to t...

Страница 50: ...6 Set Presets STEP4 Click Set button at right of Cruise Here users can set cruise track as Fig 3 27 Set Cruise Choose the preset set stay time of every preset Click button to add the preset to the lef...

Страница 51: ...STEP6 Click button to save and exit Press right mouse to show the control bar Click PTZ to enter PTZ control as Fig 3 28 PTZ Control Fig 3 28 PTZ Control STEP7 Select the speed dome Click the directio...

Страница 52: ...rization check switch Live Camera name Camera mask Name time switch SPOT out switch Color adjustment Record Video quality Frame rate Record switch Resolution Recycle switch Post alarm record time Sche...

Страница 53: ...Speed setup Presets setup Cruise setup User Add users Delete users Change authorization Tools Disk manager Update Load default Tab 4 1 Menu Navigation 4 2 Main Menu Setup Click right mouse or press EN...

Страница 54: ...Digital Video Recorder User Manual 48 Fig 4 2 Up listed Menu Select System A graphic user interface will show as Fig 4 3 System Setup Fig 4 3 System Setup...

Страница 55: ...deo system menu language audio time and authorization check The following are the definitions of every option Device name The name of the unit It may display on the client end or CMS which help users...

Страница 56: ...as Fig 4 5 Live Configuration Fig 4 5 Live Configuration Here users can set name time display picture color and hide cameras The following are the definitions of every option Camera name set camera na...

Страница 57: ...r Click Set button a window will appear as Fig 4 6 Color Adjustment Fig 4 6 Color Adjustment Adjust Brightness Hue Saturation and Contrast in live here Default set the color to the default value 4 2 3...

Страница 58: ...file if checked Record Switch on off recording function for every camera It records the camera only if having the camera checked here Then you can use manual timer motion detection and sensor alarm re...

Страница 59: ...ys Motion and Sensor refer to record schedule motion schedule and alarm schedule respectively The volume means the 7 days of one week from Monday to Sunday The row refers to 24 hours Click the boxes o...

Страница 60: ...following are the definitions of every option Device type NC and NO Normal Close and Normal Open Set the value according to the alarm signal level of the sensors Enable enable sensor alarm Trigger se...

Страница 61: ...hannel and multi channels as linked channels Alarm in holding time S the interval time between the two adjacent efficient sensor alarms If a second alarm is detected in Hold time again it is recognize...

Страница 62: ...ith that of sensor alarm Nevertheless linked speed domes must be different front current channel I e now users enable motion detection of camera 1 the linked speed domes must be camera 2 8 Area set se...

Страница 63: ...detection sensitivity from 1 8 The default is 4 Exit quit without saving Holding time S the interval time between the two adjacent efficient motions similar with that of sensor alarm 4 2 7 Network Co...

Страница 64: ...lank I e set HTTP port to 82 IP address to 192 168 0 25 Users need input http 192 168 0 25 82 in IE browser Server port communication port DHCP enable DHCP It wants this feature work need enable DHCP...

Страница 65: ...m or www 88IP net Then input register ID and password here Click OK button The unit will connect DNS2P or 88IP Fig 4 14 DDNS Configuration Server select DDNS server User name and Password input regist...

Страница 66: ...Configuration Video quality network picture quality Frame rate it has 3 options 1 2 and 3 fps Resolution now it only has CIF Time stamp Time displayed in the image 4 2 8 P T Z Configuration Click P T...

Страница 67: ...re The following are the definitions of every option Protocol Baud rate Address please set the value according to the settings of the speed dome Speed set the speed of speed domes Preset Name select a...

Страница 68: ...e Name select a cruise track and rename it Click Set in Cruise row A window will appear as 3 6 PTZ Control Notice It has 128 presets and 32 cruise tracks totally 4 2 9 User Configuration Click USER to...

Страница 69: ...tion Administrator can add delete users and change their authorization Please refer to 3 2 Login User Management Notice It supports one administrator and max 15 users 4 2 10 Tools Configuration Click...

Страница 70: ...ital Video Recorder User Manual 64 Fig 4 19 Tools Manager Disk manager please refer to 5 1 Format Hard Disk Update please refer to 5 2 Update Firmware Load default please refer to 5 3 Load Default Set...

Страница 71: ...ary to format the hard disk at first If not being formatted it will show the position of the disk free space and total space show 0M at the bottom of screen STEP1 Enter TOOLS configuration referring t...

Страница 72: ...Disk Manager STEP1 Plug an USB flash to the computer Copy the firmware to the flash The extension of firmware is tar STEP2 Remove the USB flash to the DVR Enter TOOLS configuration referring to 4 2 10...

Страница 73: ...up blocks please refer to Fig 5 2 Reset Blocks STEP3 Press OK to do default It will return to TOOLS interface after finished 5 4 Check System Information Users can check system information like firmwa...

Страница 74: ...Digital Video Recorder User Manual 68 Fig 5 3 Status Interface STEP3 Click System the window below will display Check firmware version recording parameters here...

Страница 75: ...ital Video Recorder User Manual 69 Fig 5 4 System Information STEP4 Return to the previous interface and click Network The window below will display Check IP address DVR Mac address network video qual...

Страница 76: ...d operation The form below is the details of the two groups Group Details Events Motion Video Loss Sensor Operation Delete File Lock File Search Login Enable check Boot Shutdown Reset Start Record Sto...

Страница 77: ...Click Date to change date by a calendar Click Type to select the event type Then click Search button It will refresh the event list STEP3 Click to do pgdn or pgup STEP4 Click right mouse to return to...

Страница 78: ...events log Notice The log files are saved to the HDD inside If HDD not installed it will not record any thing The number of log files is unlimited 5 6 Check On line Network Users Press right mouse to...

Страница 79: ...l every video file locking and deleting them Once users lock an important file it cannot be covered or deleted But the locked files can still be cleared by formatting STEP1 Press right mouse to show t...

Страница 80: ...the file area of file manager at bottom It show the details of every file like start end time lock state STEP4 Select the files and click Lock it will lock the selected files At this time a letter L d...

Страница 81: ...upports XP and Vista 6 1 1 On LAN STEP1 Input IP address Subnet Gateway If using DHCP please enable DHCP in both the DVR and router STEP2 Enter Video to set network video parameters like resolution fr...

Страница 82: ...Digital Video Recorder User Manual 76 Fig 6 1 View with IE browser...

Страница 83: ...al STEP4 If users want to utilize dynamic domain name need apply for a domain name in a DNS server supported by the DVR or router Then add to the DVR or router Now this unit only supports www dns2p co...

Страница 84: ...Digital Video Recorder User Manual 78 Fig 6 2 Remote Preview Interface...

Страница 85: ...backup make remote playback and backup check system log and journal Please refer to 6 3 Remote Playback Backup Remote menu setup set the parameters remotely Please refer to 6 4 Remote Menu Configurat...

Страница 86: ...lick Snap to capture pictures STEP4 Click Browse to set saving path Click Save to save pictures to HDD on the computer And the saving folder window will pop up STEP5 Click Exit to return to live previ...

Страница 87: ...Digital Video Recorder User Manual 81 PTZ control Click P T Z to enter the interface as below Click on a channel to select the speed dome Fig 6 4 Remote PTZ control...

Страница 88: ...me the preset Select and do auto cruise Click right mouse a pull down menu will appear as below Fig 6 5 Preview Control Menu Full screen the picture will fill the screen without tools bar display Doub...

Страница 89: ...max 3fps for every channel referring to 4 2 7 Network Configuration It requires low network bandwidth Master stream has higher frame rate max 30fps for every channel It also needs higher network bandw...

Страница 90: ...ack Backup Interface This DVR supports remote time search event search and one channel playback The above is the default interface after entering Playback Backup block By time search STEP1 Select the...

Страница 91: ...the top bar refers to hours and minutes in a day The left column refers to cameras Drag the slide bar to a time point Click right mouse on of the slide bar It will zoom in 10 times which is helpful fo...

Страница 92: ...ure it is the same as that in remote preview referring to Fig 6 3 Preview Snap STEP6 Click to return to search interface By event search STEP1 Click Event search the window will display as below Fig 6...

Страница 93: ...of time search above 6 3 2 Remote Backup Users can download the recorded files from the DVR through network Click Backup to enter the interface as below Fig 6 10 Remote Backup Interface STEP1 Select t...

Страница 94: ...to do remote backup It will show the process on the bottom of the screen as below Notice the backup file is AVI format Users can play with the third player directly 6 4 Remote Menu Configuration Excep...

Страница 95: ...Remote Menu Setup The sub menu lists and the options in every sub menu are similar with those on the DVR Please refer to 4 2 Main Menu Setup to do setup Click Save to save the change Some changes may...

Страница 96: ...Management 6 5 1 Check System Log Remotely Users can check system log remotely About the details of system log please refer to Tab 5 1 Details of System Log STEP1 Click Search Log the window below wi...

Страница 97: ...r Manual 91 Fig 6 12 Remote System LOG Search STEP2 Select the date channel and event type Then click Search STEP3 The entire log found will be listed in left area STEP4 Click Operation to enter opera...

Страница 98: ...d click Search It will list all the log files in the day in left area 6 5 2 Lock Delete Files Remotely Users can lock and delete video files through network About the details of this feature please re...

Страница 99: ...n the day in left area STEP3 The relative status will show Lock if the file is locked Writing means the file is still in being written STEP4 Select the files which is unlocked click Delete A security...

Страница 100: ...need first enable network service on the DVR referring to 4 2 7 Network Configuration The below is the use instructions on mobile client end for two OS Notice It supports only live view by mobile devi...

Страница 101: ...Digital Video Recorder User Manual 95 STEP3 Click on the software name A dialog box pops up STEP4 Click Yes to download and install...

Страница 102: ...l 96 STEP5 PCam will be opened after installed STEP6 Input the server s address ID and password respectively in the columns of Server User and Password And click Go to login the DVR It will show the p...

Страница 103: ...User Manual 97 STEP7 Camera 1 is the default display after login Change the camera in rolling down menu of Channel Notice User name and password here are the same with that used on the DVR The defaul...

Страница 104: ...twork access on mobile phone and then run Web browser STEP2 Input the DVR server s IP address in a new built bookmark Click this bookmark to connect to the DVR STEP3 A welcome window will pop up and r...

Страница 105: ...Digital Video Recorder User Manual 99 STEP5 A Scam shortcut icon appears on the system menu after finish STEP6 Run Scam program...

Страница 106: ...Digital Video Recorder User Manual 100 STEP7 Click Options Settings to enter login interface STEP8 Input the server s address ID and password respectively And click OK to login the DVR...

Страница 107: ...igital Video Recorder User Manual 101 STEP9 It will show the camera after access successfully Notice User name and password here are the same with that used on the DVR The default are admin and 123456...

Страница 108: ...format of the DVR is different from that of the monitor c Connection problem Please check the cable and the ports of monitor and DVR Q3 Why are no images displayed on parts or all of the channels of t...

Страница 109: ...cycle function Please refer to 4 2 3 Record Configuration Chang a new HDD or enable recycle d The HDD is damaged Change a new one Q6 Cannot use mouse a wait 5 minutes after mouse connected b Not detec...

Страница 110: ...Digital Video Recorder User Manual 104 select Security Custom Level...

Страница 111: ...Digital Video Recorder User Manual 105 Enable all the sub options under ActiveX controls and plug ins...

Страница 112: ...tiveX Please uninstall or close them Q8 How to deal with when DVR starts it displays please wait all the time First possible reason hard disk cable and data cable are not well connected Solution Pleas...

Страница 113: ...to U disk and then select upgrade in the menu If upgrading the kernel procedure please refer to the following method firstly insert U disk into DVR and then input adwsws in the password of system logi...

Страница 114: ...kbps Used Space MB h Highest 640 281 Higher 512 225 Medium 384 168 7 Lower 256 112 5 PAL CIF 25 Lowest 128 56 Highest 640 281 Higher 512 225 Medium 384 168 7 Lower 256 112 5 NTSC CIF 30 Lowest 128 56...

Страница 115: ...almost record for one month For 4 channel DVR Total Recoding capacity 112 5 mb h X 24 hours day X30 days X4 channels 324000 MB 324 GB If users install one 320GB SATA HDD it can almost record one mont...

Страница 116: ...ible USB drive after test Brand Capacity SSK 512MB 1G 2GB Netac 4GB Kingston 2GB Aigo 2GB Smatter vider 1GB Scandisk 4GB Tab C 1 Compatible USB drive 2 Compatible SATA CD DVD writers after test Brand...

Страница 117: ...240 704 480 NTSC Display Frame Rate 200FPS PAL 240FPS NTSC Record Frame Rate 200FPS 50FPS PAL 240FPS 60FPS NTSC Audio input 8dB 22k RCA X8 Audio output 8Db 92dB RCA X1 Alarm input NO or NC 8CH Alarm o...

Страница 118: ...240 704 480 NTSC Display Frame Rate 100FPS PAL 120FPS NTSC Record Frame Rate 100FPS 25FPS PAL 120FPS 30FPS NTSC Audio input 8dB 22k RCA X4 Audio output 8Db 92dB RCA X1 Alarm input NO or NC 4CH Alarm o...

Страница 119: ...40 704 480 NTSC Display Frame Rate 400FPS PAL 480FPS NTSC Record Frame Rate 400FPS 100FPS PAL 480FPS 120FPS NTSC Audio input 8dB 22k RCA X16 Audio output 8Db 92dB RCA X1 Alarm input NO or NC 16CH Alar...

Отзывы: