LT Security LTD2304SE Скачать руководство пользователя страница 10

Digital Video Recorder User Manual 

10 


2


Hardware Installation 

  Notice: Check the unit and the accessories after getting the DVR. 

Please disconnect the power before being connected to other devices. Don't hot plug in/out


2.1  Install Hard Drive   

2.1.1  Install Hard Drive 

  Notice: 1. this series support one SATA hard drives. Please use the hard drive the manufacturers recommend specially for security and safe 

field.


                    2. Please calculate HDD capacity according to the recording setting. Please refer to “Appendix B Calculate Recording Capacity”. 

Step1: Unscrew and Open the top cover 

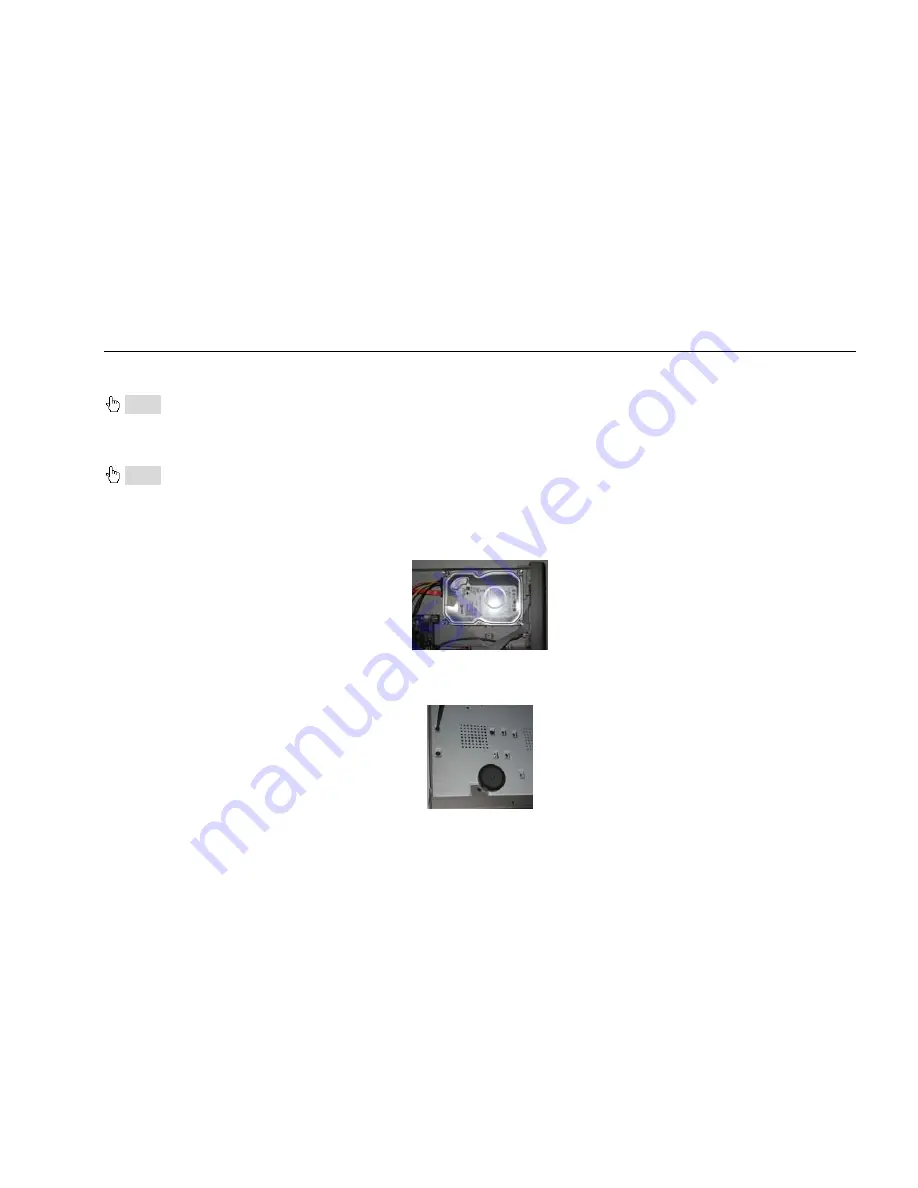
Step2: Connect the power and data cables. Place the HDD onto the bottom case as below. 


Fig 2.1 Connect HDD 

Step3: Screw the HDD as below. 

Note: For the convenience to install, please connect the power and data cables firstly, and then screw to fix. 


Fig 2.2 Screw HDD 

Содержание LTD2304SE

Страница 1: ...DVR User Manual For H 264 4 8 16 channel digital video recorder All rights reserved...

Страница 2: ...th a dry cloth z Do not block any ventilation openings And ensure well ventilation around the machine z Do not power off the DVR at normal recording condition The correct operation to shut off DVR is...

Страница 3: ...tall Hard Drive 10 2 2 Front Panel Instructions 11 2 3 Rear Panel Instructions 12 2 3 1 Rear Panel Interface 12 2 4 Remote Controller 16 2 5 Control with Mouse 18 2 5 1 Connect Mouse 18 2 5 2 Use Mous...

Страница 4: ...st monitor 30 4 2 3 SPOT 31 4 2 4 Mask 31 4 3 Record configuration 33 4 3 1 Enable 33 4 3 2 Record stream 35 4 3 3 Time 36 4 3 4 Recycle record 37 4 3 5 Stamp 37 4 4 Schedule configuration 38 4 4 1 Sc...

Страница 5: ...1 Time search 63 5 2 Event search 64 5 3 File manager 65 5 4 Backup 66 6 Manage DVR 68 6 1 Check system information 68 6 1 1 System information 68 6 1 2 Event information 68 6 1 3 Log information 69 6...

Страница 6: ...Remote System configuration 87 8 Mobile Surveillance 88 8 1 By Phones with WinCE 88 8 2 By Phones with Symbian 91 8 3 The operation method for iPhone mobile clients 94 Appendix A FAQ 100 Appendix B C...

Страница 7: ...unctions and high stability Due to these distinctive characteristics it is widely used in banks telecommunication transportation factories warehouse and irrigation and so on 1 2 Main Features COMPRESS...

Страница 8: ...lient through LAN or internet ALARM 1 channel alarm output and 4 8 16 channel alarm input available Support schedule for motion detection and sensor alarm Support pre recording and post recording Supp...

Страница 9: ...k stream is adjustable independently to fit the network bandwidth and environment Support picture snap and color adjustment in remote live Support remote time and event search and channel playback wit...

Страница 10: ...s Please use the hard drive the manufacturers recommend specially for security and safe field 2 Please calculate HDD capacity according to the recording setting Please refer to Appendix B Calculate Re...

Страница 11: ...is shown as Fig 2 3 Fig 2 3 Front Panel Item Name Function 1 POWER Shot switch off 2 RECORD Record manually 3 PLAY Enter play interface 4 REW Rewind key 5 FORWARD Fast forward 6 STOP ESC 1 Quit play...

Страница 12: ...isplay mode like1 4 9 16 channel 12 Menu 1 increase the value in setup 2 Enter menu in live 13 USB port To connect external USB devices like USB flash USB HDD for backup or update firmware Tab 2 1 Def...

Страница 13: ...nels from 1 4 5 DC12V POWER INPUT 6 VGA port VGA output connect to monitor 7 LAN Network port 8 USB port Connect USB mouse or connect external USB devices 9 P Z Connect to speed dome 10 K B Connect to...

Страница 14: ...display no menu show 3 Audio out Audio output connect to the sound box 4 Video in Video input channels from 1 8 5 DC12V POWER INPUT 6 VGA port VGA output connect to monitor 7 LAN Network port 8 USB po...

Страница 15: ...nel interface for 16 ch is shown as Fig 2 6 Fig 2 6 Rear Panel for 16 ch Item Name Description 1 Audio out Audio output connect to the sound box 2 Audio in 4 CH Audio input 3 VGA port VGA output conne...

Страница 16: ...Panel Buttons 2 4 Remote Controller It uses two AAA size batteries and works after loading batteries as following Step1 Open the battery cover of the Remote Controller Step2 Place batteries Please ta...

Страница 17: ...put digital or choose camera 5 Multi Screen Button To choose multi screen display mode 6 SEARCH Button To enter search mode 7 MENU Button To enter menu 8 ENTER Button To confirm the choice or setup 9...

Страница 18: ...the same device ID For more convenient to operate we don t recommend user to set the device ID too long Step3 Cancel controller to control DVR turn the IR sensor of the remote controller to the IR rec...

Страница 19: ...the wheel when the value blinks It supports mouse drag I e Set motion detection area click customized hold left button and drag to set motion detection area Set schedule hold left button and drag to...

Страница 20: ...display blue Step3 before start a WIZZARD dialogue box will be pop up refer to below picture and show some information about time zone and time setup After the device power on if there is no menu or...

Страница 21: ...er into Menu then select System Shut Down icon the Shut down window will appear Step2 click OK the unit will power off after a while Step3 disconnect the power 3 2 Login User can login and logout the...

Страница 22: ...l in the live preview interface symbol meaning symbol meaning Green Manual record or time record Red Alarm record Yellow Motion detection record Figure icon Move event 3 3 1 Live playback Click Play b...

Страница 23: ...Digital Video Recorder User Manual 23 Fig 3 3 live playback...

Страница 24: ...icon beside the screen display mode a channel select dialog will appear as below Take 8 channel DVR for example user can tick off channels form 1 ch to 8 ch at random to display the live pictures 8 ch...

Страница 25: ...ser Manual 25 Fig 4 2 system setup 4 1 Basic configuration Basic configuration includes three sub menus system date time and DST 4 1 1 System Step1 enter into system configuration basic configuration...

Страница 26: ...y Video format two modes PAL and NTSC User can select the video format according to that of camera Password check enable this option user needs to input user name and password can do corresponding ope...

Страница 27: ...m configuration basic configuration time date refer to Fig 4 4 Fig 4 4 basic configuration time date Step2 set the date format time format time zone in this interface tick off sync time with NTP serve...

Страница 28: ...to resort default setting click apply button to save the setting click exit button to exit current interface 4 2 Live configuration Live configuration includes four submenus live host monitor SPOT an...

Страница 29: ...Digital Video Recorder User Manual 29 Fig 4 6 live configuration live Step2 tick off camera name click setting button a window will pop up as Fig 4 7 Fig 4 7 live color adjustment...

Страница 30: ...2 Host monitor Step1 enter into system configuration live configuration host monitor refer to Fig 4 8 Fig 4 8 live configuration host monitor Step2 select split mode 1 1 2 2 2 3 3 3 4 4 and channel S...

Страница 31: ...isplay switching to next dwell picture display Step4 selected the split mode then setup current picture group Click button to setup the previous channel groups of dwell picture click button to set the...

Страница 32: ...Setting button enter into live image to press left mouse and drag mouse to set mask area refer to below picture Click Apply button to save the setting Delete mask area select a certain mask area clic...

Страница 33: ...ive image mask area 4 3 Record configuration Record configuration includes five sub menus enable record bit rate time recycle record and stamp 4 3 1 Enable Step1 enter into system configuration record...

Страница 34: ...p all channels with same parameters tick off all then to do relevant setup Step4 click default button to resort default setting click apply button to save the setting click exit button to exit current...

Страница 35: ...stream Step3 user can setup all channels with same parameters tick off All then to do relevant setup Step4 click default button to resort default setting click apply button to save the setting click e...

Страница 36: ...it stream Range from 64 Kbps 128 Kbps 256 Kbps 512 Kbps 768 Kbps 1Mbps 2 Mbps 4 3 3 Time Step1 enter into system configuration record configuration time refer to Fig 4 13 Fig 4 13 record configuration...

Страница 37: ...enter into system configuration record configuration recycle record Step2 tick off recycle record the recycle record function will enable it will cover the earlier recorded files and keep recoding whe...

Страница 38: ...click default button to resort default setting click apply button to save the setting click exit button to exit current interface 4 4 Schedule configuration Schedule configuration includes three sub...

Страница 39: ...Video Recorder User Manual 39 Fig 4 15 schedule configuration schedule Step2 select channel double click and a dialog box will pop up as Fig 4 16 user can edit week schedule Fig 4 16 schedule week sc...

Страница 40: ...els just only select channel and click Copy button Step3 click default button to resort default setting click apply button to save the setting click exit button to exit current interface 4 4 2 Motion...

Страница 41: ...ser can refer to 4 4 1 Schedule for details Note the default schedule of sensor is full selected that is the color of schedule setting interface is blue Fig 4 18 schedule configuration sensor 4 5 Alar...

Страница 42: ...rm type according to triggered alarm type Two option NO and NC Step3 user can setup all channels with same parameters tick off all then to do relevant setup Step4 click default button to resort defaul...

Страница 43: ...log box will pop up as Fig 4 21 Fig 4 21 alarm handling trigger Step3 tick off Buzzer there will be triggered buzzer alarm out Full screen alarm when triggered alarm there will pop up full screen alar...

Страница 44: ...n to exit the current interface Step4 user can setup all channels with same parameters tick off all then to do relevant setup Step5 click default button to resort default setting click apply button to...

Страница 45: ...between two adjacent detective motions If there is other motion detected during the interval period which is considered continuous movement otherwise it will be considered that those two adjacent det...

Страница 46: ...r can adjust its value according to the practical conditions click icon set the whole area as detection area click icon the set detection area will be cleared click icon user can test whether the sens...

Страница 47: ...save the setting click exit button to exit current interface Schedule Step1 enter into system configuration alarm configuration schedule refer to Fig 4 25 Fig3 25 alarm configuration schedule Step2 th...

Страница 48: ...andling user can refer to Chapter 4 5 1 Sensor alarm handling for more details Step3 user can setup all channels with same parameters tick off all then to do relevant setup Step4 click default button...

Страница 49: ...rm out schedule and buzzer Alarm out Step1 enter into system configuration alarm out refer to Fig 4 28 Fig 4 28 system configuration alarm out Step2 in this interface set relay alarm out name select h...

Страница 50: ...ce is blue Buzzer Step1 enter into system configuration buzzer Step2 tick off Buzzer set buzzer alarm hold time 4 6 Network configuration Network configuration includes two submenus network and networ...

Страница 51: ...d and host domain name of the registered website click TEST to test the effectively of relevant information STEP6 click default button to resort default setting click apply button to save the setting...

Страница 52: ...2 Login Step 1 Return to homepage after registering successfully Step 2 Click Account Manager on the right of homepage to login Step 3 Input the username and password with the information that you ha...

Страница 53: ...pay for it 2 Setup in the DVR DOMAIN Domain is set in 1 1 Apply the Domain Name According to the example above the domain is DVR www 88IP net USER ID Username of registered which is set in 1 Register...

Страница 54: ...ration Parameter Meaning HTTP port The port number of accessing IE browser The default port is 80 Server port The port number of data The default port is 6036 Static IP IP address The IP address of th...

Страница 55: ...ers tick off all then to do relevant setup Step4 click default button to resort default setting click apply button to save the setting click exit button to exit current interface Definitions and descr...

Страница 56: ...t rate Range from 64 Kbps 128 Kbps 256 Kbps 512 Kbps 768 Kbps 1Mbps 2 Mbps 4 7 User management configuration Step1 enter into system configuration user management configuration refer to Fig 4 34 Fig 4...

Страница 57: ...DVR on the binding computer after set the specific binding MAC address Authority Step1 enter into Add user authority refer to Fig 4 36 Fig 4 36 add user authority Step2 In the authority interface assi...

Страница 58: ...4 37 P T Z configuration serial port Step2 tick off Enable setup the value of address baud rate and protocol according to the settings of the speed dome Step3 user can setup all channels with same pa...

Страница 59: ...erface click preset Setting button a dialog box will pop up as Fig 4 39 Parameter Meaning Address The address of the PTZ device Baud rate Baud rate of the PTZ device Range form 110 300 600 1200 2400 4...

Страница 60: ...down left left down right and up right and stop rotating adjust the rotate speed and the value of zoom focus and iris of the dome c select the serial number of the preset point set the preset name Cli...

Страница 61: ...uise Setting button a dialog box will pop up as Fig 4 41 Fig 4 41 cruise set a click Add button to add cruise line in the list box max 8 cruise line can be added select a cruise line click Setup butto...

Страница 62: ...ave the setting click Exit button to exit current interface Step4 in the Advance interface click track Set button a dialog box will pop up as Fig 4 43 Fig 4 43 track set a user can control the dome ro...

Страница 63: ...h configuration time search Step2 select channel screen display mode the highlight date in the calendar means have record data Step3 select a date press Search button click the time grid to set the pl...

Страница 64: ...e monitor resolution is VGA800 600 the time search interface will appear a hide button click this button the whole interface can be expanded 5 2 Event search Step1 enter into Search configuration even...

Страница 65: ...click this button the whole interface can be expanded 5 3 File manager Step1 enter into Search configuration file manager refer to Fig 5 3 Fig 5 3 Search configuration file manager Step2 click Search...

Страница 66: ...be expanded 5 4 Backup This unit supports backup by USB device through the USB port on the front panel User also can make backup by IE browser via internet Refer to 7 3 2 Remote backup Step1 enter in...

Страница 67: ...ion interface user can check the relevant information of backup files storage type save file type etc click Apply button to starting backup Note when the monitor resolution is VGA800 600 the file mana...

Страница 68: ...bmenus system event log network and online user 6 1 1 System information In this interface user can check the hardware version MCU version kernel version device ID etc refer to Fig 6 1 Fig 6 1 system...

Страница 69: ...ital Video Recorder User Manual 69 Fig 6 2 event information 6 1 3 Log information In this interface user can check relevant log information according to set date refer to Fig 6 3 Fig 6 3 log informat...

Страница 70: ...In this interface user can check relevant parameters of network refer to Fig 6 4 Fig 6 4 network information 6 1 5 Online information In this interface user can check the details of the current connec...

Страница 71: ...f manual alarm refer to Fig 6 6 Fig 6 6 manual alarm 6 1 7 Disk manager Step1 enter into disk manager interface refer to Fig 5 7 Fig 6 7 disk manager Note please format the hard disk before record If...

Страница 72: ...fter formatted 6 1 8 Upgrade At present it only supports USB update Get the firmware from your vendor when there is a new firmware version and make sure it is corresponding with the DVR User can check...

Страница 73: ...P address Subnet Gateway If using DHCP please enable DHCP in both the DVR and router Enter Menu Information Network and user can check the network configuration of DVR Step2 Enter Video to set network...

Страница 74: ...Notice If HTTP port is not 80 other number instead need add the port number after IP address For example set HTTP port as 82 need input IP address like 192 168 0 25 82 User name and password here are...

Страница 75: ...r router Then add to the DVR or router Now this unit only supportswww dns2p com www 88IP net www meibu com www dyndns com and www no ip com About the router please check in the router manual Step5 Ope...

Страница 76: ...Digital Video Recorder User Manual 76 7 2 The remote live preview interface as below Fig 7 2 Remote live preview interface...

Страница 77: ...record file will be saved in user s PC Screen display mode Click the icon beside the screen display mode channel select dialog will appear as below Fig 7 3 Channel select dialog Take 8 channel DVR for...

Страница 78: ...r from Frame pull down list box such as 3 tick off Title and Time it will show capture title and time on the snap pictures simultaneously Refer to Fig 6 5 Fig 7 5 Multi picture snap 3 Click Browse to...

Страница 79: ...S485 firstly make sure the protocol of the speed dome is supported by the device and set the relative parameters manually User can control the dome up down right left or stop rotating on Control Cente...

Страница 80: ...low Fig 7 6 right key sub menu Stream this DVR supports master stream and sub stream Master stream has higher frame rate max 25FPS PAL 30 FPS NTSC for every channel but it needs higher network bandwid...

Страница 81: ...7 3 1 Remote playback Click button to enter into record playback interface refer to Fig 7 7 Select the record date and channels double click the file name in the record file list box user can play tha...

Страница 82: ...event search and file management By Time Search Step1 Enter into Search time search refer to Fig 7 8 Fig 7 8 time search interface Step2 click Search button The record data will be displayed in the d...

Страница 83: ...a playing time and display mode in the area as required Step4 Select certain item from the data information list box click play button to playback Step5 Click the relevant buttons in the interface use...

Страница 84: ...event search interface Step2 click the highlight date and select record channels and then tick off the event type motion and sensor click search button Step3 the events will be display in the event li...

Страница 85: ...Lock select certain file item in the file list box click Lock button to lock this file that ca not be deleted or overlaid Unlock select a locked file click unlock button to unlock this file Delete sel...

Страница 86: ...12 Fig 7 12 remote backup interface Step1 select channels set the start and end time then click search button the file information will be displayed in the file list box Step2 select backup files clic...

Страница 87: ...ation User should firstly select an item in the menu list on the left and then setup the relative parameters When one user setup parameters of a certain item others cannot setup this one Click Config...

Страница 88: ...ne with the DVR It wants to make mobile surveillance need first enable network service on the DVR and refer to Chapter 4 6 Network configuration The below is the use instructions on mobile client end...

Страница 89: ...Digital Video Recorder User Manual 89 Step3 Click Yes to start downloading and installing Step4 PCam will be opened automatically after installed...

Страница 90: ...f Server User and Password and click Go to log on the server It will show the picture if access successfully Step6 Camera 1 is the default channel after login Change the channel in rolling down menu o...

Страница 91: ...t the DVR server s IP address in a new built bookmark Click this bookmark to connect to the DVR Step3 A welcome window will pop up and requires a package Click the software name to download Step4 A se...

Страница 92: ...2 Live view to do mobile live view Image view to check the pictures snapped in live view System setting Login setting and Alarm setting Help function indication and help Step7 Click System setting Log...

Страница 93: ...there may be different access points in different countries or from service providers Step9 Enter Live View it will connect the server and display pictures Notice User name and password here are the s...

Страница 94: ...supports version of iPhone os2 2 and above if phone firmware lower than this version please upgrade it Below is the operation method for iPhone mobile clients Step1 Enter into App Store function of iP...

Страница 95: ...4 Enter into iTunes Store password click OK will display below interface Note if it was the first time for user to operate please enter into user ID if there is no Store account user need to apply one...

Страница 96: ...6 Step 6 Click System setting enter into login interface Enter into server s IP address or domain name user s ID and password Click Back to save Step 7 Click Live View the default Cam1 picture will be...

Страница 97: ...tal Video Recorder User Manual 97 Step 8 On function interface click Image View to view the captured picture Click or to switch to next or previous picture Click to delete the current picture Iphone h...

Страница 98: ...f connected successfully it will go to Live View of CH1 as default Pic 3 please choose other desired channels from channel button underneath Meanwhile please note below functions 1 Switch channels 2 P...

Страница 99: ...nual 99 Image View Pic 4 Pic 5 Item Buttons Explanations Item Buttons Explanations Item Buttons Explanations 1 Previous picture 2 Next Picture 3 The first Picture 4 The last picture 5 Delete 6 Search...

Страница 100: ...adapter is not enough Please remove the HDD or change an adapter to try b The video format of the DVR is different from that of the monitor c Connection problem Please check the cable and the ports o...

Страница 101: ...nction Please refer to 4 3 Record configuration Chang a new HDD or enable recycle d The HDD is damaged Change a new one Q6 Cannot use mouse a wait 1 2 minutes after mouse connected b Not detected Plug...

Страница 102: ...k activeX Please uninstall or close them Fig7 1 Fig7 2 Q8 How to deal with when DVR starts it displays please wait all the time First possible reason hard disk cable and data cable are not well connec...

Страница 103: ...and the system will upgrade kernel procedure automatically After finished please restart DVR to achieve Notice Do not power off in the system upgrading process Otherwise it may cause that DVR cannot...

Страница 104: ...ove Windows XP SP2 above VISTA DirectX 9 0 Q13 What are the PC configurations for 16 ch real time product with fully open channel mainstream PC Module Parameters CPU Intel Core TM 2 Duo CPU E4600 Moth...

Страница 105: ...28k 56 PAL CIF 25 Highest 1M 466 Higher 768k 295 Medium 512k 235 Low 384k 175 Lower 256k 56 4 Lowest 128k 45 The calculation format is Total Recording capacity Used space per hour MB h coverage rate o...

Страница 106: ...Recorder User Manual 106 Appendix C Compatible Devices 1 Compatible USB drive after test Brand Capacity SSK 512MB 1G 2GB Netac 4GB Kingston 2GB Aigo 2GB Smatter vider 1GB SanDisk 4GB Tab C 1 Compatib...

Страница 107: ...AL 352 240 704 480 NTSC Display Frame Rate 100FPS PAL 120FPS NTSC Record Frame Rate 100FPS PAL 120FPS NTSC Audio input 8dB 22k RCA X4 Audio output 8Db 92dB RCA X1 Alarm input NO or NC 4CH Alarm output...

Страница 108: ...AL 352 240 704 480 NTSC Display Frame Rate 200FPS PAL 240FPS NTSC Record Frame Rate 200FPS PAL 240FPS NTSC Audio input 8dB 22k RCA X8 Audio output 8Db 92dB RCA X1 Alarm input NO or NC 8CH Alarm output...

Страница 109: ...AL 352 240 704 480 NTSC Display Frame Rate 400FPS PAL 480FPS NTSC Record Frame Rate 400FPS PAL 480FPS NTSC Audio input 8dB 22k RCA X16 Audio output 8Db 92dB RCA X1 Alarm input NO or NC 16CH Alarm outp...

Отзывы: