LT Security 16CH(8 POE) Скачать руководство пользователя страница 21

Quick Operation Guide of 8700-P Series NVR 

20 

Start Live View 

Steps: 

1.


In the live view window, select a playing window by clicking the mouse. 

2.


Double-click a camera from the device list to start the live view. 

3.


You can click the 


button on the toolbar to start the live view of all cameras on the device list.   

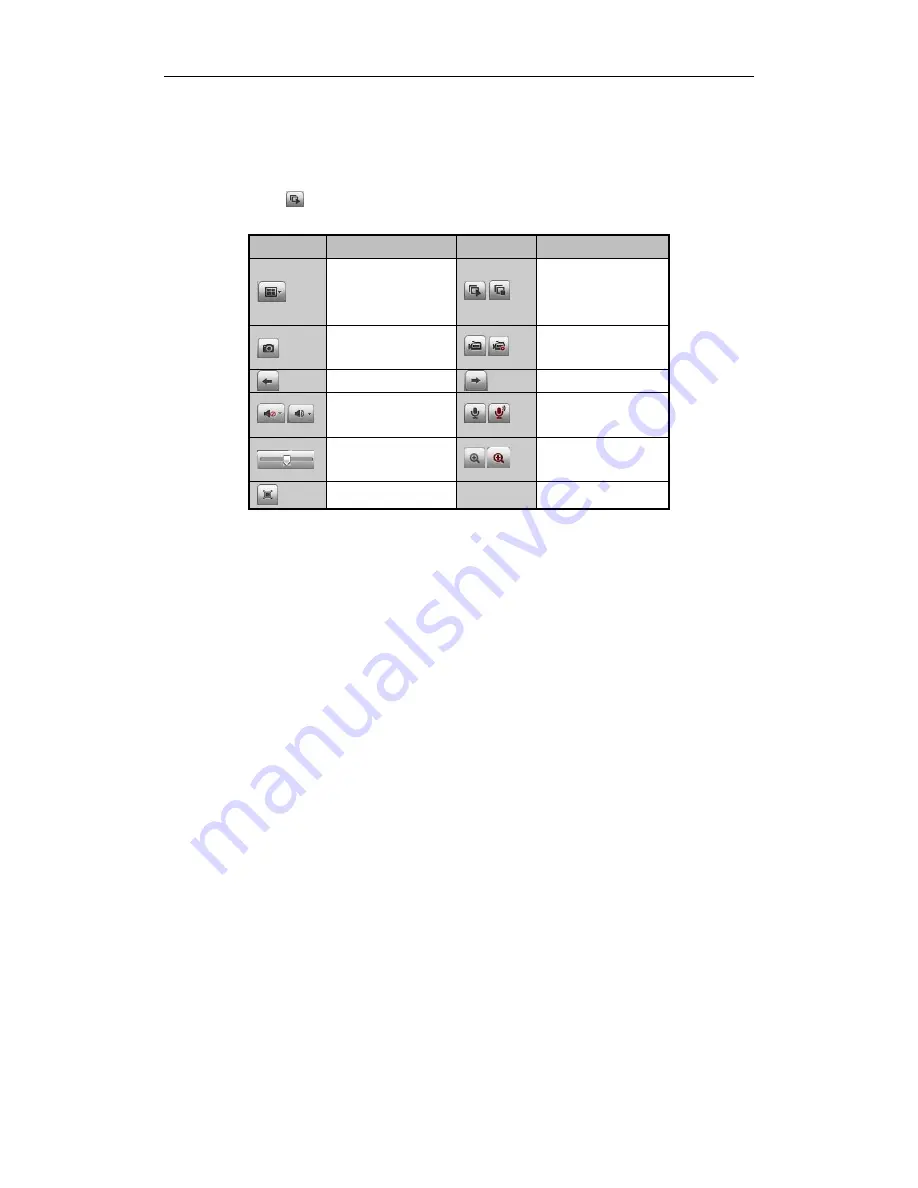
Refer to the following table for the description of buttons on the live view window: 

Icon 

Description 

Icon 

Description 


Select the 

window-division 

mode


/


Start/Stop all live view 


Capture pictures in 

the live view mode 

/


Start/Stop all 

recording 


Previous page 


Next page 

/


Open/Close audio 

/


Start/Stop two-way 

audio 


Adjust volume 

/


Enable/Disable digital 

zoom 


Full-screen 


Recording 

Before you start 


Make sure the device is connected with HDD or network disk, and the HDD or network disk has been initialized 

for the first time to use. 

Two recording types can be configured: Manual and Scheduled. The following section introduces the 

configuration of scheduled recording.   

Steps: 


1.


Click Remote Configuration> Camera Settings> Record Schedule to enter Record Schedule settings interface. 

2.


Select the camera to configure the record schedule. 

3.


Check the checkbox of 

Enable Record Schedule 

to enable recording schedule. 

4.


Click 

Edit

 to edit record schedule. 

5.


Choose the day in a week to configure scheduled recording. 

1)


Configure All Day or Customize record: 


If you want to configure the all-day recording, please check the 

All Day 

checkbox.   


If you want to record in different time sections, check the 

Customize 

checkbox. Set the 

Start Time 

and 

End Time. 


Note:


The time of each segment can’t be overlapped. Up to 8 segments can be configured.   

2)


Select a 

Record Type

. The record type can be Normal, Motion, Alarm, Motion & Alarm, and Motion | 

Alarm. 

3)


Check the checkbox of 

Select All 

and click 

Cop

y to copy settings of this day to the whole week. You 

can also check any of the checkboxes before the date and click 

Copy

4)


Click 

OK 

to save the settings and exit the 

Edit Schedule 

interface. 

6.


Click 

Advanced 

to configure advanced record parameters

.


7.


Optionally, check the checkboxes of other cameras to copy the settings to. 

8.


Click 

Save 

to validate the above settings. 

Содержание 16CH(8 POE)

Страница 1: ...Network Video Recorder Quick Operation Guide...

Страница 2: ...1 Use brackets for rack mounting 2 Ensure there is ample room for audio and video cables 3 When installing cables ensure that the bend radius of the cables are no less than five times than its diamet...

Страница 3: ...of the data cable to the motherboard of NVR and the other end to the HDD 3 Connect the power cable to the HDD 4 Place the HDD on the bottom of the device and then fasten the screws on the bottom to f...

Страница 4: ...Quick Operation Guide of 8700 P Series NVR 3 Front Panel 8700 P Series Status Indicators Alarm Ready Status HDD power Tx Rx USB Interfaces Composite Keys SHIFT Compound Buttons...

Страница 5: ...urning on off the device 5 USB Interface Universal Serial Bus USB ports for additional devices such as USB mouse and USB Hard Disk Drive HDD 6 GND Ground needs to be connected when NVR starts up 7 HDM...

Страница 6: ...Playback resolution 5MP 3MP 1080P UXGA 720P VGA 4CIF DCIF 2CIF CIF QCIF Synchronous playback 4 ch 720P 2 ch 1080P 1 ch 5MP 8 ch 4CIF 4 ch 720P 2 ch 1080P 1 ch 5MP Hard disk SATA 2 SATA interfaces for...

Страница 7: ...fixed bit rate Bit Rate Storage Used 96K 42M 128K 56M 160K 70M 192K 84M 224K 98M 256K 112M 320K 140M 384K 168M 448K 196M 512K 225M 640K 281M 768K 337M 896K 393M 1024K 450M 1280K 562M 1536K 675M 1792K...

Страница 8: ...HIGHLY recommended that an Uninterruptible Power Supply UPS be used in conjunction with the device The Power indicator LED on the front panel should be red indicating the device gets the power supply...

Страница 9: ...tup Wizard at that moment click the Cancel button You can also choose to use the Setup Wizard next time by leaving the Start wizard when NVR starts checkbox checked 2 Click Next button on the Wizard w...

Страница 10: ...rk Setup Wizard window Network Configuration Note For A Series B Series and C Series series NVR the internal NIC IPv4 address should be configured for the cameras connecting to the PoE network interfa...

Страница 11: ...Initialization removes all the data saved in the HDD 9 Click Next button You enter the Adding IP Camera interface 10 Click Search to find online IP Camera Select the IP camera to be added and click th...

Страница 12: ...ive View mode to indicate different camera status These icons include Live View Icons In the live view mode there are icons at the right top of the screen for each channel showing the status of the re...

Страница 13: ...u can search and add the online IP cameras by following the startup wizard or according to the following steps Steps 1 Enter the Camera Management interface Menu Camera Camera Main Menu 2 To add the o...

Страница 14: ...meters of IP Cameras After the adding of the IP cameras the basic information of the camera lists in the page and you can configure the basic setting of the IP cameras Steps 1 Click the icon to edit t...

Страница 15: ...interface PTZ Settings Steps 1 Enter the PTZ Settings interface Menu Camera PTZ Camera Settings Interface 2 Choose the camera for PTZ setting next to Camera label 3 Enter the parameters of the PTZ ca...

Страница 16: ...Description Icon Description Direction button and the auto cycle button Zoom Focus Iris Zoom Focus Iris The speed of the PTZ movement Light on off Wiper on off 3D Zoom Image Centralization Preset Pat...

Страница 17: ...d back Instant Playback Interface Playback by channel Steps 1 Enter the Playback menu Mouse right click a channel in live view mode and select Playback from the menu Right click Menu under Live View F...

Страница 18: ...can be backed up to various devices such as USB flash drives USB HDDs or a DVD writer Steps 1 Enter Video Export interface Choose the channel s you want to back up and click on the Search button Quick...

Страница 19: ...Quick Operation Guide of 8700 P Series NVR 18 Quick Export using USB1 1 Checkup of Quick Export Result Using USB1 1...

Страница 20: ...le Chrome 4 The supported resolutions include 1024 768 and above When you log in for the first time the system will remind you to install the Plug in control After the installation you can configure a...

Страница 21: ...teps 1 Click Remote Configuration Camera Settings Record Schedule to enter Record Schedule settings interface 2 Select the camera to configure the record schedule 3 Check the checkbox of Enable Record...

Страница 22: ...playback interface 2 Click the camera from the device list for playback 3 Select the date from the calendar and click Search Note The day with record will be marked like 4 Click the button to play the...

Страница 23: ...D or network disk has been initialized for the first time to use Steps 1 Click Log on the menu bar to enter the Log interface 2 Set the log search conditions to refine your search including the Major...

Отзывы: