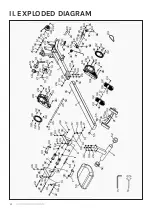
LSG GR-02 Скачать руководство пользователя страница 5


5

PARTS LIST  |

NO.

Name

Qty

1

Main frame

1

2

Rear foot tube frame

1

3

Slide tube frame

1

4

Foot pedal tube assembly

1

5

Computer bracket

1

6

Tension tube

1

7

Seat cushion limiting plate

2

8

Seat cushion mounting plate

2

9

Front foot tube

1

10

Magnetic wheel

1

11

Deep groove ball bearing 608-2RS

4

12

Deep groove ball bearing6000-2RS

2

13

Pull rod

4

14

Pull rod limiting plate

4

15

Allen Wrench

1

16

Wrench with screwdriver

1

17

Lock nut M8

5

18

Lock nut M10

1

19

Nut M8

4

20

Nut M10*1.0

4

21

NutM10*1.0

4

22

Bolt M8*125

3

23

Isolation nylon pad

φ

23*

φ

10.5*2

2

24

Bolt M8*65

4

25

Bolt M10*55

1

26

Bolt M8*20

11

27

Bolt M8*40

2

28

Screw ST4.2*12

8

29

Screw ST4.2*9.5

1

30

Bolt M5*10

3

31

Bolt ST4.2*13

8

32

Screw ST4.2*9

12

33

Bolt M6*8

4

34

Spring Washer 8

15

35

Flat washer 5

2

NO.

Name

Qty

36

Flat washer 8

23

37

Flat washer 10

1

38

Left protective cover

1

39

Right protective cover

1

40

Decorative cover

2

41

Armrest fixing pad

1

42

Foot pedal

2

43

Belt PJ660/260J

1

44

Ribbon pulley Φ45*35

1

45

Foam L=210mm

2

46

Foot pedal adjusting belt

2

47

Resistance Knob (assembly)

1

48

Pullback device

1

49

Seat cushion wheel

2

50

Seat cushion

1

51

Left front cover

1

52

Eccentric foot cover

2

53

Circular tube plug

2

54

Limit sleeve

1

55

Cushion pad

4

56

Non-slip mat

1

57

Computer back cover

1

58

Computer up cover

1

59

 Battery

2

60

Bottom wire L=500m

2

61

Induction bar clamp

1

62

Roller spacing

4

63

Right front cover

1

64

Seat cushion wheel

2

65

Bolt M6*50

2

66

Nut M6

2

67

Screw ST4.2*19

2

68

Anti-slipped pad A

2

69

Slide plate

1

III. PARTS LIST

Some items on this list may come pre-installed on your equipment. If you feel like you’re 
missing anything, please double check your equipment.

Содержание GR-02

Страница 1: ...all instructions carefully before using this product Retain this owner s manual for future reference NOTE This manual may be subject to updates or changes Up to date manuals are available through our...

Страница 2: ...BLE OF CONTENTS TABLE OF CONTENTS I Important Safety Instructions 03 II Exploded Diagram 04 III Parts List 05 IV Assembly Instructions 06 V Exercise Guide 14 VI Storage and Maintenance 16 VII Warranty...

Страница 3: ...l heartbeat shortness of breath head light dizzy or nauseous If any of these symptoms occur during exercise be sure to consult your doctor before continuing exercise Keep children and pets away from e...

Страница 4: ...13 55 17 17 17 36 6 45 53 55 3 26 31 28 28 28 28 38 31 19 19 14 13 5 31 57 59 25 23 44 37 18 23 35 41 30 34 34 26 26 39 55 56 65 51 64 67 28 28 28 28 31 31 31 66 36 34 24 29 66 61 60 64 65 63 68 67 6...

Страница 5: ...ing Washer 8 15 35 Flat washer 5 2 NO Name Qty 36 Flat washer 8 23 37 Flat washer 10 1 38 Left protective cover 1 39 Right protective cover 1 40 Decorative cover 2 41 Armrest fixing pad 1 42 Foot peda...

Страница 6: ...tube frame 1 3 Slide tube frame 1 4 Foot pedal tube assembly 1 5 Computer bracket 1 9 Front foot tube 1 42 Foot pedal 2 15 Allen Wrench S 5 1 16 Wrench with screwdriver S13 14 15 1 17 Lock nut M8 2 31...

Страница 7: ...nt foot tube frame 9 onto the main frame 1 with bolt 24 Washer 36 Spring Washer 34 Use the Bolt 26 flat washer 36 and Spring Washer 34 to lock the Rear foot tube frame 2 on the Slide tube frame 3 36 3...

Страница 8: ...ide tube frame 3 1 Use Bolt 26 spring washers 34 and flat washers 36 and Slide Plate 69 to lock the Slide tube frame 3 on the Main frame 1 2 Screw the Cushion pad 55 into the Main frame 1 50 3 1 26 26...

Страница 9: ...he Foot pedal tube assembly 4 with and Bolt 24 Flat washer 36 and Lock nut 17 Use Bolt 27 Spring Washer 34 and Flat washer 36 to lock the Foot pedal tube assembly 4 to the Main frame 1 42 24 36 36 24...

Страница 10: ...uter up cover 58 and then put the battery 59 into the Computer up cover 58 as shown in C in the figure 2 Connect the communication wire as shown in the figure A B to connect the wire A with A and B wi...

Страница 11: ...rap is adjustable The specific tightness adjustment method is shown in the left figure A direction is to tighten B direction is to loosen The front foot tube frame has transport wheel in the front Lif...

Страница 12: ...3 seconds to clear all time times and calories data 47 52 52 A B Resistance Adjustment Frame Horizontal Regulation Adjust the resistance knob 47 clockwise to increase the resistance and counterclockw...

Страница 13: ...time calories total number of times and every scan interval is 6 seconds 2 TIME shows the time from the computer start to the end 3 Times Count CNT shows the number of times from the computer start to...

Страница 14: ...art and lungs and how efficient they are in delivering oxygen via your blood to your muscles is an important factor to your fitness Your muscles use this oxygen to provide enough energy for daily acti...

Страница 15: ...exercise problems WORKOUT GUIDELINES This is how your pulse should behave during general fitness exercise Remember to warm up and cool down for a few minutes TARGET ZONE MAXIMUM 85 70 COOL DOWN AGE HE...

Страница 16: ...to move it The seat will move and it may hurt your hand and fingers 3 Remove the battery before storing themachine for along time 4 Clean the Seat Rail with an absorbent cloth 5 Always make sure all t...

Страница 17: ...e entitled to have the goods repaired or replaced if the goods fail to be of acceptable quality and the failure does not amount to a major failure Full details of your consumer rights may be found at...

Страница 18: ...18...

Страница 19: ...19...

Страница 20: ...WWW LSGFITNESS COM AU...

Отзывы: