LSG GBH-210 Скачать руководство пользователя страница 4


GBH-210


2.   CARE INSTRUCTIONS 


Lubricate moving joints with grease after periods of usage 


Be careful not to damage plastic or metal parts of the machine with heavy or sharp objects 


The machine can be kept clean by wiping it down using dry cloth 
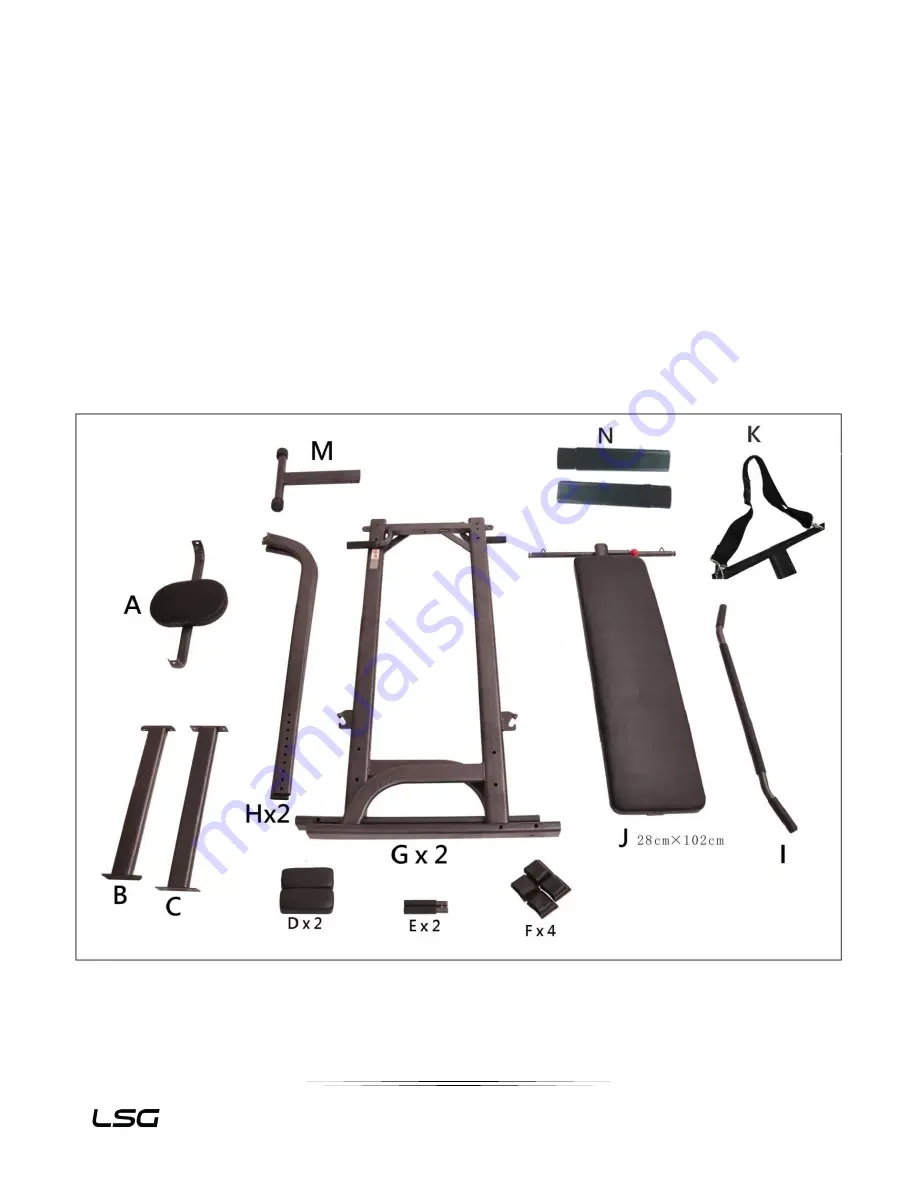
 

3.   PARTS LIST 


Содержание GBH-210

Страница 1: ...re available through our website at www lifespanfitness com au Product may vary slightly from the item pictured due to model upgrades Read all instructions carefully before using this product Retain t...

Страница 2: ...2 GBH 210 TABLE OF CONTENTS 1 IMPORTANT SAFETY INSTRUCTIONS 3 2 CARE INSTRUCTIONS 4 3 PARTS LIST 4 4 ASSEMBLY INSTRUCTIONS 6 5 WARRANTY 12...

Страница 3: ...ur chest irregular heartbeat and extreme shortness of breath lightheadedness dizziness or feelings of nausea If you do experience any of these symptoms you should consult your doctor before continuing...

Страница 4: ...S Lubricate moving joints with grease after periods of usage Be careful not to damage plastic or metal parts of the machine with heavy or sharp objects The machine can be kept clean by wiping it down...

Страница 5: ...ate 2 D Arm support cushion 2 4 Metal Plate 2 E Hand Grip 2 5 Bolt M8 30mm 4 F Stabilizer Tube Pad 4 6 Nut M10mm 12 G Main Frame 2 7 Bracket 2 H Leg adjustable Tube 2 8 Knob M10mm 4 I Chin Up Bar 1 9...

Страница 6: ...ct 2 x Part N onto Part G Slide 2 x Part F onto Part G Slide 2 x Part F onto Part N Secure 1 x Part B to 2 x Part G and N with 4 x Bolt 1 M10 90mm 4 x Nut 6 M10mm 2 x Plate 3 Secure 1 x Part C to 2 x...

Страница 7: ...7 GBH 210 STEP 4 STEP 5 Secure 1 x Part A to 2 x Part G with 2 x Bolt 10 M8 25mm 2 x Nut 11 M8mm Secure 2 x Part D to 2 x Part G with 4 x Bolt 9 M6 40mm...

Страница 8: ...8 GBH 210 STEP 6 STEP 7 Secure 2 x Part E to 2 x Part G with existing bolt in Part G Secure 1 x Part I to 2 x Part H with 4 x Bolt 5 M8 30mm 2 x Bracket 7...

Страница 9: ...9 GBH 210 STEP 8 Step 9 Secure 2 x Part H to 2 x Part G with 4 x Hand Bolt 8 M10mm Secure 1 x Part J onto frame hook on Part G with 2 x Knob 13 M8mm...

Страница 10: ...10 GBH 210 Step 10 Step 11 Secure 1 x Bolt 12 M8 90mm onto Part M Insert Safety Pin 14 onto Part M Part K Adjustable Tying Belt can be used to hold trainer s feet when doing sit ups...

Страница 11: ...11 GBH 210 To fold up the bench loosen the safety pin and fold up Part K Adjustable Tying Belt can be used to hold the bench leg to the back of the cushion...

Страница 12: ...e entitled to have the goods repaired or replaced if the goods fail to be of acceptable quality and the failure does not amount to a major failure Full details of your consumer rights may be found at...

Отзывы: