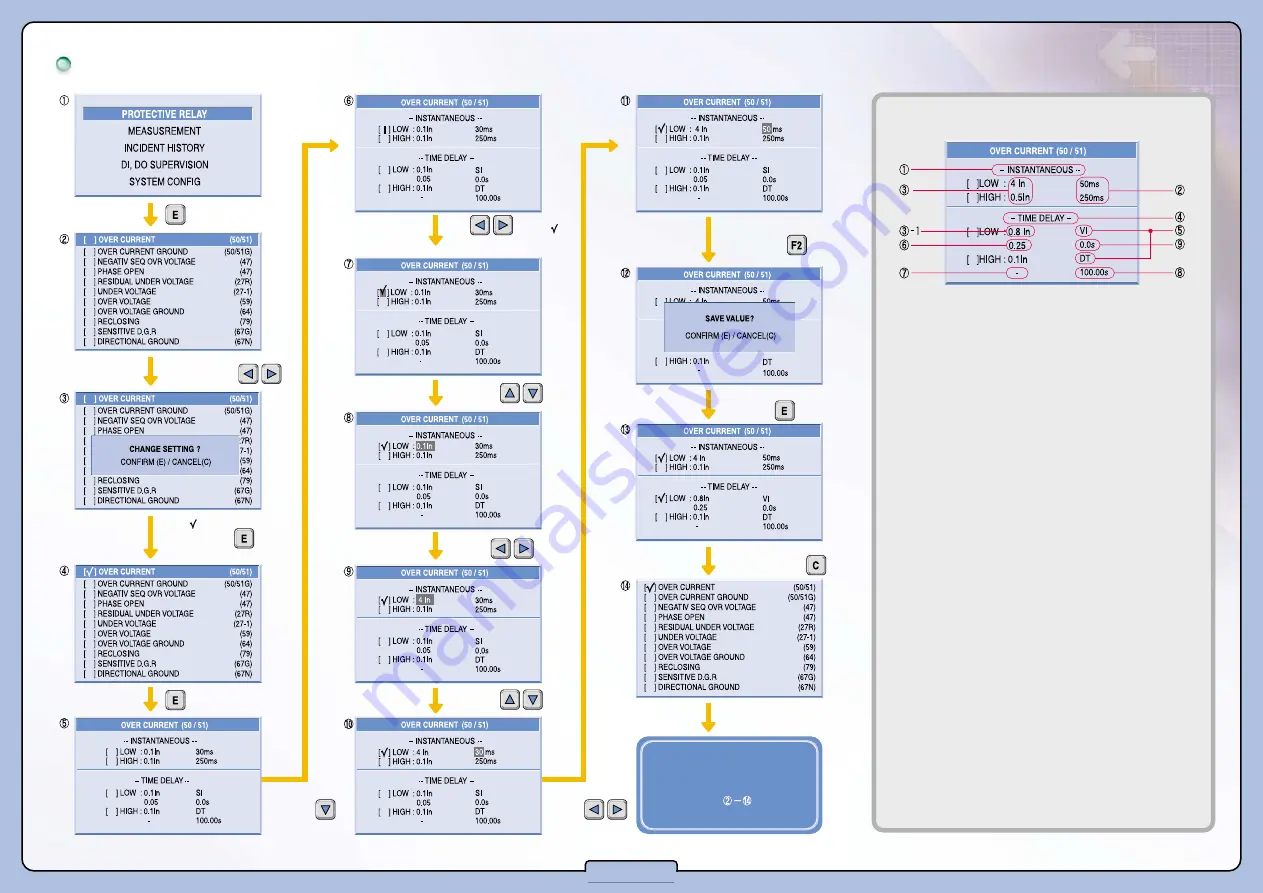
How to set relay elements
●
Setting Items
①
INSTANTANEOUS: Indicates instantaneous elements
②
Indicates the instantaneous action time, and setting range can be
selected up to 30~250ms
③
Indicates the instantaneous current TAP value, and set by same
method of the
③
-1.
③-
1 Indicates time delay current TAP value, and means the multiples
of the CT ratio.
ex) When the CT ratio 100/5, and the correction value is 0.8In as
in the picture In indicates CT ratio, and 0.8 is the multiple.
Therefore, the correction value is...
�
Based on CT 1st: 0.8 X100 (CT 1st rating) =80A
�
Based on CT 2nd: 0.8 X5 (CT 2nd rating) =4A
④
Time Delay: Indicates the time delay element.
⑤
It is an item to select characteristic curve. In GIPAM, it supports
Definite-time (DT) and 7 curves of inverse time (SI, VI, EI, LI, KSI,
KVI).
⑥
This is an item to select the Time Lever. The setting ranges are up to
0.05~1.2 and can select in 0.01 units. (Can only be corrected when
selecting inverse time curve at
⑤
)
⑦
When the definite time curve (DT) is selected at
⑤
, Time Lever
correction as shown in the picture above is not possible.
⑧
Indicates the definite time operation time, and the setting range can
be selected up to 0.05~300.00sec.
⑨
This item indicates the Constant Time Delay, and can be selected up
to 0.0~10.00sec. (Can only be corrected when selecting the inverse
time curve at
⑤
)
�
When selecting the Time Lever, if protection is not possible because
the relay’s operation characteristic curve is on the load characteristic
curve, even though the Lever is selected to its maximum, increase
the relay’s operation characteristic curve to delay the operation time
as much as the changed time in this item.
※
For some of delay elements such as OCR and OCGR, can be set by
synthesizing Low and High curves considering the characteristics of
the loads.
Can select
protective relay
element by using
.
Put a in [ ] to
select the relay,
by pressing
.
Use to put a
in [ ], to select the
feature you want to use.
When every correction is
completed with the same
method, press to save
the correction value.
Move
cursor with
The save will be
completed
by pressing
.
.
Go back to the
previous
screen by pressing
.
Move
cursor with
To input correction values for
other relay elements, go
through the process.
.
Input the
value by
using
.
Generate a
cursor by
pressing
.
Input the
value by
using
.
5-3


