background image

20

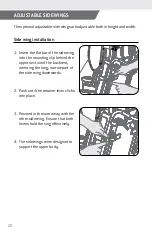
The optional adjustable side wings are adjustable both in height and width.

ADJUSTABLE SIDE WINGS

Side wing installation

1.  Insert the flat bar of the side wing 

into the mounting clip behind the 
upper section of the backrest, 
orienting the long, narrow part of 
the side wing downwards.

2.  Push until the retainer lever clicks 

into place.

3.  Proceed in the same way with the 

other side wing. Ensure that both 
levers hold the sing effectively.

4.  The side wings were designed to 

support the upper body.

Содержание Optimum Posturo-pedic 1400 Series

Страница 1: ...USER S MANUAL Positioning tilt in space Chair Optimum Posturo pedic Series 1400 FOCUSED ON WHAT MATTERS lpamedical com 2527 avenue Dalton Qu bec Qc G1P 3S6 T 418 681 1313 1 800 663 4863 F 418 681 448...

Страница 2: ...features within an aesthetic design that is centered around the user s dignity and well being Please read this instruction manual carefully and consult it often to maximize the benefits your LPA chair...

Страница 3: ...e proud to provide one of the most complete warranty on the market TABLE OF CONTENT A Word of Thanks 2 Replacement Parts Availability Policy 3 General Information 4 Definitions 4 Safety Measures 5 App...

Страница 4: ...or any other use deemed abnormal LPA products are not designed to be pressure washed or washed in automaticwheelchairwashers LPAproductsarenotdesignedtobeused outdoors or to be used in the shower DEF...

Страница 5: ...one who has not received adequate training should not be allowed to use the chair APPLICATIONS The Optimum chair is dedicated to long term and short term care for patients with loss of autonomy or in...

Страница 6: ...iltshouldbeusedproperly to prevent the risk of upsetting the balance of the chair In addition the chair must not be within reach of railings bed rails or fixed objects that thepatientcouldgrabandcause...

Страница 7: ...djusting the length of the footrest based on the leg support angle Reclining the backrest without changing the tilt angle of the seat CLEANING The chair s coverings must be cleaned according to the ma...

Страница 8: ...r wheels and front left wheel WARNING BEFORE HANDLING OR ADJUSTING ALL 3 BRAKES MUST BE APPLIED WHEN THE CHAIR IS NOT BEING USED FOR TRANSPORTATION TO ENSURE ITS STABILITY To disengage the brakes 1 Us...

Страница 9: ...s Itsfrontpositionallowsyoutomaneuverthe chairwithaminimumriskofinjurytothecaregiver Drivingawheelchair using the rear wheels to initiate turns requires some practice but it ensuresthatthepatient swei...

Страница 10: ...ctivation lever This adjustment should remain the same until assignment to a new person The proper depth ensures comfort correct positioning and prevents the patient from slipping A positioning profes...

Страница 11: ...N Tilting from behind 1 Explain the maneuver to the patient before doing it 2 Grab the push bar with your right hand 3 Use your left hand to pull the far left activation leaver and apply the necessary...

Страница 12: ...You can use the strength of your legs to tilt from 0 to 30 degrees 1 Stand on the left side of the chair at the patient s side 2 Grasp the front of the armrest with your left hand The tilt is intende...

Страница 13: ...width footrest ELEVATING LEGREST Legrest use and adjustment 1 Lift the patient s legs slightly 2 Detach the restraining strap from the footrest and lower it 3 Place the patient s feet on the footrest...

Страница 14: ...t the lengthening must be proportional to the angle selected The right configuration keeps the thighs on the seat and the feet flat on the footrests Over compensating may cause the person to slip and...

Страница 15: ...sh under the seat as much as possible 4 Lift the person s legs slightly so that you can fold the footrest 5 Shorten the legrest as much as possible pulling it upwards while holding the lever 6 Re atta...

Страница 16: ...positional ring ontherodofthecylinder givingtheoptiontolimitthebackrestrecline angle according to the prescribing professional s instructions BACKREST Reclining the backrest 1 Explain the maneuver to...

Страница 17: ...If you are on the left of the wheelchair press the activation lever under the armrest with your right hand while tilting the wheelchair forward by exerting pressure on the armrest with your left hand...

Страница 18: ...crewing the black knob about 2 rotations while holding the armrest with your other hand 2 Pull the black knob to release the adjustable armrest s safety lock 3 Adjust the armrest to the desired height...

Страница 19: ...ft of the profiled headrest into the support bracket 4 Loosen the memory ring on the shaft and tighten the spline knob on the docking bracket to lock the headrest at the proper height 5 Tighten the me...

Страница 20: ...f the side wing into the mounting clip behind the upper section of the backrest orienting the long narrow part of the side wing downwards 2 Push until the retainer lever clicks into place 3 Proceed in...

Страница 21: ...hey can be moved into the sliders of the upper section of the backrest 2 Set at the appropriate height 3 Retighten the nuts Width adjustment 1 Loosen the two screws on the flat bar latch without remov...

Страница 22: ...E BY A POSITIONING PROFESSIONAL IMPROPER ADJUSTMENT COULD CAUSE INJURY TO THE USER Height adjustment 1 Loosen but do not remove the two nuts from the flanges so that they can be moved into the sliders...

Страница 23: ...elivery If damage has occurred it is the person receiving the goods responsibility to file a claim with the carrier immediately Failure to notify carrier and LPA SPECIALTY HEALTHCARE SEATING in writin...

Страница 24: ...under this warranty contact our Customer Service Department in writing giving the following information 1 Model or part number involved 2 Date of purchase including LPA MEDICAL invoice or acknowledge...

Страница 25: ...luding fire and water Fabric facing and metal oxidation rust including damages caused by power washers and wheelchair washing machines Unauthorized modifications or repairs made or attempted Damage re...

Страница 26: ...emovable Back Up Cushion 18 XPE65052R Slide Tip for Table Right 19 XPE65052L Slide Tip for Table Left 20 PV7850102R Slider for Table Right 21 PV7850102L Slider for Table Left 22 1C2500 DR Support for...

Страница 27: ...ort Foot Plate for Optimum 1400 18 and 20 with Hardware 51 D1 25 N Support Foot Plate for Optimum 1400 22 and 24 with Hardware 52 D2 01 18 Calf Support Cushion 18 53 D2 01 20 Calf Support Cushion 20 2...

Страница 28: ...28 VUE CLAT E EXPLODED VIEW 28 49 54 20 18 9 52 53 47 46 45 41 40 39 55 56 50 51 44 43 42 29 68 69 70 63 64 65 66 67 VUE CLAT E EXPLODED VIEW...

Страница 29: ...29 29 59 60 61 62 59 59 38 31 32 21 19 61 38 30 31 23 13 5 32 22 8 17 7 5 4 2 1 12 1 3 4 10 26 25 24 28 27 5 6 16 15 14 13 11 36 37 12 9 48 33 34 35 6 57 58...

Отзывы: