background image

TROUBLESHOOTING

PROBLEM

POSSIBLE CAUSE

CORRECTIVE ACTION

Vanity door rubs 

against another 

surface.

Floor is not level.

Use a shim to ensure the vanity is level.

There is a large 

uneven gap between 

the vanity door and 

cabinet.

Floor is not level.

Use a shim to ensure the vanity is level.

There is a gap 

underneath the

vanity.

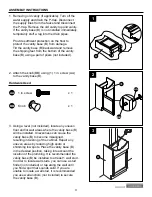
Shipping feet are still 

attached.

See Step 1 in Assembly Instructions.

6

Vanity top wobbles 

when placed on the 

vanity base.

1. The vanity base is not 

    installed level and 

    plumb.

2. The under side of the 

    vanity top is uneven: this 

    can be a common 

    occurrence in porcelain 

    tops due to the 

    manufacturing process.

1. Ensure the vanity base is level and plumb. 

    It may be necessary to use shims if the 

    base sits uneven (see Step 3 in Assembly 

    Instructions).  

2a) Identify which corners have the wobble.  

2b) Carefully remove the vanity top and turn 

      it over.

2c) Apply the bumpers (CC) adhesive side 

      down on the corners of the vanity top 

      that you identified in Step 2a. 

2d) Carefully place the top back onto the 

      vanity base and make any necessary 

      adjustments to the bumper placement(s) 

      until the top does not wobble.

WARRANTY

All products should be checked for defects or damages prior to installation and any defects or 

damages should be notified to the manufacturer.

What This Warranty Covers:

The manufacturer warrants its products to be free from substantial defects in materials and 

workmanship from the original date of purchase under normal home use. This warranty is offered only 

to the original consumer purchaser and may not be transferred. The manufacturer is only responsible 

for the actual purchase price.

How Long The Warranty Lasts:

Coverage for all vanity cabinets, fixed vanities, drawer banks, bath storage cabinets, linen cabinets, 

wall hutches, fillers, toe kicks, medicine cabinets, mirrors, and accessories lasts from 3 years from 

the original date of purchase. Coverage for all porcelain vanity tops lasts from 1 year from the original 

date of purchase.

Содержание Style selections 39518

Страница 1: ...efore returning to your retailer call our customer service department at 1 877 888 8225 8 a m 8 p m EST Monday Friday MODEL 39518 VANITY WITH TOP Fran ais p 9 Espa ol p 17 Style Selections is a regist...

Страница 2: ...PACKAGE CONTENTS 2 PART DESCRIPTION QUANTITY A B Vanity top Vanity base 1 1 A...

Страница 3: ...inished prior to installation of the vanity base Do not use water that exceeds temperatures of 140 F 46 C Do not place any sharp or abrasive objects on the bare surface of the vanity top PREPARATION B...

Страница 4: ...nob BB using 1 1 in screw AA to the vanity base B BB Knob x 1 1 2 3 3 Using a level not included locate any uneven floor and or wall areas where the vanity base B will be installed Unevenness can caus...

Страница 5: ...e stain If the vanity top wobbles once placed on the vanity base refer to TROUBLESHOOTING on page 6 4 Ensure the vanity base B is level front to back and confirm at both sides Also ensure the vanity b...

Страница 6: ...CC adhesive side down on the corners of the vanity top that you identified in Step 2a 2d Carefully place the top back onto the vanity base and make any necessary adjustments to the bumper placement s...

Страница 7: ...hquakes or floods The warranty and any applicable implied warranties do not cover incidental or consequential damages arising from any defects in the product such as labor charges for installation or...

Страница 8: ...customer service department at 1 877 888 8225 8 a m 8 p m EST Monday Friday PART DESCRIPTION PART A C AA BB CC Vanity top Door 1 in screw Knob Bumper 39518 1 39518 2 39518 3 39518 4 39518 5 C AA BB A...

Страница 9: ...de commerce d pos e de LF LLC Tous droits r serv s Num ro de s rie Date d achat Des questions des probl mes des pi ces manquantes Avant de retourner l article au d taillant appelez notre service la c...

Страница 10: ...10 PI CE DESCRIPTION QUANTIT A B Comptoir de meuble lavabo Base de meuble lavabo 1 1 CONTENU DE L EMBALLAGE A...

Страница 11: ...lerie S il y a des pi ces manquantes ou endommag es ne tentez pas d assembler le produit Temps d assemblage approximatif 2 heures y compris l ventuelle d pose de l ancien meuble lavabo BB AA Bouton Qt...

Страница 12: ...sous avec une paire de pinces non inclus INSTRUCTIONS POUR L ASSEMBLAGE 3 Utilisez le niveau non inclus pour rep rer toute irr gularit du plancher ou du mur l endroit o la base de meuble lavabo B sera...

Страница 13: ...vabo B au mur en ins rant 2 vis M8 de 2 po non comprises dans la traverse arri re de la base de meuble lavabo B ENTRETIEN poussetez r guli rement la base de meuble lavabo au moyen d un linge propre do...

Страница 14: ...obl me 2b Retirez d licatement le comptoir de meuble lavabo puis retournez le 2c Appliquez le c t adh sif des tampons CC sur les coins du comptoir de meuble lavabo rep r l tape 2a 2d Replacez d licate...

Страница 15: ...t De plus il nous est impossible de repr senter parfaitement les couleurs des articles dans les documents imprim s Pour cette raison il est pr f rable de choisir les couleurs partir d chantillons Ce q...

Страница 16: ...r ou t l phone Vous devez joindre toute r clamation le num ro de mod le du produit une copie du re u original de m me qu une explication de la nature du probl me sa discr tion le fabricant pourra exig...

Страница 17: ...Todos los derechos reservados 17 N mero de serie Fecha de compra Preguntas problemas piezas faltantes Antes de volver a la tienda llame a nuestro Departamento de Servicio al Cliente al 1 877 888 8225...

Страница 18: ...18 A B Cubierta para tocador Base de tocador 1 1 CONTENIDO DEL PAQUETE PIEZA DESCRIPCI N CANTIDAD A...

Страница 19: ...ara tocador se pueda sujetar de forma segura al levantarlo ADVERTENCIA PRECAUCI N Para mantener la belleza del acabado de la base de tocador evite ubicarlo bajo la luz solar directa Evite las temperat...

Страница 20: ...la base del tocador B utilizando un par de alicates pinzas no se incluyen 3 Utilice el nivel no se incluye para detectar si alguna parte del suelo o de la pared en que se instalar la base de tocador B...

Страница 21: ...dor B Fije la base de tocador B a la pared insertando 2 tornillos de M8 x 2 no se incluyen a trav s del travesa o trasero de la base de tocador B CUIDADO Y MANTENIMIENTO Limpie el polvo de la base de...

Страница 22: ...ambalean 2b Retire cuidadosamente la cubierta para tocador y volt ela 2c Coloque los topes CC con el lado adhesivo sobre las esquinas de la cubierta para tocador que identific en el Paso 2a 2d Coloque...

Страница 23: ...ariaci n en la madera es normal e inevitable Adem s no es posible hacer corresponder exactamente nuestros colores en los materiales impresos Por lo tanto debe ver las muestras reales al realizar la se...

Страница 24: ...tel fono que se listan Todas las reclamaciones de garant a deben incluir el n mero de modelo del producto una copia del recibo original y la naturaleza del problema Adem s el fabricante a su elecci n...

Отзывы: