INTRODUCTION
Translation of the original instructions
3
1 INTRODUCTION
1.1
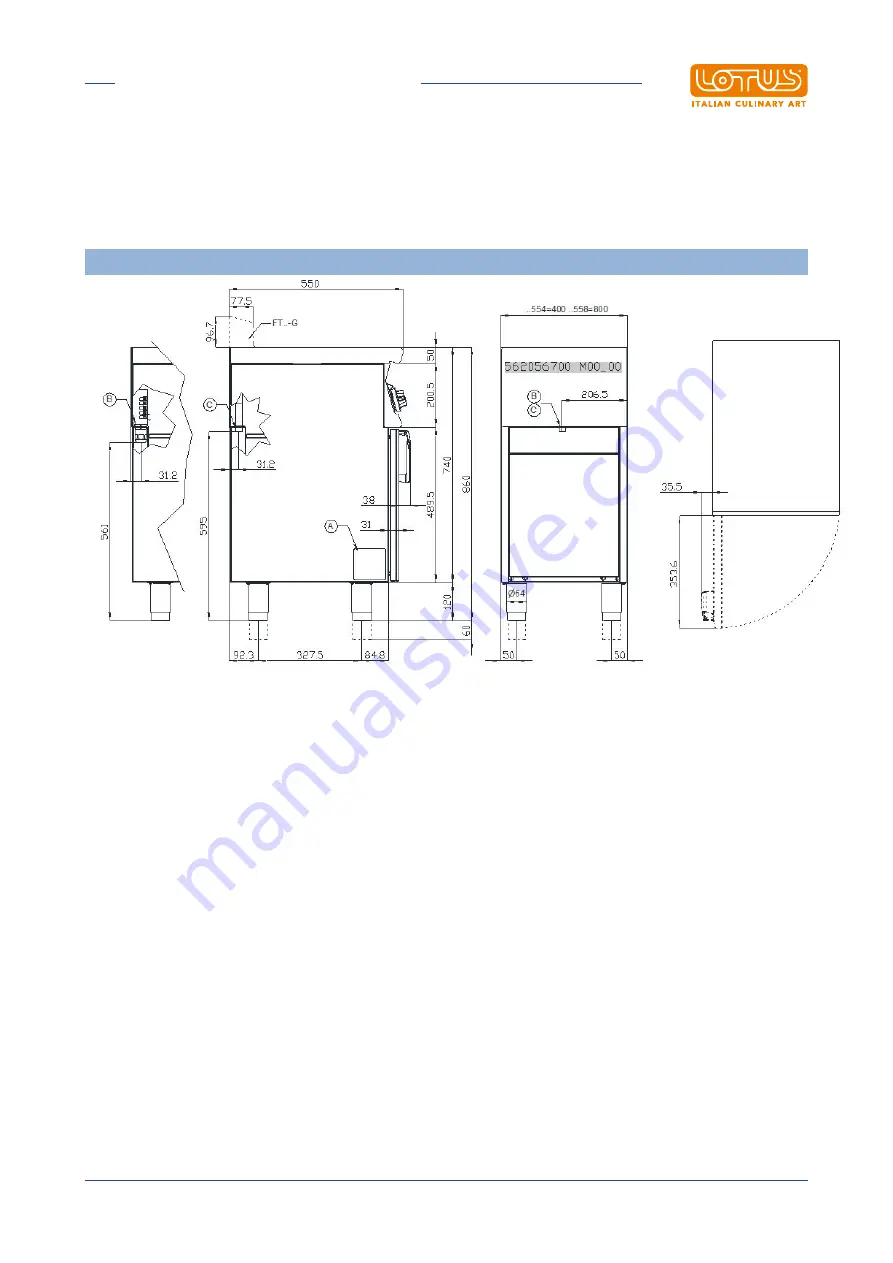
Installation drawing
FIG. 1 PC-554G, PC-558G
A Data PlateB Electrical connectionC Gas connection
Страница 1: ...structions KITCHEN WITH OVEN FOR PROFESSIONAL USE PC 554G PC 558G PC 114G PC 118G CF4 118G CF4 118GE Model LIBR ISTR PC CF110G GE Code 5630512A0 Review 1 Edition date 06 06 2022 Language English LOTUS S p A Via Calmaor 46 31020 San Vendemiano 39 0438 778020 39 0438 778277 ...
Страница 2: ...ns 12 4 BURNERS TECHNICAL DATA TABLE ITGB 17 4 1 Burners technical data table 17 6 INSTRUCTIONS FOR USE 18 6 1 General information 18 6 2 Lighting and adjusting the open rings 18 6 3 Starting the main burner and adjusting the temperature 18 6 4 Switching the main burner off 19 6 5 Turning the appliance off 19 6 6 Lighting and regulating gas oven burner 19 6 7 Turning on and adjusting the static ov...
Страница 3: ...INTRODUCTION Translation of the original instructions 3 1 INTRODUCTION 1 1 Installation drawing FIG 1 PC 554G PC 558G A Data Plate B Electrical connection C Gas connection ...
Страница 4: ...ODUCTION Translation of the original instructions 4 FIG 2 PC 114G PC 118G A Data Plate B Electrical connection C Gas connection FIG 3 CF4 118G CF4 118GE A Data Plate B Electrical connection C Gas connection ...
Страница 5: ...INTRODUCTION Translation of the original instructions 5 1 2 Components FIG B 1 Flame open by pass 2 Oven by pass FIG C FLAMES 1 Flame injector 2 Air adjustment 3 Pilot ...
Страница 6: ...slation of the original instructions 6 FIG D Fire pilot 1 Pilot bracket screw 2 Pilot bracket 3 Pilot air bushing 4 Pilot injector 5 Injector screw 6 Spring 7 Extends drainage FIG E 1 Oven injector 2 Oven air regulation ...
Страница 7: ...INTRODUCTION Translation of the original instructions 7 FIG F Oven pilot 1 Pilot light nozzle 2 Ignition spark plug 3 Extends drainage 4 Pilot bracket FIG G Burner air adjustment ...
Страница 8: ...CTION Translation of the original instructions 8 WIRING DIAGRAM OVEN H 1 Switch 2 Power supply terminal board 3 Heating element 4 White indicator light 5 Green indicator light 6 Thermostat 7 Safety thermostat ...
Страница 9: ...INTRODUCTION Translation of the original instructions 9 1 3 Example installation of the appliance ...
Страница 10: ...e electrical safety of this equipment is only ensured when it is correctly connected to an effective ground earth system as required by current electrical safety standards The manufacturer cannot be held liable for any damage caused if the system is not connected to ground earth Before carrying out any cleaning or maintenance tasks on the equipment unplug it from the electricity mains In the event...
Страница 11: ...onic equipment the potential effects on the environment and human health may be due to the misuse of the same equipment or parts of it The symbol next to the rating plate indicates the obligation of separate collection The penalties provided for in the event of improper disposal of RAEE Waste Electrical and Electronic Equipment are those provided for by the national transpositions of European Dire...
Страница 12: ... not install the appliance near equipment machines used in cold processes If the appliance has to be installed close to cold process equipment it is advisable to install non combustible thermal insulating material and or neutral elements between them 3 4 Electrical gas connections Before being offered for sale on the market the appliance was subjected to gas and electrical testing as required The ...
Страница 13: ...t least 3 mm The connection terminal is located behind the rear wall Proceed as follows to install the power supply cable Remove the rear panel Pass the new connection cable through the cable gland connect the leads to the corresponding terminal on the terminal block and fasten them securely Lock the cable with the cable gland and refit the panel The earth ground lead must be longer than the other...
Страница 14: ...eplace the screw firmly tighten and check the seal Liquid gas connection G30 G31 The liquid gas connection pressure is 30 mbar for butane and 37 mbar for propane Check the data plate measure the pressure and verify that the description of the nozzle installed matches the information provided by the manufacturer Methane gas connection H G20 The methane gas connection pressure is 20 mbar Check the d...
Страница 15: ...andard Resetting the gas supply to the appliance must be possible only by hand 1 Extractor hood 2 Servo system B11 type devices See data plate Natural evacuation fig 3 Connection to an efficient natural draft fume stack by means of a windproof connection with discharge of combustion products directly to the outside Forced evacuation fig 4 The gas supply to the appliance must be directly servo cont...
Страница 16: ...f the original instructions 16 1 Windproof fume stack fig 3 Extractor hood fig 4 2 Servo system B11 type appliances are supplied on request with a hood or a hood and windproof fume stack to be assembled and delivered separately ...
Страница 17: ...00 mm 65 65 adjustable Pilot injector 1 100 mm 20 20 35 Consumption kg h 0 552 kg h 0 544 m3 st h 0 740 Primary air h mm open open 1 Burner max 10 kW min 2 3 kW Burner injector 1 100 mm 155 155 230 Minimum adjustment 1 100 mm 75 75 adjustable Pilot injector 1 100 mm 20 20 35 Consumption kg h 0 789 kg h 0 777 m3 st h 1 058 Primary air h mm open open 1 Oven burner max 10 kW min 3 5 kW Burner injecto...
Страница 18: ...alding RISK OF BURNS Do not touch hot surfaces floor with your hands or other parts of the body to avoid burns caused by high temperatures After switching off the appliance wait for a sufficient time for it to cool before carrying out any cleaning or maintenance operation 6 2 Lighting and adjusting the open rings The corresponding burner marked on the index is indicated above each knob on the fron...
Страница 19: ...n into the position hold the knob pressed and activate the button with the symbol until the pilot lights up Ignition of the flame can be checked through the inspection hole on the bottom of the oven Note The flame might go out in which case the procedure must be repeated Set the knob to the desired temperature position Turn the knob into position The burner turns OFF and only the pilot flame remai...
Страница 20: ...NSTRUCTIONS FOR USE Translation of the original instructions 20 Also turn the knob of the selector setting one of the three positions Top bottom heating element Bottom heating element Top heating element ...
Страница 21: ...aintenance but during the use of the equipment it is advisable to check the following at least once a year possibly increasing the frequency depending on the degree of use The status of connections especially on the terminal board and the power supply cable as well as the status of the gas connections The operating condition of the various components perform a functional test For appliances fitted...
Страница 22: ...ems and that it does not go out after closing or opening the oven door quickly 7 5 Minimum setting After conversion to use another type of gas or if a flame is too high when the knob is in position small flame adjust the minimum setting by turning the by pass screw For operation with LPG the by pass must be completely closed for operation with natural gas it must first be closed and then opened by...
Страница 23: ...s are available commercially but a diluted solution of acetic acid can also be used To clean STAINLESS STEEL appliances it is advisable to use detergents specifically formulated for this material For minor cleaning a mild washing up liquid solution may also be used Do not wash the appliance with jets of water under pressure Avoid using detergents containing abrasive powders or bleaches of any kind...