background image

20

Time Lapse Video Cassette Recorder

19

Time Lapse Video Cassette Recorder

Series Recording

Using 2 VCRs or more, the series recording function lets
you switch recording from one unit to the next (only
with VCRs of the same model as this one).

Series Recording Setup

1

Connect 2 VCRs or more as illustrated below.

2

Set the following items as indicated.

• 3/5/10/15/20/25/30 MIN : Recording for the set

duration.(MIN : minute)

• T.END : Records until the tape end is reached when

there is alarm trigger input.

Alarm Recording Counter Display

During alarm recording, “

“ will be flashing on  the

display panel.

The maximum display number of alarm triggers is “35”,
at the next alarm recording the counter will  indicate
“00”.

Panic Recording

When there is a panic input at the PANIC IN Terminal,
panic recording starts and continues to  the end of tape
in 2-hour recording mode.

Item

VCR No.1

VCR No.2

and on

Cassette tape

Loaded

Loaded

Operation mode

Stop

Stop

Repeat Rec Set 

“NO”

“NO” 

Series Rec Set 

“YES” 

“YES”

Timer recording

OFF (not set) OFF (not set)

Security lock switch (SET LOCK switch)

“OFF”     

“ON” 

• Alarm Counter Reset can

be performed by pressing
the CLEAR key in “Alarm
Time” of Initial Menu
screen.

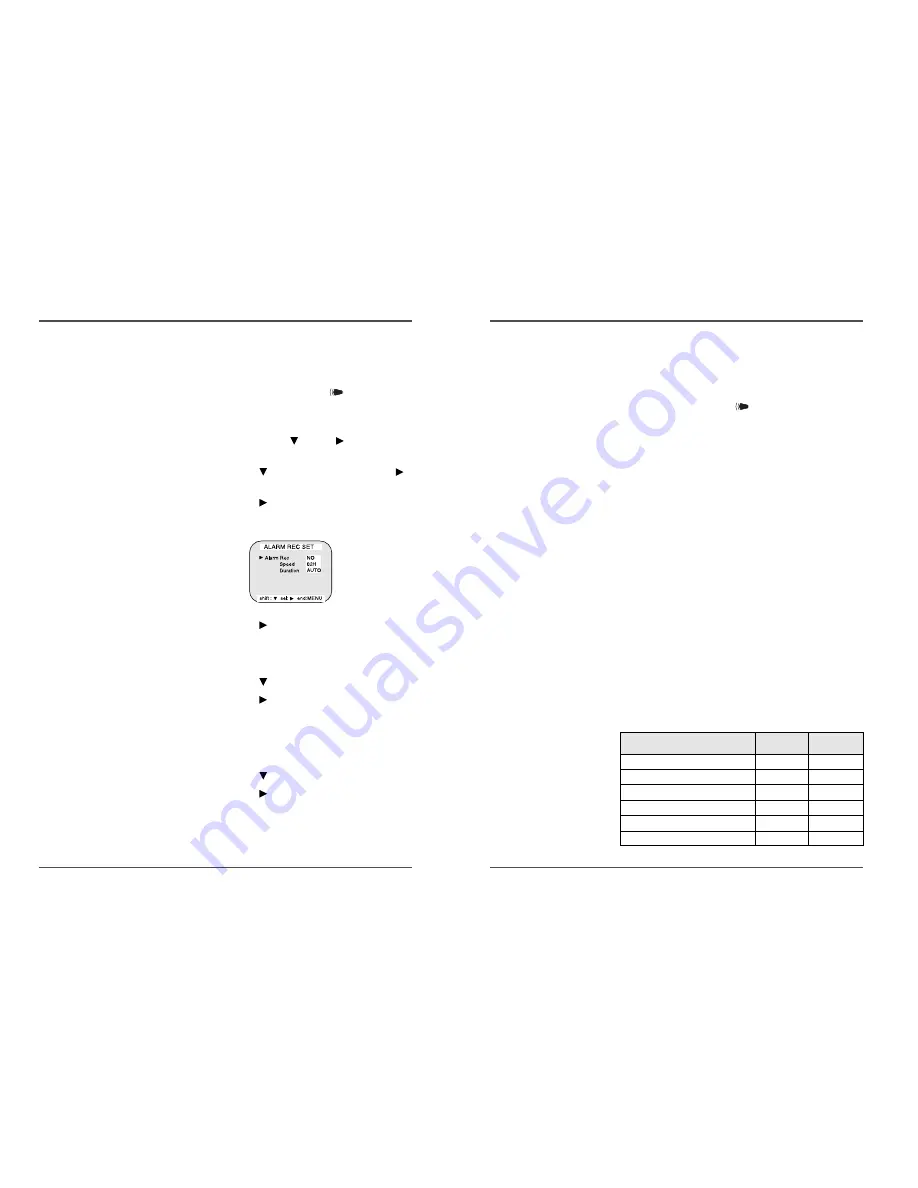
Alarm Recording         

Alarm Recording Setting

Alarm recording is performed when there is an input
(trigger) at the ALARM IN terminal, “

“ is displayed

on the display panel.

1

Make all necessary connections.

2

Press the MENU, SHIFT 

, SHIFT 

buttons in

sequence to display the REC MODE SET menu .

3

Press the SHIFT 

button until the arrow mark(

)

points to Alarm Rec Set.

4

Press the SHIFT 

button to display the ALARM REC

SET menu.

5

Press the SHIFT 

button to select “YES” or “NO”.

•  YES . . . . .  The alarm recording takes place when there

is alarm trigger input

•  NO . . . . . .  The alarm recording does not take place

6

Press the SHIFT 

button to set the Alarm speed.

7

Press the SHIFT 

button to select the desired

recording speed.

•  2H . . . 2-hour mode recording
•  12H . . . 12-hour mode recording
•  24H . . . 24-hour mode recording

8

Press the SHIFT 

button to set the alarm duration

9

Press the SHIFT 

button to select the desired

recording duration.

•  Auto : Records as long as the alarm signal is being

input.   (Minimum 2 minutes is recorded.)

• During alarm recording all

buttons are disabled
except the STOP button. If
the STOP button is
pressed, the alarm
recording will stop.

• If an alarm trigger is

received while alarm
recording is in progress,
the recording duration for
the second alarm will be
calculated from that point.

• When there is a power

loss during alarm
recording, if the power is
restored within the
recording set duration,
alarm recording will
continue.

Содержание SG-7960

Страница 1: ...Time Lapse Video Cassette Recorder User s Guide SG 7960 Be sure to read carefully and follow all the SAFETY INFORMATION on pages i ii iii Keep the manual in a safe place for future reference...

Страница 2: ...ult in a risk of fire or electric shock Overloaded AC outlets extension cords frayed power cords damaged or cracked wire insulation and broken plugs are dangerous They may result in a shock or fire ha...

Страница 3: ...ltage or other hazards Refer all servicing to qualified service personnel 18 Conditions Requiring Service Unplug this video product from the wall outlet and refer servicing to qualified service person...

Страница 4: ...C PAUSE REC 3 Playback PLAY 4 Still image STILL 5 Fast forward FF 6 Rewind REW 7 CUE CUE 8 Review REVIEW 9 Slow Pause Still FF Pause Still REW 1 Time Lapse Video Cassette Recorder Front panel Location...

Страница 5: ...r AM PM AM off 10 RMC L indicator RMC L Comes on when the RMC LOCK sw is set to the ON position 11 S REC indicator S REC Comes on when YES is selected in the menu for the series recording 12 R REC ind...

Страница 6: ...ons are not made properly it may cause a fire or damage the equipment 5 Time Lapse Video Cassette Recorder Remote Control 1 POWER TIMER button 2 PLAY STILL TRACKING button 3 PLAY STILL TRACKING button...

Страница 7: ...ial menu Press the SHIFT button to select the desired item Press the SET or button to set or Press the SHIFT button to select YES or NO Press the MENU button to return to the initial menu If the VCR i...

Страница 8: ...e recording use a flathead screwdriver to break off the erasure prevention tab on the cassette To record again on a tape without erasure prevention tab cover the hole with adhesive tape Erasure preven...

Страница 9: ...the SHIFT button until the arrow mark points Display set 5 Press the SHIFT button to select Display Set then the DISPLAY SET menu is displayed 6 Press the SET or button to set the minutes ex 30 then p...

Страница 10: ...gain During pause the image appears on screen but it is not recorded If a recording pause continues for 5 minutes or more the VCR will go into stop mode to avoid damage to the tape If you playback the...

Страница 11: ...VCR will consider the stop time to be the following day Program Timer Recording There are two program timer recording methods daily recording or recording on certain days of multiple weeks weekly reco...

Страница 12: ...nd it will maintain all the VCR settings memory for up to 30 days Set the timer recordings so that the recording times do not overlap If they do the one with the earliest recording start time will hav...

Страница 13: ...ding Alarm Recording Setting Alarm recording is performed when there is an input trigger at the ALARM IN terminal is displayed on the display panel 1 Make all necessary connections 2 Press the MENU SH...

Страница 14: ...ill start When the tape s end is reached the VCR will rewind it to the beginning regardless of the counter memory and recording will resume If during autorepeat recording there is an alarm trigger is...

Страница 15: ...id damaging the tape If the image is unstable rolling vertically adjust the tracking control to correct During recording check operations recording is suspended momentarily Normal Playback Normal Play...

Страница 16: ...ay returns to the normal screen The VCR will advance or rewind the tape at high speed and playback the first 5 seconds of every normal recording To cancel the index search mode press the STOP button 4...

Страница 17: ...Functions Tape Counter Zero Search Using the counter it is easy to find a desired recording 1 Press the CLEAR button at the beginning of the desired recording The counter will be reset to 0H 00M 00S o...

Страница 18: ...dings past 35 is erased POWER LOSS the number of power losses and the date and time of the 35 most recent power losses and recoveries are displayed 7 Press the MENU button the normal screen is display...

Страница 19: ...0V for 500 msec or more the VCR starts panic recording TAPE END OUT Terminal 1 High During recording when the end of the tape is reached the output becomes DC 5V 2 Low During recording when the end of...

Страница 20: ...ged it has to be released before proceeding with the inspection If any problem is discovered during the inspection unplug the power cord and consult your dealer SW OUTPUT Terminal While recording a pu...

Страница 21: ...ry the following 1 Unplug the power cord then plug it back in 2 Reset the memory Press the RESET button Under normal conditions do not touch the RESET button 3 If the problem is not corrected after pe...

Страница 22: ...tion Black white mode 350 lines Color mode 300 lines Audio Input RCA pin jack more than 47k 8 8dBm unbalanced Output RCA pin jack less than 1 5k 7 8dBm unbalanced Microphone input 60 dBs 3 5mm mini ja...

Отзывы: