


Use the system’s on–screen display to navigate menus and configure options and settings.
NOTE
To access the on-screen display, you must connect the included mouse and a monitor (not included) to the recorder.
See 4
, page 7 for full instructions.
8.1
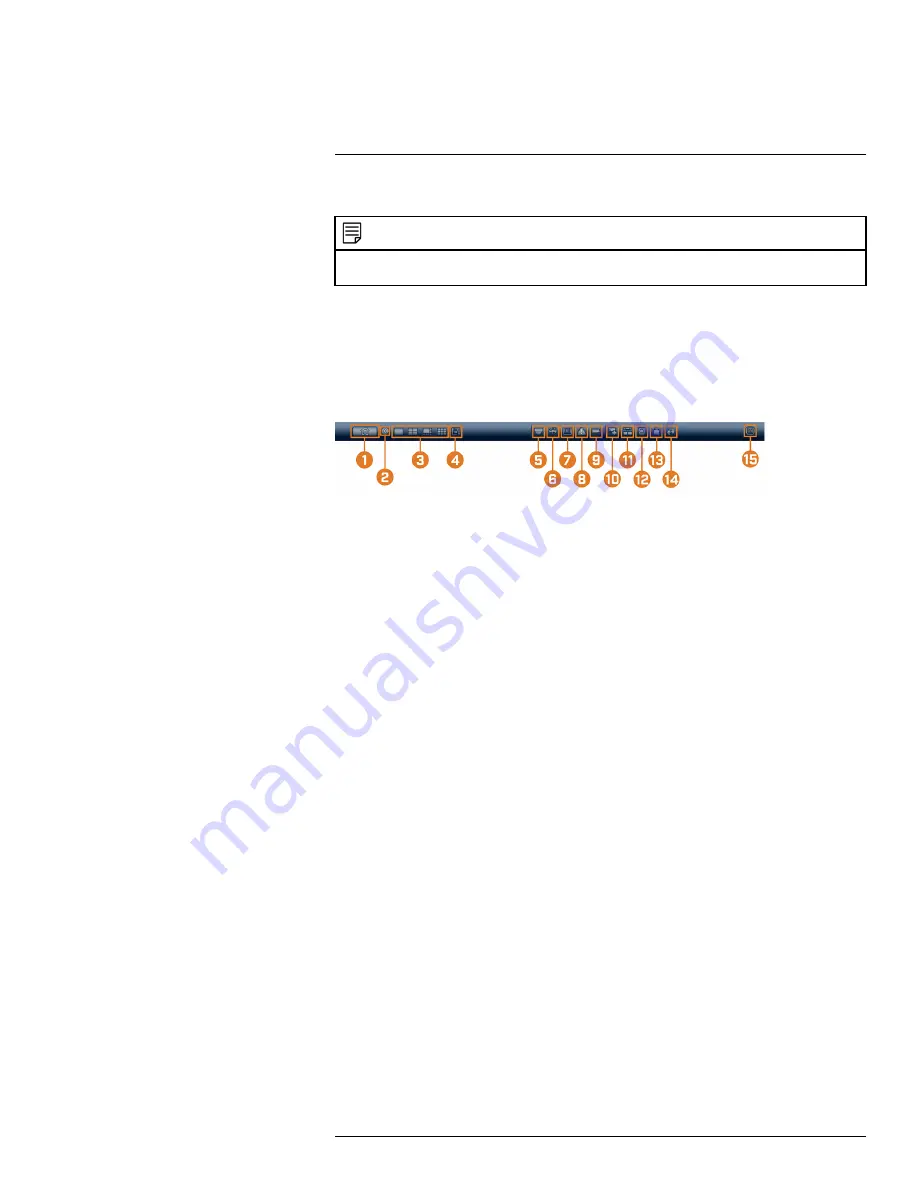
Navigation Bar
The
Navigation Bar
along the bottom of the recorder’s Live View display allows you to access
the Main Menu and control basic functions of the recorder.
To show the Navigation Bar:
•
Hover the mouse pointer near the bottom of the Live View screen.
1.
Main Menu:
See 16
, page 59 for full instructions on using the Main
Menu.
2.
Collapse Navigation Bar
3.
Viewing Modes:
Select how many channels are shown on screen during live viewing.
4.
Sequence Mode:
Start or stop Sequence Mode. In Sequence Mode, the system display will
automatically cycle through connected channels every few seconds.
5.
Pan/Tilt/Zoom:
Control and configure settings for Pan-Tilt-Zoom (PTZ) cameras. For full in-
structions on connecting and using PTZ cameras, see 17
, page
6.
Camera:
Click to open camera image settings. For full details, see 8.5
,
page 21.
7.
Playback:
Opens the Playback Menu. This allows you to search for video recordings saved
on the recorder’s hard drive. For details on using the Playback menu, see 10
, page
8.
Alarm Status:
View alarms in progress. See 16.3.5
for details.
9.
Channel Info:
Click to access status information about connected cameras.
10.
Remote Device Search:
Manage IP cameras over the network.
11.
Network:
View and configure network options, including setting a dynamic or static IP ad-
dress. For full instructions on configuring network options, see 16.4.1
, page 75.
12.
Hard Drive Manager:
Configure hard drive read/write options (see 16.4.16
, page 91 for details) or format drives (see 16.4.15
13.
USB Manager:
Click to access options for connected USB thumb drives (not included). You
can backup video, logs, or system configurations and install firmware upgrades.
14.
System Upgrade:
Check for firmware upgrades. The system must be connected to the Internet
to check for or receive updates.
15.
Warning Light & Siren — Deterrence Cameras Only:
Click to activate warning lights and
sirens for all connected deterrence cameras. Click again to deactivate.
8.2
Quick Menu
The
Quick Menu
gives you quick access to functions which can also be accessed using the Navi-
gation Bar.
To open the Quick Menu:
#LX400113; r. 3.0/56326/56332; en-US
18
Содержание N881 Series
Страница 1: ...User Manual N881 Series...
Страница 2: ......
Страница 3: ...User Manual N881 Series LX400113 r 3 0 56326 56332 en US iii...
Страница 118: ...Pan Tilt Zoom PTZ Cameras 17 To run autoscan Click LX400113 r 3 0 56326 56332 en US 110...
Страница 135: ......