

LWB4801AC_LWB5801AC_LWB6801AC_QSG_EN_R1
4. Lower the camera
base onto the
mounting bracket
so the 2 tabs in the
mounting bracket lock
into the 2 slots in the
camera base.
6.
OPTIONAL:
Tighten the pre-installed locking
screw on the base of the Power Pack using the
included screwdriver (item A+B
provided in the
toolkit with your wire-free system
).
7. Adjust the angle of the camera:
ATTENTION:
This camera includes an Auto Mechanical IR Cut Filter. When the camera changes between Day/Night viewing
modes, an audible clicking noise may be heard from the camera. This clicking is normal, and indicates that the
camera filter is working.
STEP 3B:
Installing the Cameras
(continued)
8.
OPTIONAL:
Use the included cable clips
to complete the installation. Remove the
protective strip to uncover the adhesive on the
cable clip to attach to the mounting surface.
Charging the Power Pack
Connect the included power adapter to the micro USB
port on the Power Pack.
LED Color
Meaning
Green
Fully charged
Red
Currently charging
Power Pack
Charge Time
2-cell
Approx. 6 hours
3-cell
Approx. 8 hours
NOTE:
You will need to loosen the locking screw to
remove the Power Pack in the future.
Problem
Solution
No picture / signal
• Ensure the camera is connected to a compatible recorder. For full camera compatibility,
visit
lorex.com/compatibility
.
• Ensure the Power Pack is properly inserted into the camera base.
• Ensure you have removed the
PLEASE REMOVE
label from the Power Pack.
• Connect the power adapter to your Power Pack to ensure it is charged. The LED on the
Power Pack glows green for full charge, or red for less than full charge.
• Remove obstructions between the recorder and camera. Materials such as brick,
concrete and wood can significantly impact the wireless signal strength.
• Try repositioning the camera, recorder, or both to improve the reception.
Battery life is too
short
• Ensure the camera is not pointing at a high-traffic area. Position the camera so it only
captures areas of interest with no high-traffic areas (e.g., a busy sidewalk or roadway)
visible in the image.
• Live video is being viewed too frequently. Viewing live video often will impact battery
performance.
• Ensure you have set an active area and distance setting for motion detection to reduce
false alarms. See “Optimizing Motion Detection” for details.
• Battery life will vary based on temperature, settings and number of events.
Picture is dropping
• Move the camera closer to the recorder.
• Try repositioning the camera, recorder, or both to improve the reception.
Picture is or has
become choppy
• Change camera resolution to 720p using the Lorex Cirrus app or the recorder to increase
the frame rate.
• Move the camera closer to the recorder.
• Remove obstructions between the recorder and camera.
Camera is not
detecting motion
• Your camera may be too far away from the area of interest. Try to keep the camera within
20ft (6.1m) of the area you want to monitor.
• Review the “Installation Tips” and “Optimizing Motion Detection” sections to ensure your
camera is installed in an optimal location and motion detection is properly configured.
Picture is too bright
• Ensure your camera isn’t pointed directly at a source of light (e.g., sun or spot light).
• Move your camera to a different location.
Night vision is not
working
• The night vision activates when light levels drop. The area may have too much light.
Picture is not clear
• Check the camera lens for dirt, dust, spiderwebs. Clean the lens with a soft, clean cloth.
• Too much environmental interference will affect picture clarity. Move your camera to a
different location.
Bright spot in video
when viewing at night
• Night vision reflects when pointing a camera through a window. Move the camera to a
different location.
Troubleshooting
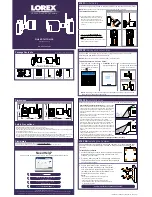
LWB4801AC Series
LWB5801AC / LWB6801AC Series
Adjustment
ring
Twist the
adjustment ring
counterclockwise
to reposition the
camera. Tighten
the adjustment
ring when finished.
Camera
levelling
Arm
rotation
Arm
angling
Use the included
Allen Key to loosen
the adjustment
screws labelled
below. Tighten all
adjustment screws
when finished.
Power cable
Mounting
surface
NOTE:
The Power Pack LED flashes red while outside the safe
charging temperature of 32-113°F (0-45°C). In this state, the
camera remains powered up, but the Power Pack will not charge
outside the safe temperature range.
Available Accessories
The following accessories are available for purchase. Visit
lorex.com
and search for the
model numbers below for details:
COLOR
Extra Power Pack
Power Adapters
2-cell Accessory
Power Pack
3-cell Accessory
Power Pack PLUS
WHITE
ACPWF1 (US)
ACPWF1P (EU/UK)
ACBATT2
ACBATT3
BLACK
ACPWFBK1 (US)
ACPWFBK1P (EU/UK)
LWB4801AC Series
LWB5801AC / LWB6801AC Series
5. Insert the security
screw through
the fasteners on the
top of the camera base
and mounting bracket
to secure the camera to
the mounting bracket.
Tighten using the
included screwdriver
(item A+B
provided in
the toolkit with your
wire-free system
).
Optimizing Motion Detection
Customize motion detection settings to ensure motion events are being recorded and
reduce false alarms.
To optimize motion detection:
1.
Launch the
Lorex Cirrus
app.
2.
Tap a channel in Live View to select it.
3.
Tap
, then tap
Motion
.
4.
Configure the following as needed:
a.
Sensitivity:
The amount of motion needed
to trigger recording (e.g., higher sensitivity
requires less motion to trigger recording).
b.
Area Selection:
Set the active area for
motion detection. Video appears with a red
grid overlayed, meaning the whole image is
active. Tap red squares to disable motion
detection in those areas (see example image
to the right). Tap
Save
when finished.
TIP:
Disable areas that will trigger unwanted
motion events, like busy streets or trees and shrubs that will move in the wind.
c.
Distance Setting:
Configure distance setting for motion detection. While watching
the camera’s video on your mobile device, recreate a motion event in front of your
camera. The icon will change from
to
when motion is detected by the camera.
Change the distance setting if motion detection is being triggered by unwanted
events.
NOTE:
Distance will be affected by temperature.
d.
Buzzer:
Set the recorder to sound an alarm when motion is detected.
5.
Tap
Save
when finished. Repeat for other cameras on the system.
a
b
c
d