Waterproof End-cap
(Video-only)
Audio End-cap
(has holes for microphone;
not waterproof
)
+
Getting Started
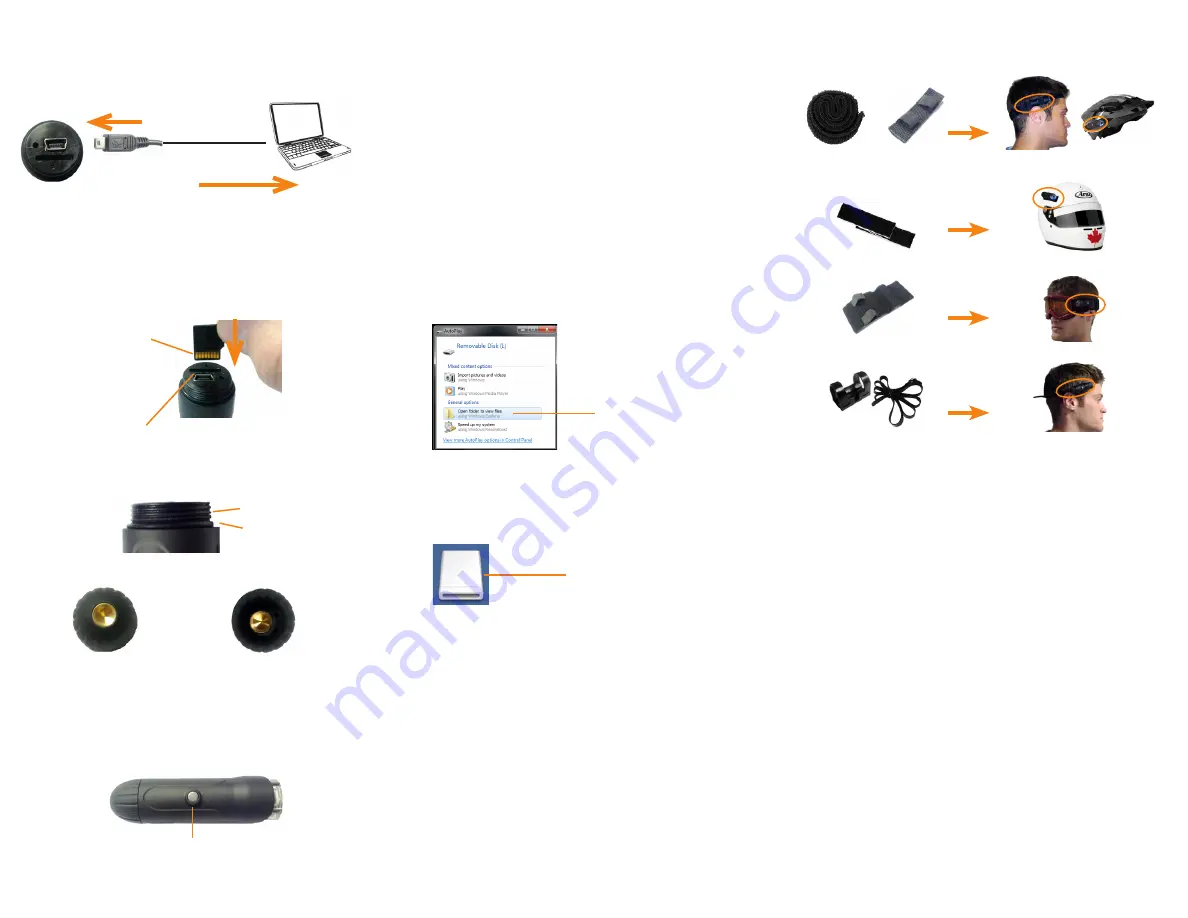
1. Unscrew the End-cap.
2. Connect the mini-USB cable to the camera. Connect
the other end to your computer.
3. Charge the camera for
4 hours
to fully charge.
4. Disconnect the USB cable from the camera and
insert a microSD card (not included) into the
camera and push it down until it clicks into place.
NOTE:
The camera can support microSD cards up to a
maximum size of 32GB.
Camera
mini-USB Port
5. Ensure there is an O-ring around the thread at the
back of the camera. Screw on the End-cap tightly to
ensure a waterproof seal.
6. Press the Power/Record button once to turn on the
camera. The camera begins recording immediately.
The blue LED flashes to indicate recording is
active.
microSD slot
microSD card
7. To stop recording, press and hold the Power/Record
button.
Power/Record button
Accessing/Saving Videos on your
Computer
1. Connect the mini-USB cable to the camera
and connect the other end to your computer.
The computer will recognize the camera and
automatically install drivers.
2.
Windows:
An Autorun window appears. Click
Open folder to view files
. If Autorun does
not appear, open Computer and double-click
Removable Disk
.
3. Double-click the
DCIM
folder then the
100MEDIA
folder to access your videos.
4. Your videos are saved in .mov format. Double-
click videos to open. Copy videos to a folder
on your computer to save them to your hard
drive.
NOTE:
You may need to install Quicktime Player to watch
videos. Quicktime Player is a free download from
www.apple.com
Removable disk folder
Autorun window
Click Open folder to
view files
OR
Mac:
Double-click the removable disk folder on
the Desktop.
Setting the Time and Date
System Requirements
•
PC:
Windows 7
•
Mac:
OS 10.5 or higher
•
Minimum 10GB free hard drive space to
save recordings
Setting the time and date affects the time stamps on the
videos.
To set the time and date:
1. Connect the camera to your computer and open it
using steps 1 & 2 under Accessing/Saving Video
on your computer.
2. Open a text editor (such as Notepad for PC or
TextEdit for Mac).
3. Enter the current time in the following format:
•
YYYY MM DD hh mm ss
•
Time is in 24-hour format.
•
For example, if the time and date is:
11:21:05am, June 22, 2012, enter
2012 06 22 11 21 05
.
4. Save the file to the Removable Disk folder (do not
save to DCIM or 100MEDIA) of the camera as a
plaintext file (e.g. .txt) with the filename
time
.
TIP:
To test if the time and date was saved successfully,
disconnect the camera and record a video. Then reconnect
the camera and check the time stamp.
Thread
O-ring
End-cap Types
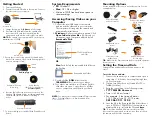
Mounting Options
Use the included accessories to mount the camera. See the
examples below:
Velcro Headband
and Velcro Mount
Wraparound Velcro
Mount
Attach to goggles
Plastic Mount and
Rubber Strap
TIP:
Make sure the Power/Record button is pointed upwards
for easy access.
Wrap around head or
a bike helmet
Wrap around head
for swimming
Stick to helmet
Velcro Tape


