background image

DVR Quick Start Guide 121002

P.3

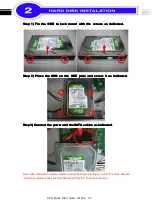
Step

Step

Step

Step 1)

1)

1)

1) Fix

Fix

Fix

Fix the

the

the

the HDD

HDD

HDD

HDD to

to

to

to rack

rack

rack

rack mount

mount

mount

mount with

with

with

with the

the

the

the screws

screws

screws

screws as

as

as

as indicated.

indicated.

indicated.

indicated.

Step

Step

Step

Step 2)

2)

2)

2) Place

Place

Place

Place the

the

the

the HDD

HDD

HDD

HDD on

on

on

on the

the

the

the HDD

HDD

HDD

HDD plate

plate

plate

plate and

and

and

and screw

screw

screw

screw it

it

it

it as

as

as

as indicated.

indicated.

indicated.

indicated.

Step

Step

Step

Step 3)

3)

3)

3) Connect

Connect

Connect

Connect the

the

the

the power

power

power

power and

and

and

and the

the

the

the SATA

SATA

SATA

SATA cables

cables

cables

cables as

as

as

as indicated.

indicated.

indicated.

indicated.

Note: After installation, please initialize Hard Disk before starting to record. For more detailed

information, please check out User Manual 4-9 System Tools for reference.

Содержание DVR 8CH

Страница 1: ...DVR Quick Start Guide 121002 P 1 8CH DVR Quick Start Guide 1 Packing P 2 2 Hard Disk Installation P 3 3 DVD RW Installation P 4 4 Front Panel Controls P 6 5 Rear Panel Connectors P 7...

Страница 2: ...4 4 4 Battery Battery Battery Battery 5 5 5 5 CD CD CD CD 6 6 6 6 Hard Hard Hard Hard Disk Disk Disk Disk Mount Mount Mount Mount 7 7 7 7 Screws Screws Screws Screws 8 8 8 8 IDE IDE IDE IDE to to to...

Страница 3: ...on on on the the the the HDD HDD HDD HDD plate plate plate plate and and and and screw screw screw screw it it it it as as as as indicated indicated indicated indicated Step Step Step Step 3 3 3 3 Con...

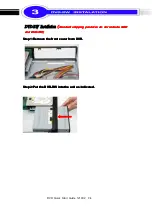
Страница 4: ...e HDD HDD HDD HDD and and and and DV DV DV DVD D D D RW RW RW RW Step Step Step Step 1 Remove 1 Remove 1 Remove 1 Remove the the the the front front front front cover cover cover cover from from from...

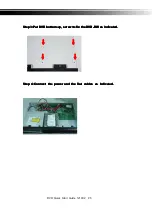
Страница 5: ...o to to to fix fix fix fix the the the the DV DV DV DVD RW D RW D RW D RW as as as as indicated indicated indicated indicated Step Step Step Step 4 Connect 4 Connect 4 Connect 4 Connect the the the th...

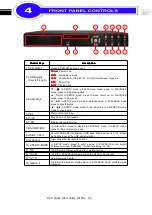
Страница 6: ...e In PLAYBACK mode press to play forwards In SETUP mode press to reduce value In PLAYBACK mode press to play rewind 4 REC Start or stop recording 5 PLAY Play back in normal speed 6 T SH Display the se...

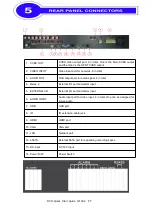
Страница 7: ...rt for audio signal 2 in total 4 Relay 2 External I O port and alarm input 5 EXTERNAL I O External I O port and alarm input 6 AUDIO INPUT Audio input port for video input 4 in total One can be assigne...

Отзывы: