


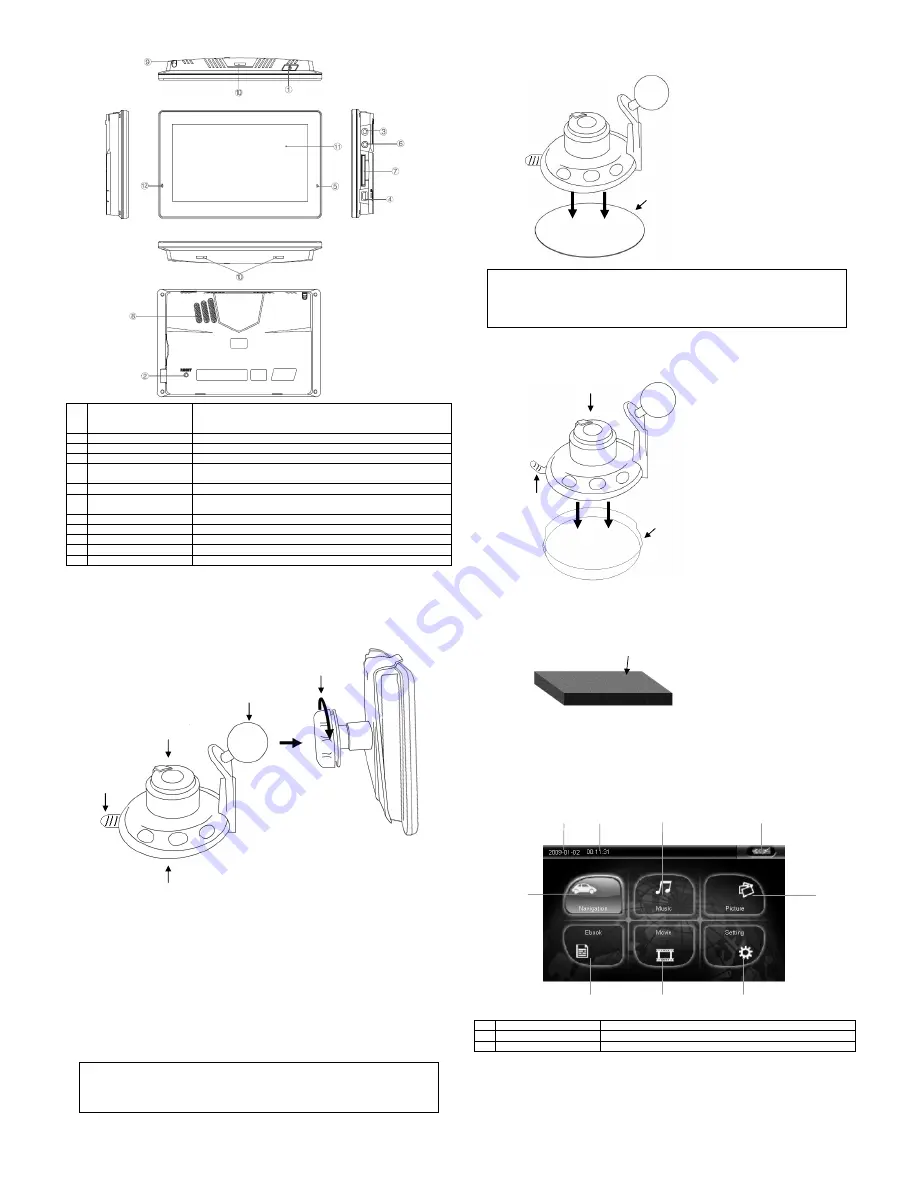
Getting to know your Lokatoo B1000 GPS navigator
1
Power button
Pressing the power button for more than 2 seconds will
switch off the device completely. Pressing it briefly will turn
the device to sleep mode.
2
Reset button
To reset the device.
3
AVIN Connector
Connect to external AVIN wired receiver module. (Optional)
4
Mini-USB Connector
Connect to the USB cable for file transfer or battery charging.
5
Charging Indicator
Static red indicate that external power is connected and
charging. Static green indicate a fully charged battery.
6
Headphone Connector
Connect to stereo headphone.
7
SD/MMC Card slot
To access navigation software, map, song and video files
stored in SD/MMC card.
8
Speaker
Produces audio.
9
Stylus
For inputting via touch screen.
10
Bracket block slot
To lock the device to holder.
11
Display screen
Display screen with touch screen capability.
12
Microphone
For inputting via voice. (Dependent on software capability)
In the event that the holder cannot be mounted onto the car dashboard
due to the material of the instrument panel, a backup base with
adhesive can be used as a platform for the holder.
1.
To use the backup
base, remove the
adhesive protector at
the bottom of the
base.
2.
Stick the backup base
at the desired spot of
the dashboard.
3.
Mount the holder at
the top of the backup
base.
Important
As the backup base uses a very strong adhesive to stick to the
dashboard permanently, please decide carefully and choose the right
location on the dashboard before sticking the base
Removing the holder (Stand-type)
1.
Turn the locking knob
clockwise to loosen
the mounting.
2.
Lift the tab and ‘peel’
the suction pad off the
dashboard.
3.
Cover the suction pad
with suction pad
protector.
Mounting The Device To Holder (Stand-type)
1.
Turn the tightening knob anticlockwise to loosen the ball joint
(female). Insert the ball joint (male) as shown on the illustration
above, and then tighten the knob.
2.
Remove the suction pad protective film. Attach the suction pad to the
car dashboard. Turn the locking knob anticlockwise to secure the
mounting.
3.
Fit the navigator to the holder.
Important
Be sure to place the device in an appropriate place, so as not to
obstruct the driver’s view, or deployment of airbags.
Cleaning the suction pad
Use for cleaning the suction
surface of the holder when it
is dirty to improve the
suction power of the holder.
The sponge should be wet
(Do not use detergent or
alcoholic content).
Main Interface Menu
A
Date
Display date, month and year.
B
Time
Display the current time.
C
Battery Indicator
Display the battery level of the device.
1.
Navigation
Tap this icon to launch the navigation software. (Please refer to the
navigation software user manual)
1
A
B
2
C
3
4
5
6
Ball joint
(female)
Ball joint
(male)
Suction
pad
Locking
knob
Tab
Backup
base
Tab
Locking
knob
Suction
pad
protector
Cleaning
Sponge


