background image

GB

15

Connec

tions

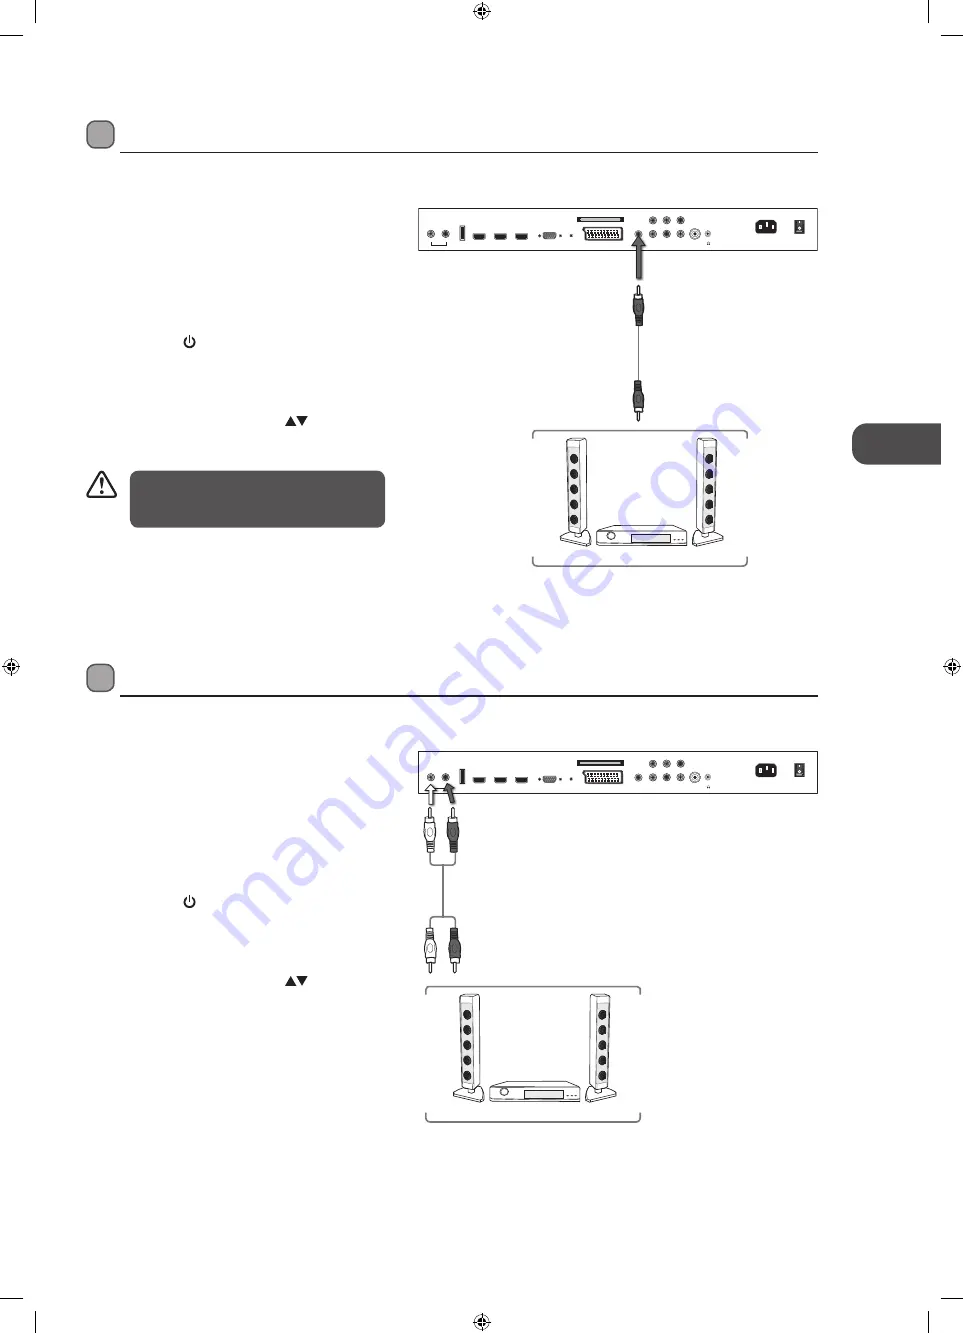
 Connecting an Audio Receiver

For better sound quality, you may want to play the audio through your multi-channel audio receiver.

1.  Use an audio cable to connect the TV’s 

AUDIO(L/R) input sockets to the external audio 
device’s audio output sockets. (Audio Left = 
white, and Audio Right = red) 

2.  Plug the connected devices into the mains socket 

before switching on the POWER SWITCH which is 
located at the rear of the TV.

3.  Press the STANDBY button at the front right side of 

the TV or the   button on the remote control to turn 
on your TV.

4.  Press the TV/AV button at the front right side of the 

TV or the Source button on the remote control to 
display the Source List. Use the 

 buttons to select 

any desired input source and then press the OK 
button to confirm.

 Connecting a Digital Audio Receiver

For better sound quality, you may want to play the audio through your multi-channel audio receiver.

1.  Use an audio cable to connect the TV’s Digital 

Audio out socket to an external audio receiver’s 
audio coaxial input socket.

2.  Plug the connected devices into the mains socket 

before switching on the POWER SWITCH which is 
located at the rear of the TV.

3.  Press the STANDBY button at the front right side of 

the TV or the   button on the remote control to turn 
on your TV.

4.  Press the TV/AV button at the front right side of the 

TV or the Source button on the remote control to 
display the Source List. Use the 

 buttons to select 

any desired input source and then press the OK 
button to confirm.

The TV’s volume control will have no 

effect. You may control the audio level via 
the Audio Receiver.

Audio Receiver

HDMI1

HDMI2

HDMI3

VGA

PC audio

SCART

Digital

Audio out

AV

R in

L in

Aerial

AC POWER IN

POWER SWITCH

Y

Pr

Pb

Common Interface

USB

Headphone out

L

R

Audio out

Rear View of TV

Audio Receiver

W

hit

e (L)

Red (R)

Audio Cable

(not included)

Red (R)

W

hit

e (L)

Rear View of TV

HDMI1

HDMI2

HDMI3

VGA

PC audio

SCART

Digital

Audio out

AV

R in

L in

Aerial

AC POWER IN

POWER SWITCH

Y

Pr

Pb

Common Interface

USB

Headphone out

L

R

Audio out

Audio Cable

(not included)

L42_473CD11_IB_111011_Zell.indd   15

11/10/2011   9:06 PM

Содержание L423CD11

Страница 1: ...42 47 3D Ready LCD TV Instruction Manual L423CD11 L473CD11 L42_473CD11_IB_111011_Zell indd 1 11 10 2011 9 06 PM...

Страница 2: ...L42_473CD11_IB_111011_Zell indd 2 11 10 2011 9 06 PM...

Страница 3: ...iptor 18 Selecting the Input Source 19 Channel Selection 19 Display Channel Information 19 Volume Adjustment 19 Customising TV Settings 20 Channel Setting TV DTV or Radio Mode 20 Auto Tuning ATV DTV m...

Страница 4: ...e 44 Watching 3D TV 44 3D Options 44 3D Customised Setting 44 Connecting a USB Storage Device 45 Viewing Photos 46 Listening to Music 46 Watching Movies 47 Viewing Texts 48 PVR Personal Video Recorder...

Страница 5: ...10193 3D Thank youfor purchasing your new Logik 42 47 3D Ready LCD TV Your new TV has many features and incorporates the latest technology to enhance your viewing experience We recommend that you spen...

Страница 6: ...such as a pillow or thick piece of foam beneath the screen Installing Removing the Base Stand In order to get the best 3D effect from your wall mounted 3D TV we strongly recommend that you use a tilt...

Страница 7: ...started in the standby mode 3 TV AV Press to select among different input signal sources DTV ATV AV SCART YPBPR HDMI1 HDMI2 HDMI3 PC USB Confirmed the selection on OSD menu 4 MENU Displays the OSD on...

Страница 8: ...device with a SCART output socket 7 Digital Audio Out To connect to the audio socket on the digital standard 5 1 audio system 8 VIDEO AUDIO L R To connect to the Composite VIDEO and AUDIO L R output s...

Страница 9: ...icated in this manual When the batteries are exhausted the remote will not function Replace both batteries at the same time with new ones Do not install new batteries with used ones and do not mix dif...

Страница 10: ...r recording USB DVD mode 11 Record the current programme DTV mode 12 To reverse advance playback rapidly DVD USB mode 13 To skip to the beginning of the previous or next chapter track photo DVD USB mo...

Страница 11: ...the S button twice and then press the buttons to select speaker sound output DTV mode Press the S button twice and then press the buttons to select Mono to Nicam Stereo ATV mode 22 GUIDE Displays the...

Страница 12: ...rol to turn on your TV 4 Press the TV AV button at the front right side of the TV or the Source button on the remote control to display the Source List Use the buttons to select HDMI1 or HDMI2 or HDMI...

Страница 13: ...ich is located at the rear of the TV 3 Press the STANDBY button at the front right side of the TV or the button on the remote control to turn on your TV 4 Press the TV AV button at the front right sid...

Страница 14: ...vice s SCART output socket 2 Plug the connected devices into the mains socket before switching on the POWER SWITCH which is located at the rear of the TV 3 Press the STANDBY button at the front right...

Страница 15: ...Audio out socket to an external audio receiver s audio coaxial input socket 2 Plug the connected devices into the mains socket before switching on the POWER SWITCH which is located at the rear of the...

Страница 16: ...e listening level Long term exposure to loud music may cause hearing damage It is best to avoid extreme volume when using earphones especially for extended periods Rear View of TV HDMI1 HDMI2 HDMI3 VG...

Страница 17: ...he aerial is plugged in and then press the OK button If you have already installed the TV using the Quick Start Guide please go to Selecting the Input Source section on the next page Please ensure aer...

Страница 18: ...e that you require Press the buttons to adjust each option s setting and then press the OK button to confirm Country Code This will be shown as GBR for the UK Primary Region This will show the regiona...

Страница 19: ...mote control repeatedly or the 0 9 buttons on the remote control to select the channel Alternative Press the OK button to enter the Channel List Then use the buttons to highlight and select the channe...

Страница 20: ...utton and then press the buttons to select the country where you will operate the TV Press the OK button to confirm 2 Press the buttons to select Auto Tuning and then press the OK button Channel Setti...

Страница 21: ...exit the menu DTV Manual Tuning DTV mode Allows you to make manual fine tuning adjustments of the channel under DTV mode 1 Press the Menu button and then press the buttons to select the CHANNEL menu a...

Страница 22: ...3 The DTV Manual Tuning screen will pop up Press the buttons to select the desired UHF channel and then press the OK button to commence the search of that channel When the signal has been tuned the pi...

Страница 23: ...Press the BLUE button again to undo it 4 Press the Menu button to return back to the main menu 5 Press the Exit button to exit the menu Channel Edit DTV Mode Allows you to edit TV programmes in the C...

Страница 24: ...press the buttons to select the CHANNEL menu and then press the OK button CI Common Interface DTV Mode The common interface allows the use of a Common Access Module to enable you to view scrambled pa...

Страница 25: ...gnal Information CI Information Software Update USB Channel Edit Conax Conditional Access Main menu Press OK to select Press EXIT to quit CI Information Smart Card Information Language Software Downlo...

Страница 26: ...rmat Press the buttons to adjust the balance between red and green levels Tint is only available for NTSC signal input via the SCART or AV IN Sharpness Press the buttons to adjust the level of crispne...

Страница 27: ...3D video to the available choice Side by Side Top Bottom Frame Packing Line by Line 3D Off Alternative Whilst in viewing mode press the 3D button repeatedly to select this function Exchange 3D Left Ri...

Страница 28: ...Press the buttons to select On Off SPDIF Mode Press the buttons to select the digital audio output mode AD Switch For DTV mode Audio Description is an auxiliary audio function that provides an additio...

Страница 29: ...imer and summer time 1 Press the Menu button and then press the buttons to select the TIME menu and then press the OK button CHANNEL PICTURE SOUND TIME OPTION LOCK EXIT Clock Time Zone Sleep Timer Aut...

Страница 30: ...on and then press the OK button Press the buttons to select the Auto Standby option and then press the OK button to select Off Press the Exit button to exit the main menu To save energy you should alw...

Страница 31: ...s Italiano English TT Language Allows you to select your preferred Teletext language 1 Press the Menu button and then press the buttons to select the OPTION menu and then press the OK button CHANNEL P...

Страница 32: ...desired audio language Press the OK button to confirm and return to the previous menu 4 Press the Menu button to return to the previous menu Press the Exit button to exit the menu Audio language Dansk...

Страница 33: ...d and then press the OK button to select On Off and return to the previous menu 3 Press the Menu button to return to the previous menu Press the Exit button to exit the menu Hearing Impaired Allows yo...

Страница 34: ...press the button to start formatting This may take awhile depending on the size of your USB storage device Warning All data will be lost Start Exit Format disk Format disk File System Size PVR File Sy...

Страница 35: ...selection will allow you to zoom in the picture without any alteration while filling the entire screen However the top and bottom of the picture will be cropped This selection will allow you to zoom i...

Страница 36: ...o Language TT Language PVR File System Subtitle Language Off Auto On English English West English 3 Press the button to select Yes The TV will return to the first time installation menu Press the butt...

Страница 37: ...0000 for first time use To change the password please refer to page 37 Set Password Lock System The Lock System is designed to prevent accidental retuning of the TV losing channels and prevent childre...

Страница 38: ...password 2 Press the buttons to select Set Password and then press the OK button Lock System Set Password Block Channel Parental Guidance Off Key Lock Off Off The default password is 0000 If you chang...

Страница 39: ...lock Channel screen will pop up Press the buttons to select a channel Press the GREEN button on the remote control to lock or unlock the channel Press the GREEN button again to unblock 6 Press the Men...

Страница 40: ...ssword Block Channel Parental Guidance Off Key Lock Off Off Key Lock Key Locked is designed to prevent children from pressing the buttons on the TV The Lock System must be set to On for this function...

Страница 41: ...rogramme Press the buttons to select the desired channel and then press the buttons to select the desired programme Press the OK button to confirm Button Functions in a 7 Days Guide Remote Control But...

Страница 42: ...ing the Teletext control buttons you can view pages of information that are listed in the teletext index To Turn on Teletext Function Make sure the TV channel you are watching transmits teletext No Te...

Страница 43: ...r nausea Parents should monitor their children including teenagers for these symptoms as they may be more sensitive to the effects of watching 3D TV Risk of photosensitization seizure can be reduced w...

Страница 44: ...wise incorrect adjust the Exchange 3D L R setting in Picture setting 4 Press the 3D button again to close the 3D Setup Menu 3D Options This TV has the facility to display the 3D image as normal 2D or...

Страница 45: ...TANDBY button at the front right side of the TV or the button on the remote control to turn on your TV 5 Press the TV AV button at the front right side of the TV or the Source button on the remote con...

Страница 46: ...ss the TV AV button at the front right side of the TV or the Source button on the remote control and then press the buttons to select the USB mode and then press the OK button to display the functions...

Страница 47: ...ont right side of the TV or the Source button on the remote control and then press the buttons to select the USB mode and then press the OK button to display the root menu 2 Press the buttons to selec...

Страница 48: ...and then press the button to confirm 5 Press the Info button or the OK button to display the function bar Press the buttons and then press the OK button to select the function Prev page Next page Prev...

Страница 49: ...ress the button to confirm Time Shift Mode and Recording functions may not work if the signal strength is weak Stop the time shift function before switching to another input source PVR Personal Video...

Страница 50: ...GUIDE button on the remote control The EPG menu will appear 10 00 11 00 Pinky and perky Frankenstei No information 2 BBC TWO My Fair Lady 7 BBC THREE This is BBC THREE 70 CBBC Channel Bear Behaving Ba...

Страница 51: ...ule List 15 30 10th Mar Delete Time Date Programme Title Channel Name Back 4 Press the buttons to select the MY PVR folder and then press the OK button Press the buttons to navigate in the MY PVR fold...

Страница 52: ...n bar 6 Press the buttons and then press the OK button to select the function Pause FB FF Prev Next Stop Repeat All Set A Playlist Info 7 Press the Exit button or the button to stop the current playba...

Страница 53: ...ected AV devices are switched off before switching on your TV The remote control does not work Check to see if there are any objects between the TV and the remote control causing an obstruction Ensure...

Страница 54: ...or TV Don t worry it easy to do And once you ve done it you should get all the Freeview channels available to you If problems persist you may need to get your aerial checked Talk to your retailer or...

Страница 55: ...heck the display settings of your computer before connecting to the TV If the display setting of your computer does not match the TV there may be no video Resolution Vertical Frequency Hz Aspect Ratio...

Страница 56: ...Average Annual Energy Consumption 198kWh 270kWh Standby Power Consumption 0 4W 16W in software EPG update mode 0 4W 16W in software EPG update mode Operating Temperature 0 C 40 C 0 C 40 C Operating Hu...

Страница 57: ...D E F G ENERG Y IE IJA IA 2010 1062 2011 198 kWh annum 136 Watt 107 cm 42 inch L423CD11 C A B C D E F G ENERG Y IE IJA IA 2010 1062 2011 270 kWh annum 185 Watt 119 cm 47 inch L473CD11 L423CD11 L473CD1...

Страница 58: ...ug the unit from the mains socket during a lightning storm Mains Cable Make sure the unit or unit stand is not resting on top of the mains cable as the weight of the unit may damage the mains cable an...

Страница 59: ...is manual Supervision Children should be supervised to ensure that they do not play with the unit and the remote control Never let anyone especially children push anything into the holes slots or any...

Страница 60: ...ct the local authority or your retailer where you purchased the product HDMI the HDMI logo and High Definition Multimedia Interface are trademarks or registered trademarks of HDMI Licensing LLC The FR...

Страница 61: ...L42_473CD11_IB_111011_Zell indd 61 11 10 2011 9 07 PM...

Страница 62: ...L42_473CD11_IB_111011_Zell indd 62 11 10 2011 9 07 PM...

Страница 63: ...L42_473CD11_IB_111011_Zell indd 63 11 10 2011 9 07 PM...

Страница 64: ...L42_473CD11_IB_111011_Zell indd 64 11 10 2011 9 07 PM...

Отзывы: