background image

GB

16

Connec

tions

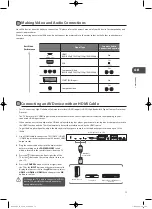
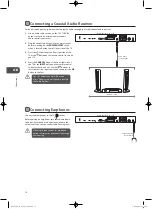
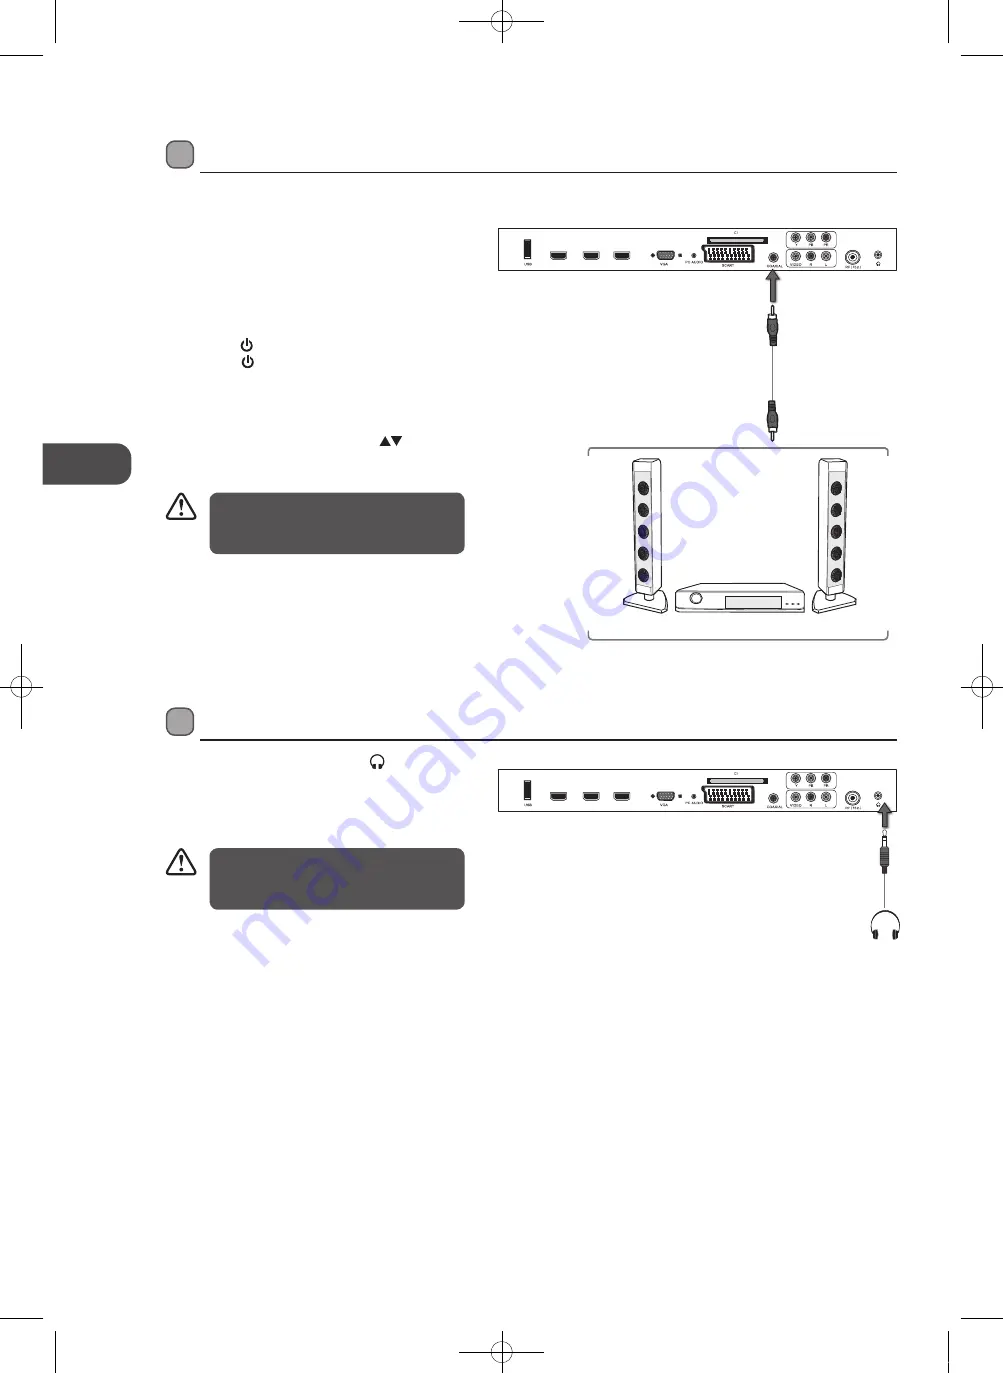
.Connecting.a.Coaxial.Audio.Receiver

For better sound quality, you may want to play the audio through your multi-channel audio receiver.

1..

Use an audio cable to connect the TV’s COAXIAL 
output socket to an external audio receiver’s 
audio coaxial input socket.

2..

Plug the connected devices into the mains socket 
before switching on the 

POWER.ON/OFF

 switch 

which is located at the rear left lower side of the TV.

3..

Press the

.


/.I

 button at the front right side of the 

TV or the

.

 button on the remote control to turn on 

your TV.

4..

Press the

.SOURCE

 button at the front right side of 

the TV or the 

INPUT

 button on the remote control 

to display the Source List. Use the 

 buttons to 

select any desired input source and then press the 

OK


button to confirm.

.Connecting.Earphones

Connect your earphones to the TV’s   socket.

Before putting on earphones, turn the volume down 
then put the earphones on and slowly increase the 
volume until you reach a comfortable listening level.

Rear Right Side View of TV

HDMI1

HDMI3

HDMI2

Earphones Cable

(not included)

The TV’s volume control will have no 

effect. You may control the audio level via 
the Audio Receiver.

Listening to loud sounds for prolonged 

periods of time may permanently damage 
your hearing.

Rear Right Side View of TV

HDMI1

HDMI3

HDMI2

Audio Cable

(not included)

Audio Receiver

L26DVDB11_IB_110414_Annie.indd   16

11年4月14日   下午5:46

Содержание L26DVDB11

Страница 1: ...26 HD Ready 1080p Digital LCD TV with DVD Player Instruction Manual L26DVDB11 L26DVDB11_IB_110414_Annie indd 1 11 4 14 5 46...

Страница 2: ...L26DVDB11_IB_110414_Annie indd 2 11 4 14 5 46...

Страница 3: ...19 Using the Features 20 Customising the Channel Setting TV DTV or Radio Mode 20 Auto Tuning ATV DTV mode 20 ATV Manual Tuning ATV mode 21 DTV Manual Tuning DTV mode 21 Channel Edit ATV Mode 22 Channe...

Страница 4: ...ing the DVD 54 Menu Playback for DVD 54 Stopping Playback 54 Previous Next for DVD CD Multimedia discs 54 Forward Backward for DVD CD Multimedia discs 54 Pause for DVD CD Multimedia discs 54 Repeat fo...

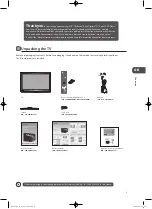
Страница 5: ...new Logik 26 HD Ready 1080p Digital LCD TV with DVD Player Your new TV has many features and incorporates the latest technology to enhance your viewing experience We recommend that you spend some time...

Страница 6: ...ck side facing up Please make sure to place a soft cushioned material such as a pillow or thick piece of foam beneath the screen screw TV Front Base Stand Front unscrew Installing Removing the Base St...

Страница 7: ...o DVD mode 5 Press to start playback or pause DVD mode 6 Press to eject disc DVD mode 7 VOL Adjusts the volume Press to select and adjust a setting in the OSD menu 8 CH Press to select a channel or se...

Страница 8: ...mmon Interface Slot Allows the insertion of a Common Access Module Refer to page 24 for details 6 SCART To connect to a VCR DVD Player or other AV device with a SCART output socket 7 COAXIAL To connec...

Страница 9: ...e indicated in this manual When the batteries are exhausted the remote will not function Replace both batteries at the same time with new ones Do not install new batteries with used ones and do not mi...

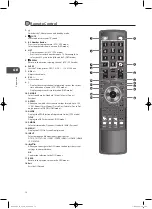
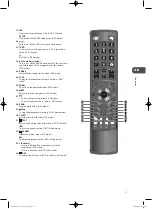
Страница 10: ...S MODE Select sound mode Standard Music Movie Sports Personal 11 ASPECT Allows you to watch the screens in various formats Auto 4 3 16 9 Zoom Smart Zoom Dot to Dot Subtitle Dot to Dot only operates in...

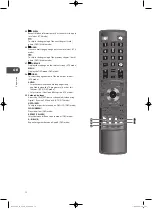
Страница 11: ...layed frame DVD mode 26 REC Record the current programme DTV mode 27 To start the timeshift playback DTV mode To start playback or pause Media DVD mode 28 PROG Programme the DVD DVD mode 29 Stop To st...

Страница 12: ...38 INDEX To select the page number of the index from teletext ATV mode AUDIO Switches between the audio languages only applicable when the TV programme disc has this features DTV DVD mode Select ster...

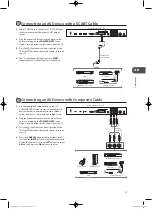
Страница 13: ...tton at the front right side of the TV or the button on the remote control to turn on your TV 4 Press the SOURCE button at the front right side of the TV or the INPUT button on the remote control to d...

Страница 14: ...AUDIO input socket to the computer s audio output socket 2 Plug the connected devices into the mains socket before switching on the POWER ON OFF switch which is located at the rear left lower side of...

Страница 15: ...tton to confirm Connecting an AV Device with a SCART Cable 1 Use a SCART cable to connect the TV s SCART input socket to an external AV device s SCART output socket 2 Plug the connected devices into t...

Страница 16: ...e of the TV or the INPUT button on the remote control to display the Source List Use the buttons to select any desired input source and then press the OK button to confirm Connecting Earphones Connect...

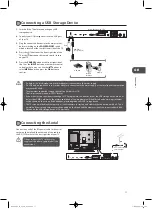
Страница 17: ...until you have completed all the connections If a hard disk is used make sure its mains adapter is connected to the mains supply If a USB hub is used make sure its mains adapter is connected to the m...

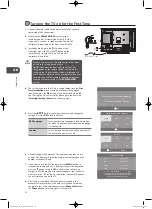
Страница 18: ...ct the mains cable to the mains socket after you have completed all the connections 2 Switch on the POWER ON OFF switch which is located at the rear left lower side of the TV At this stage the TV swit...

Страница 19: ...e password screen will be displayed Press the 0 9 buttons to enter the password the channel will then be unlocked refer to page 22 23 for details on Channel Edit Press the FAV button to view the Favou...

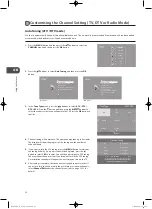
Страница 20: ...ttons to select the country where you will operate the TV Press the OK button to confirm 2 Press the buttons to select Auto Tuning and then press the OK button Customising the Channel Setting TV DTV o...

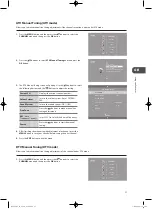
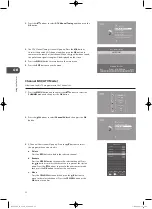
Страница 21: ...nu DTV Manual Tuning DTV mode Allows you to make manual fine tuning adjustments of the channel under DTV mode 1 Press the MENU button and then press the buttons to select the CHANNEL menu and then pre...

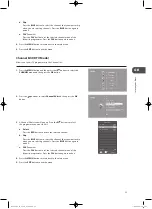
Страница 22: ...lect Channel Edit and then press the OK button 3 A Channel Edit screen will pop up Press the buttons to select the programme you want to edit a Delete Press the RED button to delete the selected chann...

Страница 23: ...ess the BLUE button to select the channels that you want to skip when you are selecting channels Press the BLUE button again to undo it e FAV Favourite Press the FAV button to set the selected channel...

Страница 24: ...le 1 Before you remove the Common Access Module ensure that the TV is switched off 2 Pull the Common Access Module from the slot 3 Switch the TV on CI Common Interface DTV Mode The common interface al...

Страница 25: ...ain menu Press OK to select Press EXIT to quit CI Information Smart Card Information Language Software Download Module Information This screen is for illustration only 2 Press the buttons to select So...

Страница 26: ...OAD 66 If you experience difficulties after the software update we recommend that you restore your TV to the factory default settings To do this follow the steps below 1 Press the MENU button to go t...

Страница 27: ...omponents independently to achieve a warm or cool for Personal mode Cold Increases blue tint Normal Warm Increases red tint Noise Reduction Press the buttons to select to reduce the noise level of the...

Страница 28: ...stening experience unlike any other technology that has been offered for a two speaker playback environment TruSurround HD builds upon its predecessor the industry leading surround sound virtualiser S...

Страница 29: ...t language to the loudspeakers DUAL I II Sends the primary and secondary broadcast languages to the loudspeakers Speaker Sound Output Selection DTV Mode While watching a DTV programme you can press th...

Страница 30: ...To cancel the sleep time press the SLEEP button repeatedly until Off appears Sleep Timer Off 10min 20min 30min 60min 90min BACK MENU EXIT Auto Standby The unit will automatically switch to standby mod...

Страница 31: ...lish West English 3 Press the buttons to navigate the menu and change the settings Press the OK button to confirm and return to the previous menu 4 Press the EXIT button to exit the menu TT Language A...

Страница 32: ...ss the buttons to select Audio Language and then press the OK button Audio Language DTV Mode Allows you to select your desired audio language Available for digital channels if multiple audio languages...

Страница 33: ...o exit the menu 2 Press the buttons to select Hearing Impaired and then press the OK button to select On Off and return to the previous menu 3 Press the EXIT button to exit the menu Hearing Impaired A...

Страница 34: ...e between FAT32 and Hi Speed FS If you select Hi Speed FS press the button and then press the buttons to select your preferred file size Press the OK button to confirm and then press the button to sta...

Страница 35: ...teration while filling the entire screen However the top and bottom of the picture will be cropped This selection will allow you to zoom in the picture without any alteration while the 4 sides of the...

Страница 36: ...ish West English CHANNEL PICTURE SOUND TIME OPTION LOCK EXIT Backlight Allows you to adjust the backlight setting of your TV This controls the brightness and display performance of the screen 1 Press...

Страница 37: ...ct Ratio Blue Screen HDMI CEC Restore Factory Default OSD Language Audio Language TT Language PVR File System Subtitle Language Off Auto On Back Light 8 English English West English This unit can only...

Страница 38: ...e LOCK menu you must enter the password Enter the default password 0000 for first time use To change the password please refer to page 39 Set Password Lock System The Lock System is designed to preven...

Страница 39: ...rget the new password press the master password 8899 2 Press the buttons to select Set Password and then press the OK button Lock System Set Password Block Channel Parental Guidance Off Key Lock Off O...

Страница 40: ...sword be sure to remember the new password If you forget the new password press the master password 8899 Lock System Set Password Block Channel Parental Guidance Off Key Lock Off Off 5 A Block Channel...

Страница 41: ...the buttons to select Lock System and then press the OK button 5 Press the buttons to select an age rating Off 4 18 Then press the OK button to confirm to return to the previous menu 6 Press the EXIT...

Страница 42: ...Use the 0 9 buttons to input a 4 digit password to enter the LOCK menu and then press the OK button to turn the Lock System On Please enter password The default password is 0000 If you change the pass...

Страница 43: ...TV programme press the TEXT button twice The text will be superimposed over the TV programme Double height text If you have difficulty reading the text on the TV you can double the height of the text...

Страница 44: ...avigate through all the possible viewing options The EPG supplies information such as programme listings start and end times for all available services In addition detailed information about the progr...

Страница 45: ...Press the BLUE button while on the selected programme the Reminder setting menu will be displayed Press the buttons to adjust the settings and then press the OK button to confirm the settings After co...

Страница 46: ...IA mode and then press the OK button to display the functions bar 2 Press the buttons to select MUSIC and then press the OK button 3 Press the buttons to select your storage device and then press the...

Страница 47: ...the OK button Some audio file formats will not be supported Supported file formats MPEG1 2 5 Select the music you want to play it will show the music information Album Title Bit Rate Artist Sampling Y...

Страница 48: ...and then press the OK button Text 1 Press the SOURCE button at the front right side of the TV or the INPUT button on the remote control then press the buttons to select the MEDIA mode and then press...

Страница 49: ...t live broadcast press the button and then press the button to confirm Time Shift Mode and Recording functions may not work if the signal strength is weak Stop the time shift function before switching...

Страница 50: ...the GUIDE button on the remote control The EPG menu will appear 10 00 11 00 Pinky and perky Frankenstei No information 2 BBC TWO My Fair Lady 7 BBC THREE This is BBC THREE 70 CBBC Channel Bear Behavi...

Страница 51: ...Schedule List 15 30 10th Mar Delete Time Date Programme Title Channel Name Back 4 Press the buttons to select the MY PVR folder and then press the OK button Press the buttons to navigate in the MY PVR...

Страница 52: ...bar 6 Press the buttons and then press the OK button to select the function Pause FB FF Prev Next Stop Repeat All Set A Playlist Info 7 Press the EXIT button or the Stop button to stop the current pl...

Страница 53: ...JPEG files DVD R AUDIO VIDEO JPEG CD R CD Recordable Audio Video format or JPEG files AUDIO VIDEO JPEG CD RW CD Rewritable Audio Video format or JPEG files AUDIO VIDEO JPEG AUDIO CD Compact Disc Digi...

Страница 54: ...ill stop the playback If the current track is the last one pressing the button will stop the playback The sound will be off during Forward or Backward For DVD discs the above functions may very due to...

Страница 55: ...to select the different angle you want Only for the dics has this characture Step for DVD Allows you to watch program in datails of every frame Press the STEP button repeatly to watch every frame Pres...

Страница 56: ...o Music Picture Video folders 1 Press the buttons to navigate through the folders and files 2 Press the 0 9 buttons to select the contents directly for example to select track 23 press the LIST button...

Страница 57: ...and this is the default setting SCREEN SAVER When the player stops or the picture becomes motionless for a couple of minutes there will be a screen saver to prevent damage to the display screen ON To...

Страница 58: ...e correct password DEFAULT DEFAULT To restore all setup parameters to the factory settings EXCEPT the password This function is available in stop state or when the tray is opened If you forget your DV...

Страница 59: ...ult language is English Using the DVD Audio Setup Page In the DVD mode press the DVD SETUP button on the remote control Press the buttons to select the Audio Setup menu and the buttons to select the m...

Страница 60: ...Digital Setup Page In the DVD mode press the DVD SETUP button on the remote control Press the buttons to select the Digital Setup menu and the buttons to select the menu options Press the DVD Setup b...

Страница 61: ...dry cloth Do not use any type of solvent such as thinner benzine commercially available cleaners or antistatic spray They may damage the disc Storing Discs Do not store discs in places subjected to di...

Страница 62: ...ure has not appeared after five minutes No or poor colour or poor picture Adjust the settings in the PICTURE menu Try another channel The problem may be caused by the broadcaster Check if the video ca...

Страница 63: ...ay need to get your aerial checked Talk to your retailer or contact your local aerial installer Why do I get blocking on my digital picture In most cases blocking is caused by a reception problem eith...

Страница 64: ...6 50 576P 720 x 576 720P 1280 x 720 50 60 1080I 1920 x 1080 50 60 1080P 1920 x 1080 50 60 PC Mode Please check the display settings of your computer before connecting to the TV If the display setting...

Страница 65: ...ss 350 420 cd m2 Contrast Ratio 600 800 1 Inputs Output SCART 1 HDMI 3 VGA 1 PC AUDIO 1 YPbPr 1 Common Interface 1 AV 1 USB 1 AUDIO IN RCA 1 L R COAXIAL 1 RF 75 1 Speaker Power 6 W 6 W Earphone 3 5mm...

Страница 66: ...the unit Unplug the unit from the mains socket during a lightning storm Mains Cable Make sure the unit or unit stand is not resting on top of the mains cable as the weight of the unit may damage the...

Страница 67: ...s could result in a fatal electric shock DVD Class 1 Laser Product This unit utilises a laser Use of controls adjustments or performance of procedures other than those specified herein may result in h...

Страница 68: ...ring and disassembly are prohibited Restriction on Use Rovi Trade Mark Rights Use of the copyright protection technology contained in this product must be authorised by Rovi Corporation and is intende...

Страница 69: ...L26DVDB11_IB_110414_Annie indd 69 11 4 14 5 47...

Страница 70: ...L26DVDB11_IB_110414_Annie indd 70 11 4 14 5 47...

Страница 71: ...L26DVDB11_IB_110414_Annie indd 71 11 4 14 5 47...

Страница 72: ...L26DVDB11_IB_110414_Annie indd 72 11 4 14 5 47...

Отзывы: