background image

7

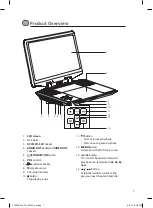
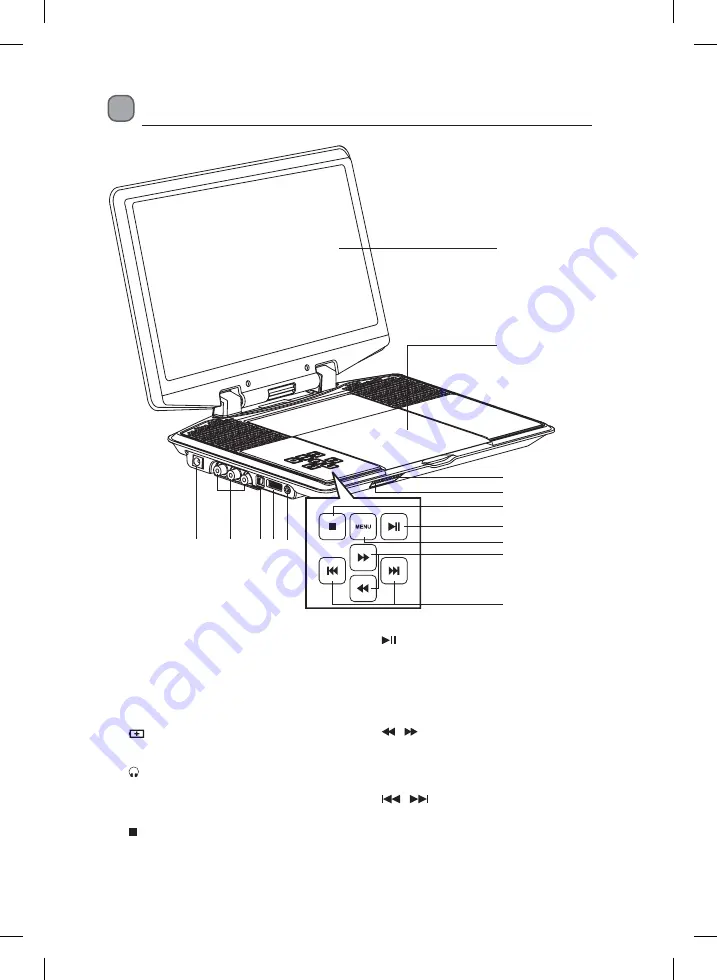
 Product Overview

1. 

LCD screen

2.  Disc Door
3. 

DC IN 9V~12V

 Socket

4. 

AUDIO OUT (L / R)

 and 

VIDEO OUT


Sockets

5. 

/STANDBY/ON

 Switch

6. 

VOL

 control

7. 


Earphones Socket

8. 

IR

 remote sensor

9.  Charging Indicator
10. 


Button

Stop playing a disc.

11. 

 Button

• 

Start or resume playback.

• 

Press once to pause playback. 

12. 

MENU

 Button

Enter or exit the DVD main menu.

13. 

 /   Button

Press to fast backwards/forwards 

playback at 4-level speed (

2x

4x

8x

16x

).

14. 

 / 

 Button

Skip backwards/forwards to the 

previous/next chapter/track/title.

1

2

11

13

14

9

10

12

8

3

4

5 6 7

L12PDVD14_IB_140509_will.indd   7

9/5/14   6:06 PM

Содержание L12PDVD14

Страница 1: ...Instruction Manual 12 Portable DVD Player L12PDVD14 L12PDVD14_IB_140509_will indd 1 9 5 14 6 06 PM...

Страница 2: ...ions 16 Connecting a TV 16 Connecting a Stereo Receiver or Amplifier 17 Using Earphones Headphones 17 Sound System 18 Dolby Digital 18 Compatible Disc Types 18 Supported Formats 18 Region Code 19 Turn...

Страница 3: ...Memory 24 JPEG Disc Playback 25 Customising the Language Settings 25 Customising the Video Settings 26 Customising the System Settings 27 Maintenance 29 Cleaning the Unit 29 Handling Discs 29 Cleaning...

Страница 4: ...materials do not obstruct the ventilation vents Safety Warnings A minimum distance of 5 cm around the unit should be maintained to allow for sufficient ventilation Do not install or place this unit i...

Страница 5: ...damaging the disc and the unit Do not stack devices heat from other devices may affect the performance of the unit Never look directly into the laser mechanism CAUTION RISK OF ELECTRIC SHOCK DO NOT OP...

Страница 6: ...urchasing your new Logik DVD Player We recommend that you spend some time reading this instruction manual in order that you fully understand all the operational features it offers You will also find s...

Страница 7: ...Indicator 10 Button Stop playing a disc 11 Button Start or resume playback Press once to pause playback 12 MENU Button Enter or exit the DVD main menu 13 Button Press to fast backwards forwards playba...

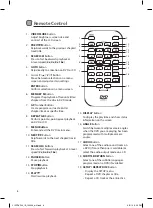
Страница 8: ...playback on DVD or CD 9 MENU Button Enter and exit the DVD main menu 10 NEXT Button Skip forwards to the next chapter track title 11 SEARCH Buttons Press to fast forwards playback at 4 level speed 2x...

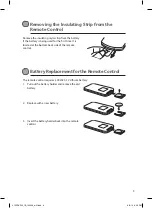
Страница 9: ...ttery 2 Replace with a new battery 3 Insert the battery holder back into the remote control Removing the Insulating Strip from the Remote Control Remove the insulating mylar strip from the battery if...

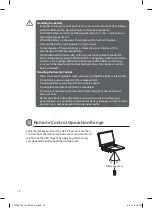
Страница 10: ...ll button cell batteries such as the one used in the remote control are easily swallowed by young children and this is dangerous Keep loose button cells away from young children and make sure that the...

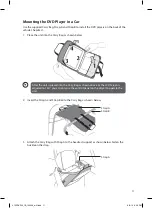
Страница 11: ...ert the Strap A and Strap B onto the Carry Bag as shown below 3 Attach the Carry Bag with Strap A to the headrest support as shown below Fasten the buckle on the strap Strap A Strap B Strap A After th...

Страница 12: ...r vehicle be sure that it is securely fixed to the headrests leg supports or held safely and does not obstruct any safety device including air bags or seat belts or it may cause injury in case of acci...

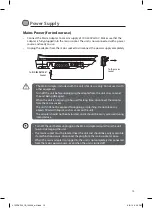
Страница 13: ...ion occurs disconnect the plug from the mains socket at once When the mains adapter is plugged in the unit is not completely disconnected from the mains power source even when the unit is turned off T...

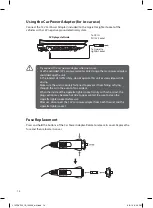
Страница 14: ...use Use the provided 12V car power adapter only Using other car power adapters could damage the unit In the interest of traffic safety do not operate this unit or view videos while driving Make sure...

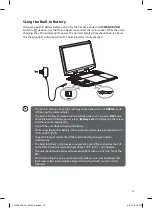
Страница 15: ...in battery power is low Battery Low will display on the screen and the unit will stop playing Turn off the unit while charging the battery While using the built in battery the environmental temperatu...

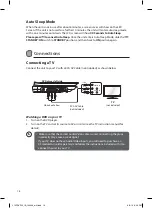
Страница 16: ...cable is used Connecting the plugs incorrectly may cause a weak signal If your TV does not have Audio Video inputs you will need to purchase an RF modulator sold separately and follow the instruction...

Страница 17: ...by a defective DVD system Long term exposure to loud music may cause hearing damage It is best to avoid extreme volume when using earphones especially for extended periods Using Earphones Headphones T...

Страница 18: ...and the double D symbol are trademarks of Dolby Laboratories Compatible Disc Types Disc Types Disc Logo Recorded Content DVD VIDEO Digital Versatile Disc AUDIO VIDEO DVD RW Audio Video format or JPEG...

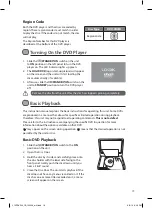
Страница 19: ...ual explains the basic instructions for operating this unit Some DVDs are produced in a manner that allows for specific or limited operation during playback Therefore this unit may not respond to all...

Страница 20: ...beginning of the disc next time you press on the unit or press PLAY on the remote control Skip Forwards or Skip Backwards 1 While playing DVD press on the unit or PREV on the remote control to go back...

Страница 21: ...s Locating a Specific Time for DVD 1 During playback press GOTO repeatedly on the remote control to display the disc information text line for Title Chapter Time 2 Press the Button on the remote contr...

Страница 22: ...erent audio channels Stereo Mono Left Mono Right or Mix Mono Some DVDs allow you to change audio selections only via the disc menu If this is the case press MENU and choose the desired audio channel o...

Страница 23: ...f Repeat Off A B Repeat Repeat a section between point A and B within a Title Chapter Track 1 Press REPEAT A B on the remote control to choose a starting point A The LCD Screen display A 2 Press REPEA...

Страница 24: ...y Off for about 5 seconds and goes back to normal screen 5 To resume normal playback from memory playback a Press MEMORY M on the remote control in play mode b Press on the remote control to move the...

Страница 25: ...cs may not permit this operation Customising the Language Settings 1 Ensure that the DVD player is in stop mode Press MENU on the unit or SETUP on the remote control to display the setup menu 2 Press...

Страница 26: ...s on the unit or on the remote control to select your preferred setting 6 Press on the unit or ENTER on the remote control to confirm and return to the Video Menu 7 Press MENU on the unit or SETUP on...

Страница 27: ...Wide Screen This is the correct mode for playing wide screen videos on the unit screen or other external wide screens Notes The displayable picture size is preset on the DVD Therefore the playback pic...

Страница 28: ...facturer Discs that are not coded by the disc manufacturer despite having movie rating printed on the disc cover CDs as they have no rating level indication Most copied DVD discs or illegal DVDs Passw...

Страница 29: ...a cloth wipe the disc lightly with a slightly moistened soft cloth and finish with a dry cloth Do not use any type of solvent such as thinner benzine commercially available cleaners or antistatic spra...

Страница 30: ...ss Make sure the unit is not in fast forward or fast reverse mode Press Make sure AUDIO VIDEO output connections are correct The DTS DVD cannot be decoded to have speaker output Press AUDIO repeatedly...

Страница 31: ...layer and or the remote control is effective Turn the unit off and then back to on Alternatively turn off the unit disconnect the mains adapter and then re connect it The DVD player may not be operati...

Страница 32: ...ion Reverse engineering and disassembly are prohibited Restriction on Use Rovi Trade Mark Rights Use of the copyright protection technology contained in this product must be authorised by Rovi Corpora...

Отзывы: