


28
1. In normal operating mode, press and hold the CLOCK SET button for two (2) seconds to enter the
clock setting menu.
2. Press the or buttons to adjust the hour.
3. Press the CLOCK SET button again to make adjustments to the next setting.
4. Settings cycle through the following options: HOUR > MINUTE > SECOND > 12-hour/24-hour format
> Year > Month > Day > M-D/D-M date format > Longitude (for sunrise/sunset) > Latitude (for
sunrise/sunset) > Time Zone > Language
5. Press the CLOCK SET button one final time after adjusting all settings options to save and exit, or the
console will automatically save and exit the menu after 60 seconds of idle time.
3. If the signal for the outdoor channel has been interrupted and does not recover within 15 minutes,
the signal icon will disappear. The temperature and humidity section (outdoor) will display “—” on
the corresponding channel.
4. If the signal still does not recover within 48 hours, the “—” display will become permanent. You will
need to replace the batteries on the associated channel’s sensor and press the SENSOR/SYNC
button to pair up the sensors again.
5. After replacing batteries in the display console or the wireless weather sensor, or if the unit fails to
receive a specified channel, press the SENSOR/SYNC button while the failed channel is being
displayed to manually receive that sensor’s signal again.
1. While in normal operating mode, press and hold the WIND button for two seconds to enter the
wind speed unit setting mode. The unit display will start flashing. Press the or buttons
to cycle through the wind speed units in the following order:
m/s > km/h > knots > mph
INDOOR COMFORT INDICATOR KEY
SELECTING WIND DISPLAY MODE
WIND READOUTS
Real time wind
direction indicator
Past wind
directions indicator
of last 5 minutes
Average / gust
wind speed
Wind Direction
Set Wind Speed Units
The indoor comfort indicators display a pictorial representation based on the indoor air temperature
and humidity levels to determine the approximate comfort level.
While in normal operating mode, press the WIND button to switch between the average wind speed
measurement and gust wind speed measurement.
NOTE:
Comfort indicator levels may vary even when the temperature is the same due to variances in relative
humidity levels. No comfort indicator will be displayed if the temperature falls below 32°F (0°C) or
over 140°F (60°C).
Northern Hemisphere Icons
Southern Hemisphere Icons
Moon Phase
New Moon
Waxing Crescent Moon
First Quarter Moon
Waxing Gibbous Moon
Full Moon
Waning Gibbous Moon
Third Quarter Moon
Waning Crescent Moon
NOTE:
-In alarm mode, the “ ” icon will display on the LCD.
Alarm off
Alarm on
Alarm with ice-alert
Temp/Humidity Trend
Arrow Icon
Rising
Steady
Falling
Too cold
Comfortable
Too hot
No signal
Weak signal
Good signal
16
WIRELESS SENSOR SIGNAL RECEIVING
1 . The console display signal strength for the wireless 5-IN-1 sensor, as per table below:
No signal
Weak signal
Good signal
2 . If the signal has discontinued and does not recover within 15 minutes, the signal icon will
disappear. The temperature and humidity will display “Er” for the corresponding channel.
3 . If the signal does not recover within 48 hours, the “Er” display will become permanent. You
need to replace the batteries and then press
[ SENSOR / WI-FI]
key to pair up the sensor
again .
VIEW THE OUTDOOR CHANNEL (OPTIONAL FEATURE WITH ADD ON EXTRA
THERMAL HYGRO SENSORS)
This console is capable to pair with a wireless 5-IN-1 sensor and up to 7 wireless thermal-hygro
sensors. If you have 2 or more sensors, you can press
[ CHANNEL ]
key to switch between
different wireless channels in normal mode, or press and hold
[ CHANNEL ]
key for 2 seconds
to toggle auto-cycle mode to display the connected channels at 4 seconds interval.
During auto-cycle mode, press
[ CHANNEL ]
key to stop auto cycle and display the current
channel .
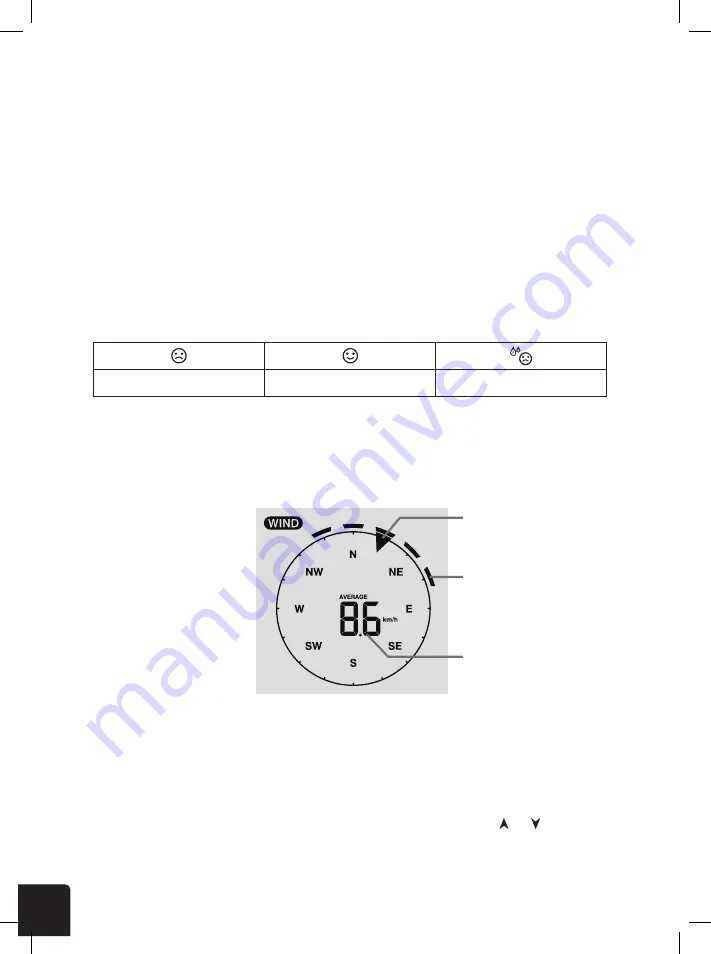
WIND
WIND SPEED AND DIRECTION SECTION OVERVIEW
Past wind
directions indicator
of last 5 minutes
Real time wind
direction indicator
Average / gust
wind speed
TO SET THE WIND SPEED UNIT AND DIRECTION DISPLAY FORMAT
1 . In normal mode, press and hold
[ WIND ]
key for 2 seconds to enter into wind speed unit
mode and the unit will flash. Press
[ ]
or
[ ]
key to change the wind speed unit in this
sequence: m/s
→
km/h
→
knots
→
mph
2 . Press
[ WIND ]
key again to return to normal mode.
TO SELECT THE WIND DISPLAY MODE
In normal mode, press
[ WIND ]
key to switch between
AVERAGE
and
GUST
wind speed.
WEATHER INDEX
At the WEATHER INDEX section, you can press
[ INDEX ]
key to view the weather index in this
sequence:
FEELS LIKE → HEAT INDEX → WIND CHILL → DEWPOINT.
FEELS LIKE
The feels like temperature index determine how the outdoor temperature that people actually
feel .


