background image

- 12

Turning the set on/off

Switching the TV set to standby mode

Activate the mains switch on the bottom of the set.

The display in the control panel on the front of the set 
will be illuminated red, the set is now in standby mode.

Switching the TV on/off on the control unit

Press the on/off button in the middle for about 2 seconds 
to switch the TV set on/off.

Meaning of the display colour:

Red:


Standby mode

Green:

  TV set is switched on

Orange:

  Radio mode, TV set receives EPG data or timer 

recording active

Switching the set on with the remote control

Press the


on/off


button

or 

numeric buttons

or 

TV button

or 

OK button

 – station list is called

or 

ASSIST button

 –  menu is called.

Switching the set off with the remote control

Press the 

on/off


button

.

➠  

Before switching off the set with the mains switch, we 
recommend you to switch it to standby mode.

Switch on in Radio mode

Press


R

 on the TV control unit.

or: 
Press the 

RADIO button

 on the remote control

(radio mode, see page 36).

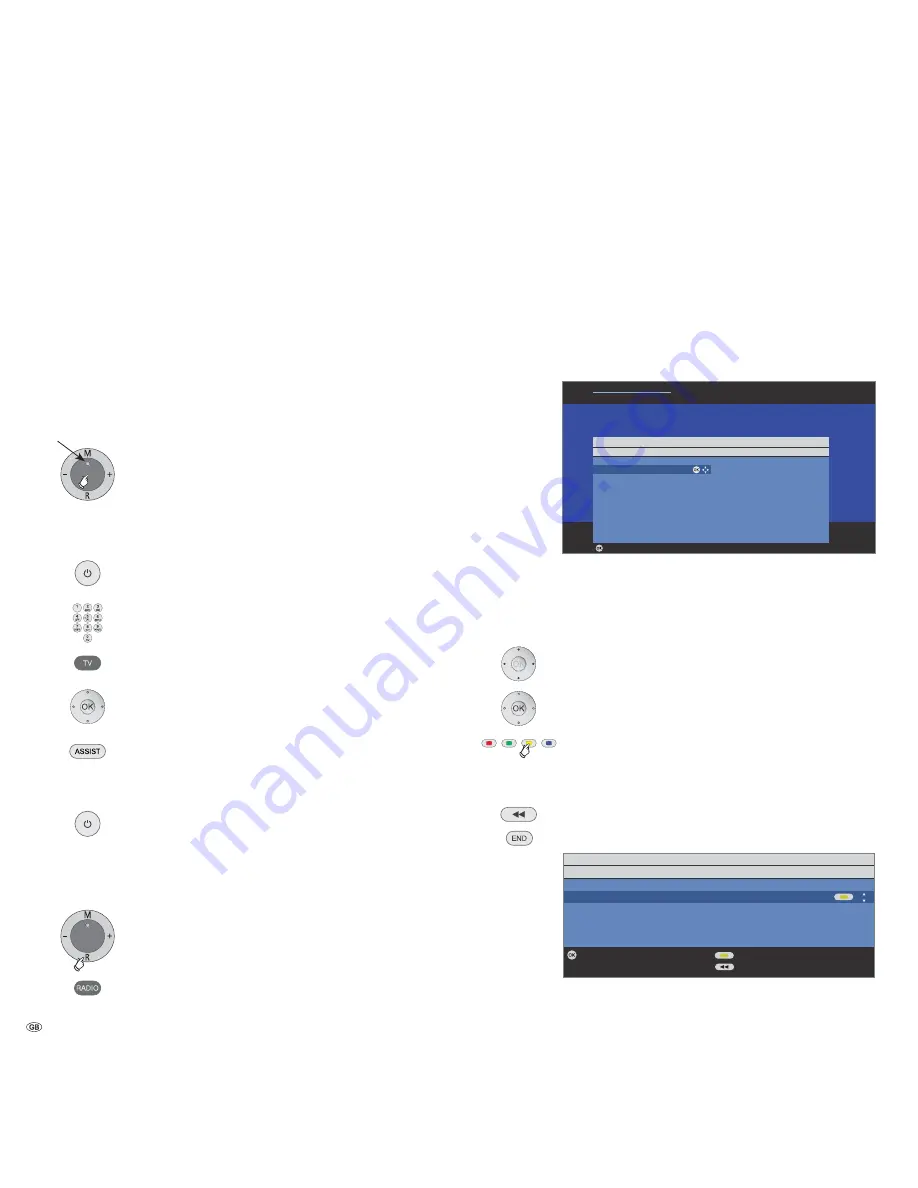
First installation wizard

Initial installation after switching on for the first time

This wizard starts automatically after the set is switched on for the first 
time, however it can also be called later manually in the TV index, see 

Repeat initial installation 

on page 17.

➠  

If at least one station is locked the access code must be entered before 
repeating initial installation (see Parental lock on page 41).

The first step with the wizard starts when selecting the 
language for the user prompts. From this point on 
follow the instructions on your TV set.

Brief explanation of button functions:

Press the ring (up, down, left, right) to move the cursor 
and to select settings.

By pressing the 

OK button 

a setting is confirmed and you 

will go to the next step.

With the 

yellow button

 you can select or remove the indi-

vidual items (see the example below).
When an element is selected, it is marked by a checkmark 

.

Use this button to go back one step.

Exit the wizard with the 

END button

 (if available).

An example of multiple selection using the 

yellow button

.

Initial installation

OK

OK

First installation wizard
Which language do you want to use for operation?

Initial installation
Language

Sprache  D 


   Kieli 

   FIN

Language 

 GB      


   Jezik 

   SLO

Langue 

  F 


    Jazyk   SK

Lingua 

  I   


       Lisan   TR

Idioma 

  E 


   Språk   S

Taal 

   NL   


      Sprog   DK

Jazyk   CZ         Idioma 

  P

                              
   !         " #   $
Nyelv   H

Proceed

Initial installation
Connect antenna cable(s)

Antenna 

cable(s) 

for:      to 

antenna 

socket(s):

Antenna/cable 

(analogue)    ANT 

TV 


DVB-T 

           ANT 

TV 


DVB-C 

           ANT 

TV

DVB-S 

(cable 

1)        ANT 

SAT 


DVB-S 

(cable 

2)        ANT 

SAT2

Proceed            


Connect/disconnect


Back

OK

continued on next page 

p

Display

Содержание Art 37

Страница 1: ...Operating instructions Art 47 SL Full HD 100 Art 42 SL Full HD 100 Art 37 SL Full HD 100 TV 233 33538 022 ...

Страница 2: ...IP 30 Configure Picture in Picture PIP mode 31 Electronic Programme Guide 32 Electronic Programme Guide EPG 32 Configuring EPG 33 Teletext 34 Teletext 34 Teletext menu 35 Digital teletext MHEG 5 36 Digital radio 36 Radio mode 36 EPG Electronic Programme Guide radio 37 Audio playback from external devices 37 DVB 38 Software update 38 Conditional Access module CA module 40 Other settings 41 Parental...

Страница 3: ... 18 Station list on page 18 MENU Confirm call page 15 Yellow button 3 Last station page 24 Blue button 3 Programme info on off page 24 Select station up 2 Still frame off 2 Still frame on 2 Still frame on off 2 page 20 Sound off on page 60 LED display for current operating mode page 11 60 Switch over to TV mode page 60 Switch over to operate recorder page 55 Timer overview on off page 24 Set pictu...

Страница 4: ...the standby mode Button Station down in the menu to the left Display Standby Operation Operation without on screen display Radio EPG data capture or timer recording Button R Radio on off 1 back to TV mode Switch on the radio from the standby mode in the menu down Button M Call the menu in the menu up down DR Digital Recorder integrated but inactive no recording no playback DR Digital Recorder acti...

Страница 5: ...S 232C 1 serial interface AUDIO IN1 L R audio input left right analogue AUDIO OUT L R audio output left right analogue ANT SAT2 1 Satellite antenna Sat tuner 2 ANT2 1 Antenna cable analogue digital tuner 2 AV1 Euro AV socket 1 AV2 RGB Euro AV socket 2 220 240V 50 60Hz mains connection SERVICE service socket PC IN VGA XGA input HDMI 2 HDMI DVI input 2 AUDIO DIGITAL IN digital audio input AUDIO DIGI...

Страница 6: ...S 232C 1 serial interface AUDIO IN1 L R audio input left right analogue AUDIO OUT L R audio output left right analogue ANT SAT2 1 Satellite antenna Sat tuner 2 ANT2 1 Antenna cable analogue digital tuner 2 AV1 Euro AV socket 1 AV2 RGB Euro AV socket 2 220 240V 50 60Hz mains connection SERVICE service socket PC IN VGA XGA input HDMI 2 HDMI DVI input 2 AUDIO DIGITAL IN digital audio input AUDIO DIGI...

Страница 7: ...le n Table mount assembled n Remote control Assist with two batteries n Operating instructions of Digital Recorder if there is one integrated in the TV set n These operating instructions About this operating manual For many questions concerning the technology you will find an answer in the index of your TV set If your question concerns TV set operation you can access a function directly from the i...

Страница 8: ...e correctly registered connected and set It is started automatically at the end of the initial installation wizard but can also be called separately see page 51 You will find the sound components wizard in the TV menu under Connections Sound components Assist You can select the most important operating modes directly with the Assist menu ASSIST button Selectable modes are TV Radio digital Teletext...

Страница 9: ...The mains plug of the TV set must be easily accessible so that the device can be disconnected from the mains at any time When you unplug the mains plug do not pull on the cable rather pull on the plug housing The cable in the mains plug could be damaged and cause a short circuit the next time it is plugged in Lay out the power cable in such a manner that it cannot be damaged The power cable may no...

Страница 10: ...r mercury Used batteries should no longer be disposed of in the domestic waste according to the Battery Ordinance Dispose of your batteries at no charge in the collection containers that are set up for this purpose in retail stores Repairs and accessories Never remove the back of the TV set yourself Only have your TV device repaired or serviced by authorized television technicians Only use origina...

Страница 11: ...the TV then plug the large power plug into a mains power outlet Initial installation AAA LR03 A A A L R 0 3 Connecting the antenna Analogue DVB C DVB T antenna In sets with DR Plug the antenna plug of the antenna or cable system or the room antenna into the ANT2 socket The connecting cable between ANT TV and ANT OUT has already been plugged in at the factory In sets without DR Plug the antenna plu...

Страница 12: ...later manually in the TV index see Repeat initial installation on page 17 If at least one station is locked the access code must be entered before repeating initial installation see Parental lock on page 41 The first step with the wizard starts when selecting the language for the user prompts From this point on follow the instructions on your TV set Brief explanation of button functions Press the ...

Страница 13: ...gradeable satellite reception Decide how energy efficiently you want to operate your TV set The value for the contrast and thus the brightness of the background lighting is adapted and the automatic dimmer activated or deactivated see page 22 depending on the presetting Eco standard The emphasis for home use is on low energy consump tion The automatic dimmer is activated Premium mode This mode opt...

Страница 14: ... DVB broadcasts which have an appropriate age identification are locked and can only be watched after entering the access code see page 41 Then the connection and sound component wizard starts which helps you to log in set and connect video recorders decoders a loudspeaker system or a HiFi AV amplifier to your TV set A DVD recorder is already logged in ex factory You can start the connection wizar...

Страница 15: ...rmation on menu operation Menus for the individual operating modes TV Radio PIP EPG Teletext PhotoViewer and DR archive if equipped with Digital Recorder are called with the MENU button Other menus can be opened with other buttons on the remote control The menus are displayed at the bottom of the screen At the top you get additional information about the selected menu item see info display on the ...

Страница 16: ...le You want to have the TV set switch off automatically at a specific time Select the item Switch off Automatic you go to the setting with OK The Assist menu The most important additional functions of the TV set can be called directly by the Assist menu Call Assist Call Assist menu Select additional functions OK calls the function Description of the individual functions TV See page 18 onwards Radi...

Страница 17: ...fects Sound adjustment Headphone volume Loudness Sound picture synchronisation more Loudspeaker sound 2 Headphone sound 2 Auto volume AV output signal Maximum volume Switch on volume Volume adjustment for current station Balance Auto speech detection Switch off times 4 Alarm times 4 Wake up with Wake up signal volume On screen displays Time and date Software update 1 CA module xxx 5 DVB settings F...

Страница 18: ...on numbers are possible When you select an empty memory location the TV switches to the next available station Call last viewed station for TV sets with MHEG 5 software You can switch back and forth quickly between two stations using these buttons With the station list In normal TV mode without other displays no favour ites selected OK Call Station list P P Scroll in the pages of the station list ...

Страница 19: ...ter changing stations Explanation of the icons following station names Digital DVB T station terrestrial via antenna 6 Digital DVB C station via cable Digital DVB S station via satellite Coded station Locked station see Parental lock on page 41 Select video source Please ensure that the appropriate devices have also been registered with the connection wizard see page 44 With the AV selection Call ...

Страница 20: ... if these have been logged in in the audio component wizard The Auro selection is only possible if a Loewe DVD Preceiver Auro is connected The menu item Sound via does not appear if TV speak ers or TV speakers active subwoofer is set in the audio components wizard Set sound effects Stereo Panorama 3D Surround Pano rama gives the stereo sound a virtual base widening 3D Surround converts a stereo si...

Страница 21: ... automatically reduced to the fixed switch on volume when switching back on The volume can differ according to the individual stations If the sound is too loud or too quiet in relation to other stations adapt the volume When the menu is open you can select the stations one after another with P P and adjust every single station conveniently Set stereo balance so that the volume impression is identi...

Страница 22: ...planations for Picture adjustment Custom adjustments of contrast colour intensity colour temperature brightness sharpness and digital noise control are saved in the Personal settings Every signal source has its own personal settings By selecting Presettings the picture settings for the respective currently active signal source are set to predefined values For an explanation of the signal sources s...

Страница 23: ...the PC formats the complete picture content will be shown In the TV formats a small part of the picture is cropped This may be necessary to hide possible interfer ence at the edge of the picture which arises from the signal supplied Move picture vertically In normal TV mode without other displays Move picture up down To show subtitles or news tickers which have been cut off the picture can be move...

Страница 24: ...tions of the coloured buttons in TV mode Continuation Green button Open the Teletext functions menu Select Personal text pages OK call Select text page OK view If only one text page is defined no list will be shown and the Teletext page will be opened immediately To define your personal text pages see page 35 Yellow button Go to the last viewed station Use this button to quickly switch back and fo...

Страница 25: ...d on page 35 Digital teletext If you press one of the coloured buttons or the TEXT button while the status display is on the appropriate selection menu is displayed The selection line is also displayed automatically when a new broadcast with different options to the previous broadcast begins or when you switch stations The selection menus are only available as long as the sta tus display is shown ...

Страница 26: ...w stations Here you can also call a configuration of the DVB T and DVB S antennae with the green button see page 13 With selection of set location the conventional TV standard colour standard is the default This should only be changed if stations with other standards are to be searched You can state whether coded stations are to be searched for in the search update Select yes then coded stations a...

Страница 27: ...elected signal source in the station list are displayed with grey shaded station number and name These stations can only be overwritten with the red button Explanations of some search settings Various settings are possible depending on the selected signal source Some settings have already been explained in the initial installation see page 12 onwards Selection of the range in which you want to sea...

Страница 28: ...u will see a line indicating the current input position Input position one character to the right also for blanks Input position one character to the left deletes the character Enter the letters one after another with the numeric buttons on the remote control Like using a mobile phone keypad press a numeric button until the desired charac ter appears The available letters are printed respectively ...

Страница 29: ...in the pages of the station list if necessary Mark station or select the station with the numeric buttons enter the initial letters in case of alpha betical station order which you want to enter in the favourites list OK transfers the station to the favourites list The new station is inserted at the end of the favour ites list Proceed in the same manner with addi tional stations Delete station fro...

Страница 30: ...ture when you press the PIP button The station of the TV picture is now freely selectable When you press the PIP button again the PIP picture returns to the TV picture and the PIP window closes Start and end picture in picture mode Show hide PIP In the Standard PIP function a green frame indicates that the station selection acts on the PIP picture A white frame means that the operation refers to t...

Страница 31: ...V picture and still keep an eye on the PIP picture You can temporarily ban commercials or programme sections to the PIP picture in this way The PIP picture becomes the TV picture again PIP off Configure Picture in Picture PIP mode In the PIP menu you can set the PIP type Split Screen or Small Picture the PIP function Standard PIP or iPIP and the position of the small picture Start PIP menu PIP mod...

Страница 32: ... topics memorised and also recordings can be programmed Starting and ending EPG Switch EPG on off Awizardwillguideyouthroughthenecessarypresettings the first time you start the EPG If you have analogue reception you enter the data capture for analogue stations after that see page 33 For TV sets with MHEG 5 software EPG is only possi ble for DVB T stations The display of the programme guide is divi...

Страница 33: ...an be sorted either according to their start times chronologically or according to stations cor responding to station list Calling additional information about the programmes Brief information about many programmes is displayed below the programme list of the broadcasts You can call detailed information with the TEXT button if this function is offered by the TEXT icon in the lower left The symbol ...

Страница 34: ...urde abgebrochen 204 Formel 1 Neues Reglement für Motoren 213 Fussball Heimsieg für den Meister 204 100 100 ARDtext Do 07 09 06 14 14 42 ARD Text Inhalt tagesschau 13 00 ARD Mittagsmagazin 312 14 00 Tagesschau OK Tagesschau 110 112 Kultur 500 Wetter 170 Gesellschaft 530 Sport 200 600 Lotto Toto 666 TV Guide 300 400 Wirtschaft 700 Page selection View Tennis Auftaktmatch wurde abgebrochen 204 Formel...

Страница 35: ...hand column The current page is hidden when you activate Newsflash A symbol at the top left indicates that the function is ac tive If the contents of the message are updated and it is a small newsflash this is displayed in the TV picture If it is a full screen page the symbol is displayed in blue and the page can be called with the OK button Shows concealed information e g for quiz questions or VP...

Страница 36: ...lose the digital teletext just select a dif ferent station using the P P buttons or follow the menu prompts on the screen Radio mode The TV set can receive digital radio stations via DVB In addition you can play the sound from an external device through the TV set via the audio AV inputs of the TV set For TV sets with MHEG 5 software the buttons may be configured differently by the provider Radio ...

Страница 37: ...n Switch EPG on off The EPG functions in radio mode are the same as in TV mode Read from page 32 onwards for further information Audio playback from external devices You can play the sound of external AV devices e g MP3 players DVD players in radio mode Select AV input Radio mode switched on if not press the RADIO button OK Open station list The AV inputs are listed in front of the first radio sta...

Страница 38: ...n path This may differ depending on the TV set and the DVB programme provided Ask your local dealer for information whether a software update via DVB reception path is possible Automatic information by new software version In the Change update settings menu see right column you can determine via which DVB reception path if possible you want to receive updates Your TV set determines automatically o...

Страница 39: ...h This is unnecessary when loading the software with the Load new software after switch off to standby update option If a new software has not been updated by a DVB station you will be reminded of this several times when switching on the set If a new TV software and a new DVB software are available in the automatic search for new software via DVB stations see page 38 you can choose which software ...

Страница 40: ...rce Make sure the module is not twisted in the process The eject button protrudes slightly when the CA module is inserted correctly Searching for encrypted stations The search wizard must only be started when the setting possibility no has been selected for the search for coded stations in first time start up or no CA module has been inserted Call TV menu Select Settings go to the menu line below ...

Страница 41: ...vidual or all of the stations in the station list specifically The lock remains active until it is switched off in the menu SomeDVBstationsalsobroadcastanageclassification Ifthe agesethereisbelowthebroadcastagelimit theprogramme can only be watched after entering the access code You can change your access code at any time Enter the new access code in place of the old one All set parental locks loc...

Страница 42: ... time is specified which has already passed on the same day the set switches off at this time the next day The set regularly switches to the standby mode automati cally every day at the specified time The set alerts you once today at the specified time If a time was specified which has already passed on the same day the alarm is saved for the next day The set regularly alerts you from Monday to Fr...

Страница 43: ... date manually if you receive station without tele text Call Time and date Call TV menu Select Settings go to the menu line below Select Miscellaneous go to the menu line below Select Time and date go to the menu line below Select the desired setting Explanations of setting possibilities in the Time and date menu Enter the time 00 00 to 23 59 with the numeric buttons of the remote control The curr...

Страница 44: ...difications OK calls the wizard The connection wizard can be exited at any time with the END button OK Proceed The connection diagram shows the currently logged in equipment OK Proceed continued on next page p OK END Connection wizard Connect the satellite dishes or cable terrestrial antennas of your AV equipment recorder decoder to the TV set according to the enclosed operating manual The connect...

Страница 45: ... transmitted to the external recorder You can also call Digital Link Plus under TV menu Con nections Digital Link Plus END Exit connection wizard Gaming mode For the inputs of your TV set on which game consoles PC applications or even Karaoke machines are operated we recommend you to activate the Gaming mode Your activities are then displayed quicker on the screen by reducing the complex picture i...

Страница 46: ... is to be transmit ted digitally a cinch cable must be plugged between the coaxial digital output of the accessory equipment and the AUDIO DIGITAL IN socket of the TV set In addition the digital audio input must be assigned to the corresponding AV socket in the connection wizard see page 45 The assignment of the digital audio input may also take place outside the connection wizard With TV menu Con...

Страница 47: ...f all equipment before connecting Connect the Euro AV output of the DVD recorder to the AV2 socket of the TV set Use a fully equipped Euro AV cable available from your dealer for this If you want to receive and record analogue stations with the receiver tuner built into the recorder the recorder must be looped into the aerial cable Connect the DVD recorder as shown in the connection example below ...

Страница 48: ...ket on the TV set see also page 53 Playback from the device Call AV selection Select HDMI DVI socket With Digital Link HD capable devices the device name may possibly appear in place of the connection name OK Switch over Start playback on the connected HDMI device The best possible format for the picture is detected and set auto matically Digital Link HD With Digital Link HD accessory equipment wi...

Страница 49: ...utput of the PC or accessory equipment to the AUDIO DIGITAL IN socket of the TV set with a cinch cable The digital audio input can be assigned to the PC IN socket by TV menu Connections Miscellaneous Assign digital audio input see page 53 Playback from the device Call AV selection Select PC IN socket OK switch over Adapt geometry only possible with certain signals This can be used to position the ...

Страница 50: ...ce to the AUDIO IN1 L R sockets of the TV set by a dual cinch cable Alternatively connect the digital audio output of the exter nal device to the AUDIO DIGITAL IN socket of the TV set with a cinch cable The digital audio input can be assigned to the COMP IN socketbyTVmenu Connections Miscellaneous Assign digital audio input see page 53 Playback from the device Call AV selection Select COMP IN sock...

Страница 51: ...and accessories see pages 65 and 66 Play sound via active speakers Connect your active speakers to the audio outputs AUDIO OUT L R of the TV set with cinch cables Switch the TV set to playback via active speakers Call TV menu Select Connections go to the menu line below Select Sound components OK calls the sound components wizard Select Active speakers OK Exit wizard Play sound via TV speakers and...

Страница 52: ...e centre input of the TV set AUDIO IN1 C with a cinch cable Attention Do not use the centre speaker connection of the amplifier use the centre pre amp output instead Connecting digital audio amplifiers Continuation of the left column above For digital audio transmission Select yes Connect the digital audio output of the TV set AUDIO DIGITAL OUT with the digital audio input of the amplifier via a c...

Страница 53: ... cinch cable to the AUDIO DIGITAL IN socket on the TV set If new devices are connected and registered in the connection wizard the digital audio input AUDIO DIGITAL IN is assigned in the connection wizard see page 45 Audio connection in HDMI DVI devices External devices with DVI connection If an external device with DVI interface is connected by an HDMI DVI adapter to one of the HDMI DVI sockets o...

Страница 54: ...ily or weekly In devices with Digital Recorder and DR recordings by EPG Serial can be selected additionally see also the instruction manual of the Digital Recorder When the automatic time control is activated only once only can be selected If you use an external recorder without Digital Link Plus you have to select the recording source e g AUX in the recorder This is also the case when DVB broadca...

Страница 55: ...EPG or Via Teletext see page 54 OK Call Station selection Select station OK Call Timer data Entry of the timer data see page 54 After confirming the timer data the new recording is transferred to the timer overview New entry Memorize programme using the timer overview Timer list is opened Red button Call New timer entry Select Memo OK EPG is opened Note desired programme as described in Switching ...

Страница 56: ...imer overview of the TV set Consequently if you want to change or delete the timer data then you must do so on the recorder Digital stations If you want to record digital stations with an externally connected recorder then the DVB tuner is used and the TV device takes over control of the recorder Then the station on the TV set is locked during the timer recording It is not possible to switch over ...

Страница 57: ...eft rotation position in future OK ends the basic adjustment Close the menu Specifying the switch off position This is where you specify the position that the TV will take when it is switched off In order for the TV set to return to the determined switch off position when switching it off this must be activated see below Call TV menu Select Settings go to the menu line below Select Miscellaneous g...

Страница 58: ...st page of the photo overview see right column If several media are available select with memory medium and then with OK start PhotoViewer Ending the PhotoViewer Remove used memory medium Or Press END button when photo list is displayed Or Press TV or RADIO button Or Press the ASSIST button and call another function in the Assist menu Viewing photos The photo overview is displayed Mark a photo pag...

Страница 59: ...d sound is to be heard during the PhotoViewer operation Select memory medium from which the photos are to be reproduced This menu item is only displayed if at least two memory media are available Open folder Folders will only be displayed if they were created on the memory card USB stick Mark a folder in the photo overview OK Open folder The photos in this folder are displayed Marking photos for s...

Страница 60: ...utton is pressed the display of the selected operating mode lights up TV REC DVD RADIO This allows you to check which op erating mode the remote control is set to every time you press a button Setting the remote control to other Loewe devices The specified button combination must be kept pressed for approx 5 s until one of the LEDs flashes twice Device Button combination Loewe TV Loewe Centros 110...

Страница 61: ...e DVD player Auro 2216 PS 8116 DT Sound off on LED indicator for current operating mode Switch over to operate TV set Switch over to operate Recorder Sleep timer Set TV picture format RADIO Mono Stereo DISC Repeat RADIO display RDS name frequency of station DISC User interface of loaded DVD Show hide menu MENU close window V V Volume down up DISC Title Chapter overview RADIO station table MENU con...

Страница 62: ... in the connection diagram b The AV standard is set incorrectly c The signal type is set incorrectly a In the connection wizard TV menu Connections New devices modifications compare the connection diagram with the actual installation and connect as illustrated page 44 b Set the correct standard page 17 c Set the correct signal type page 45 If for AV standard or AV signal is set to Automatic then t...

Страница 63: ...s not registered in the connection wizard or is connected differently to shown in the connection diagram Intheconnectionwizard TVmenu Connections New devices modifications compare the connection diagram with the actual installation and connect as illustrated page 44 The picture of a connected external recorder is visible but the error message no recorder available is still output The device is not...

Страница 64: ...xt TOP FLOF Level 2 5 Page memory 2000 Digital teletext only in UK IRL with active MHEG 5 software MHEG 5 Connections max equipment Mains socket Supply voltage EURO AV 1 Video IN Y C S VHS Hi 8 CVBS VHS 8 mm Video OUT CVBS VHS 8 mm Y C S VHS Hi 8 Audio IN L R Audio OUT L R EURO AV 2 Video IN Y C S VHS Hi 8 CVBS VHS 8 mm RGB Video OUT CVBS VHS 8 mm Y C only with SVHS Link Plus Audio IN L R Audio OU...

Страница 65: ... With the Loewe Individual Sound Projector you can enjoy digital Surround Sound without expensive installation and connection of several speakers The Sound Projector is easy to set and operate Loewe DVD Recorder The DVD recorders from Loewe feature forms and colours which match the Loewe TV sets an adapted user operation and technology Combined these devices form a system that offers many advantag...

Страница 66: ...in the table on page 67 Adapter and cables AUDIO LINK adapter 1 5 m Loewe order no 89954 001 AUDIO LINK 1 5 m Loewe order no 89952 001 AUDIO LINK 6 m Loewe order no 89952 002 AUDIO LINK 10 m Loewe order no 89952 003 Cubic plug cable 1 5 m Loewe order no 90418 930 Upgrade kit USB extension Art No 70167 080 To ensure the availability of the USB connection when mounting on the wall or to be able to i...

Страница 67: ... z z z Dual DVB T C z z z USB port 1x 1x 1x 1x 1x 1x Single DVB S2 Art No 89565 081 Twin DVB S2 Art No 89565 080 Audio AC3 dts Art No 89781 080 RS232C MU IR Link Art No 70461 080 z ex factory available as an upgrade kit not available Accessories Equipment variants The equipment of the individual set variants and their upgrade possibilities is listed in the table below ...

Страница 68: ...et with concealed setup Controlling the recorder for timer recordings Digital Link Plus System for controlling recorders according to protocol 50 For analogue stations the station and timer data are transmitted via the EURO AV socket to the recorder The timer recording is executed exclusively by the recorder There is a different designation with different manufacturers Digital Link HD System for c...

Страница 69: ...ration of TV and Loewe system components even more convenient LNB LNC The crucial electronic component of a satellite antenna is referred to as an LNB Low Noise Block Converter It is mounted in the focal point of a parabolic antenna The designation LNC Low Noise Converter indicates that conversion to lower intermediate frequency takes place The supplemental block in the LNB refers to the fact that...

Страница 70: ... display Stereo Dual channel audio Switch voltage Video devices specify this voltage to switch the TV device to playback Symbol rate Describes the transmission speed for data transmission Glossary T Terrestrial In data transmission a wireless transmission that does not use satellites as intermediate station is referred to as terrestrial TFT Thin Film Transistor One widely distributed application i...

Страница 71: ...e vertically 23 Muting 20 N Numeric buttons 15 16 18 O On screen displays 43 Overview diagram 17 P Page selection 34 Parental lock 41 PC IN 49 Personal text pages 24 35 PhotoViewer 58 Picture 22 Picture adjustment 22 Picture format 22 Cinema 23 PALplus 23 Panorama 23 Zoom 23 Picture in Picture 30 PIN 41 PIP 30 Play sound via active speakers 51 Play sound via TV speakers and active subwoofer 51 Pro...

Страница 72: ...a VR Italia Tel 39 045 82 51 611 Fax 39 045 82 51 622 Email info loewe it PL Trading pz 2004 Ltd 27 Aliat Hanoar St Givataiim 53401 Israel Tel 972 3 57 27 155 Fax 972 3 57 27 150 Email zeev loewe co il Origo Ltd Unit 23 Magna Drive Magna Business Park City West Dublin 24 Republic of Ireland Tel 353 1 4666700 Fax 353 1 4666708 Email service origo ie SALEM AGENCIES SERVICES CO Hamad Al Haqueel Stree...

Отзывы: