background image

- 36

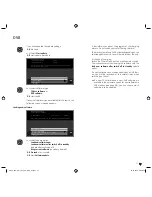
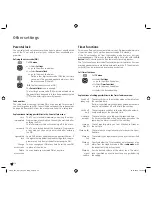
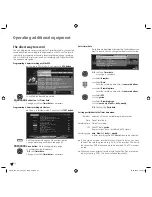
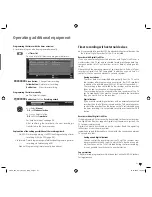
If you want to change the update settings:


 Select 

Change update settings

,


OK

   the wizard polls the update settings.

  The selection options depend on the antenna cables 

connected at the initial installation (see page 12).

USB only

New software is searched for via USB.

USB and DVB-T

New software is searched for first via USB then via DVB-T 
(digital terrestrial transmission).

USB and DVB-C

New software is searched for first via USB then via DVB-C 
(digital cable transmission).

USB and satellite

New software is searched for first via USB then via DVB-S 
(digital satellite transmission). The name of the currently 
selected satellite is displayed.

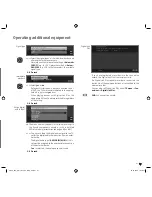
Setting parameters of the different DVB update sources:

Select the channel on which the new software is pro-
vided.

Enter the frequency of the station to be transmitted 
directly.

Is preset automatically depending on the selected chan-
nel.

Enter the symbol rate of the station to be transmitted 
directly.

Set the suitable type of modulation.

Set the transmission range for satellite reception.


Software update

 TV base software and  DVB software

Your TV set provides the option to update the TV basic and DVB soft-

ware. The current software versions can be installed on your set with a 

 USB stick. 

Contact your dealer for a software update by USB stick.
The software can also be updated by different DVB reception paths (DVB-

T, DVB-C, DVB-S 

(1

 ).

However, the prerequisite for this is that the software is provided by the 

appropriate DVB reception path. 

This may differ depending on the TV set and the DVB program provi-

ded.

Ask your local dealer for information whether a software update via DVB 

reception path is possible.

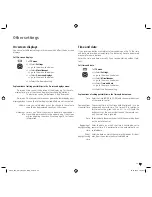
Automatic information by new software version

In the 

Change update settings

 menu (see right column) you can determine 

via which DVB reception path (if possible) you want to receive updates. 
Your TV set determines automatically overnight whether a new software 
version is available via the selected DVB reception path. The TV set must 
be left in the standby mode for this (do not switch off with the mains 
switch).
If a new software version is available, the TV set informs you of this in an 
on-screen message the next time it is switched on (see page 37 – Loading 
new software).

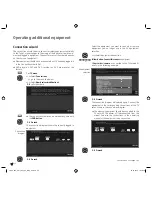
Manual search for new software

If it is not displayed automatically that a new software is available when 
you switch on the set, you can also search for one manually. The search 
depends on the selected update source(s).

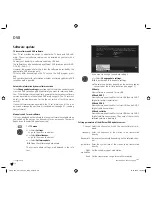
Call 

TV menu

.


 Select 

Settings

,


go to the menu line below.

 Select 

Miscellaneous

,


go to the menu line below.

 Select 

Software update

.


OK 

 Open the software update wizard.

The current update settings are displayed in the info 
text.

DVB

continued on the next page 

p

TV menu

Settings
Miscellaneous
Software update

Change update settings

Start update

Software update wizard
The software update can be made via a USB stick or DVB antenna. If you do 
not make any changes, your TV makes it with the following settings:
Update 

source        

USB and satellite: ASTRA1 19,2°E (DVB-S)


(ASTRA1 19,2°E)

Frequency          

12603 MHz

Symbol 

rate         

22000

Band            

horiz/high

END

OK

Channel

Frequency

Bandwidth

Symbol rate

QAM

modulation

Band

(1 

if upgraded

33156_024_Xelos_A32_42_GB_9_00_B36   36

33156_024_Xelos_A32_42_GB_9_00_B36   36

03.07.2008   15:38:43

03.07.2008   15:38:43

Содержание A 42 HD+ 100, A 37 Full-HD+ 100, A 37 HD+ 100, A 32 HD+ 100

Страница 1: ...ructions Xelos A 42 HD 100 Xelos A 37 Full HD 100 Xelos A 37 HD 100 Xelos A 32 HD 100 TV 233 33156 024 33156_024_Xelos_A32_42_GB_9_00_B1 1 33156_024_Xelos_A32_42_GB_9_00_B1 1 03 07 2008 15 34 27 03 07...

Страница 2: ...PIP mode 29 Electronic Programme Guide 30 Electronic Programme Guide EPG 30 Configuring EPG 31 Teletext 32 Teletext 32 Teletext menu 33 Digital teletext MHEG 5 33 Radio 34 Radio mode 34 EPG Electroni...

Страница 3: ...low button 3 Last station page 22 Blue button 3 Programme info on off page 22 Select station up 2 Still frame off 2 Still frame on 2 Still frame on off 2 page 20 Sound off on page 54 LED display for c...

Страница 4: ...eft Display Standby Operation Operation without on screen display Radio EPG data capture or timer recording Button R Radio on off 1 back to TV mode Switch on the radio from the standby mode in the men...

Страница 5: ...o in AVS Audio in right AVS Audio in left AVS AUDIO IN1 C centre audio input analogue AUDIO LINK 1 surround audio outputs analogue HDMI1 HDMI DVI input 1 USB connection 1 USB stick card reader USB 1 U...

Страница 6: ...left right analogue ANT SAT2 1 Satellite antenna Sat tuner 2 ANT2 1 Antenna cable analogue digital Tuner 2 AV1 Euro AV socket 1 AV2 RGB Euro AV socket 2 220 240V 50 60Hz mains connection SERVICE serv...

Страница 7: ...ting and service card Operating instructions of Digital Recorder if there is one integrated in the TV set These operating instructions About this operating manual For many questions concerning the tec...

Страница 8: ...he end of the initial installation wizard but can also be called separately see page 47 You will find the sound components wizard in the TV menu under Connections Sound components Assist You can selec...

Страница 9: ...that the device can be disconnected from the mains at any time When you unplug the mains plug do not pull on the cable rather pull on the plug housing The cable in the mains plug could be damaged and...

Страница 10: ...ste according to the Battery Ordinance Dispose of your batteries at no charge in the collection containers that are set up for this purpose in retail stores Repairs and accessories Never remove the ba...

Страница 11: ...DVB C DVB T antenna In sets with DR Plug the antenna plug of the antenna or cable system or the room antenna into the ANT2 socket The connecting cable between ANT TV and ANT OUT has already been plugg...

Страница 12: ...later manually in the TV index see Repeat initial installation on page 16 The first step with the wizard starts when selecting the language for the user prompts From this point on follow the instructi...

Страница 13: ...or country specific pre settings If UK or IRL is selected for the location of TV set it is pos sible to activate MHEG 5 UK Freeview for the TV set A dialogue appears where you can confirm to set the o...

Страница 14: ...ected a recorder in the connection wizard the Digital Link Plus transmission starts when the sound component wizard closes If a Digital Link Plus compatible recorder is connected the station list of t...

Страница 15: ...EPG Teletext PhotoViewer and DR archive if equipped with Digital Recorder are called with the MENU button Other menus can be opened with other buttons on the remote control The menus are displayed at...

Страница 16: ...e item Switch off Automatic you go to the setting with OK The Assist menu The most important additional functions of the TV set can be called directly by the Assist menu Call Assist Call Assist menu S...

Страница 17: ...fects Sound adjustment Headphone volume Loudness more Loudspeaker sound 2 Headphone sound 2 Auto volume AV output signal Maximum volume Switch on volume Volume adjustment for current station Balance S...

Страница 18: ...software You can switch back and forth quickly between two stations using these buttons With the station list In normal TV mode without other displays no favour ites selected OK Call Station list P P...

Страница 19: ...able Digital DVB S station via satellite Coded station Select video source Please ensure that the appropriate devices have also been registered with the connection wizard see page 40 With the AV selec...

Страница 20: ...signal into a virtual surround signal Speech Classical Pop Custom music and film sound You can set the treble and bass for music and movie sound Adjust the headphones volume Proper boost of bass and...

Страница 21: ...own personal values By selecting Standard values the picture parameters are reset to factory values for the respective currently active signal source See the glossary for an explanation of the signal...

Страница 22: ...nally correct and format filling display Black bars are visible on the left and right of the picture in the prportionally correct display Switch Keep the M button on the TV pressed at the same time pr...

Страница 23: ...on page 33 Digital teletext If you press one of the coloured buttons or the TEXT button while the status display is on the appropriate selection menu is displayed The selection line is also displayed...

Страница 24: ...ith selection of set location the conventional TV standard colour standard is the default This should only be changed if stations with other standards are to be searched You can state whether coded st...

Страница 25: ...earch settings Various settings are possible depending on the selected signal source Some settings have already been explained in the initial installation see page 12 onwards Selection of the range in...

Страница 26: ...etters one after another with the numeric buttons on the remote control Like using a mobile phone keypad press a numeric button until the desired charac ter appears The available letters are printed r...

Страница 27: ...betical station order which you want to enter in the favourites list OK transfers the station to the favourites list The new station is inserted at the end of the favour ites list Proceed in the same...

Страница 28: ...re is now freely selectable When you press the PIP button again the PIP picture returns to the TV picture and the PIP window closes Start and end picture in picture mode Show hide PIP In the Standard...

Страница 29: ...temporarily ban commercials or programme sections to the PIP picture in this way The PIP picture becomes the TV picture again PIP off Configure Picture in Picture PIP mode In the PIP menu you can set...

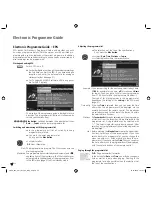
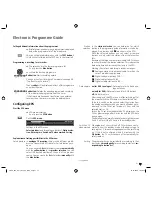
Страница 30: ...Awizardwillguideyouthroughthenecessarypresettings the first time you start the EPG If you have analogue reception you enter the data capture for analogue stations after that see page 31 For TV sets w...

Страница 31: ...eir start times chronologically or according to stations cor responding to station list Calling additional information about the programmes Brief information about many programmes is displayed below t...

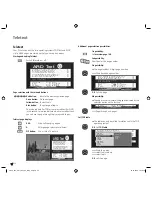
Страница 32: ...213 Fussball Heimsieg f r den Meister 204 100 100 ARDtext Do 07 09 06 14 14 42 ARD Text Inhalt tagesschau 13 00 ARD Mittagsmagazin 312 14 00 Tagesschau OK Tagesschau 110 112 Kultur 500 Wetter 170 Ges...

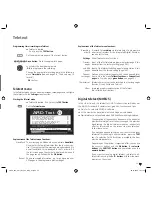
Страница 33: ...epresentation of the Teletext Not offered by all stations Digital teletext MHEG 5 In the UK or Ireland the teletext for DVB T stations is transmitted as per the MHEG 5 standard It contains text graphi...

Страница 34: ...h the remote control Red button OK button or RADIO button Switch on the screen on the TV set Press R on the TV set operating ring Radio menu In the Radio menu you can set the sound search for and stor...

Страница 35: ...button protrudes slightly when the CA module is inserted correctly Searching for encrypted stations The search wizard must only be started when the setting possibility no has been selected for the se...

Страница 36: ...B program provi ded Ask your local dealer for information whether a software update via DVB reception path is possible Automatic information by new software version In the Change update settings menu...

Страница 37: ...d new software after switch off to standby update option If a new software has not been updated by a DVB stati on you will be reminded of this several times when switching on the set If a new TV softw...

Страница 38: ...o standby If the TV set switches on from the standby mode by alarm a screen message appears If this is not confirmed within 5 minutes with the OK button the TV switches back off automatically for safe...

Страница 39: ...ave to be entered manually for some stations Enter the time and date manually if you receive station without tele text Call time and date Call TV menu Select Settings go to the menu line below Select...

Страница 40: ...wizard can be exited at any time with the END button OK Proceed The connection diagram shows the currently logged in equipment OK Proceed continued on next page p OK END Connection wizard Connect the...

Страница 41: ...f the external device If no is selected the analogue sound is used OK Proceed If you have registered a recorder into the connection wizard the Digital Link Plus transmission starts If a Digital Link P...

Страница 42: ...plugged between the coaxial digital output of the accessory equipment and the AUDIO DIGITAL IN socket of the TV set In addition the digital audio input must be assigned to the corresponding AV socket...

Страница 43: ...able from your dealer for this If you want to receive and record analogue stations with the receiver tuner built into the recorder the recorder must be looped into the aerial cable Connect the DVD rec...

Страница 44: ...yback on the connected HDMI device The best possible format for the picture is detected and set auto matically Digital Link HD in CEC capable devices With Digital Link HD accessory equipment with CEC...

Страница 45: ...GITAL IN socket of the TV set with a cinch cable The digital audio input can be assigned to the PC IN socket by TV menu Connections Miscellaneous Assign digi tal audio input see page 49 Playback from...

Страница 46: ...l cinch cable Alternatively connect the digital audio output of the exter nal device to the AUDIO DIGITAL IN socket of the TV set with a cinch cable The digital audio input can be assigned to the COMP...

Страница 47: ...ect your active speakers to the audio outputs AUDIO OUT L R of the TV set with cinch cables Switch the TV set to playback via active speakers Call TV menu Select Connections go to the menu line below...

Страница 48: ...tion Do not use the centre speaker connection of the amplifier use the centre pre amp output instead Connecting digital audio amplifiers Continuation of the left column above For digital audio transmi...

Страница 49: ...ec tion wizard at the factory If new devices are connected and registered in the connection wizard the digital audio input AUDIO DIGITAL IN is assigned in the connection wizard see page 41 Audio conne...

Страница 50: ...you use an external recorder without Digital Link Plus you have to select the recording source e g AUX in the recorder This is also the case when DVB broadcasts are to be recorded The TV s receiver is...

Страница 51: ...s complete For DVD recorders in addition the recording quality SQ or EQ is also transmitted The recording is then controlled by the recorder and the recorder tuner is used for reception of the program...

Страница 52: ...are available select with memory medium and then with OK start PhotoViewer Ending the PhotoViewer Remove used memory medium Or Press END button when photo list is displayed Or Press TV or RADIO button...

Страница 53: ...ry medium from which the photos are to be reproduced This menu item is only displayed if at least two memory media are available Open folder Folders will only be displayed if they were created on the...

Страница 54: ...e lights up TV REC DVD RADIO This allows you to check which operating mode the remote control is set to every time you press a button Setting the remote control to other Loewe devices The specified bu...

Страница 55: ...r for current operating mode Switch over to operate TV set Switch over to operate Recorder Sleep timer Set TV picture format RADIO Mono Stereo DISC Repeat RADIO display RDS name frequency of station D...

Страница 56: ...switch off position This is where you specify the position that the TV will take when it is switched off In order for the TV set to return to the determined switch off position when switching it off...

Страница 57: ...tly c The signal type is set incorrectly a In the connection wizard TV menu Connections New devices modifications compare the connection diagram with the actual installation and connect as illustrated...

Страница 58: ...TAL OUT from the TV set to a digital input of the external digital audio amplifier and select the appropriate input to this The picture of a connected external recorder is visible but the timer cannot...

Страница 59: ...ve MHEG 5 software MHEG 5 Connections max equipment Mains socket Supply voltage EURO AV 1 Video IN Y C S VHS Hi 8 CVBS VHS 8 mm Video OUT CVBS VHS 8 mm Y C S VHS Hi 8 Audio IN L R Audio OUT L R EURO A...

Страница 60: ...the Audio AC3 dts upgrade kit Numerous speaker combination possibilities with standing speakers satellite speakers and a subwoofer can be implemented Loewe Individual Sound Projector With the Loewe In...

Страница 61: ...Dual DVB T C z z z z USB port 1x 2x 1x 2x 1x 2x 1x 2x Single DVB S2 Art No 89565 081 Twin DVB S2 Art No 89565 080 Audio AC3 dts Art No 89781 080 MU RS232C Art No 89634 080 z ex factory available as an...

Страница 62: ...idual channels are broadcast sepa rately in this standard The three front channels right left and centre the two surround channels right and left and the external subwoofer channels are called a 5 1 s...

Страница 63: ...e Multimedia and Hypermedia Expert Group At the moment only available in United Kingdom and Ireland Modulator Transmitter in the video or DVD recorder so that the devices can receive signals via the t...

Страница 64: ...d to as terrestrial TFT Thin Film Transistor One widely distributed application is control of liquid crystal flat screens for which a signal transistor is used for each pixel This design of display is...

Страница 65: ...reen displays 39 Overview diagram 17 P Page selection 32 Parental lock 38 PC IN 45 Personal text pages 22 33 PhotoViewer 52 Picture 21 Picture adjustment 21 Picture format 21 22 Cinema 22 PALplus 22 P...

Страница 66: ...39 045 82 51 611 Fax 39 045 82 51 622 Email Stefano Borgognoni loewe it PL Trading pz 2004 Ltd 27 Aliat Hanoar St Givataiim 53401 Israel Tel 972 3 57 27 155 Fax 972 3 57 27 150 Email zeev loewe co il...

Отзывы: