


34
Seguridad
Estas instrucciones de montaje sirven para facilitar el montaje al técnico.
/DVLQVWUXFFLRQHVGHPRQWDMH,0QRHVWiQGHVWLQDGDVDOFOLHQWHÀQDO
Atención
El triángulo de advertencia señala indicaciones relativas a la protección de personas,
aparatos o el medio ambiente.
El texto de las advertencias aparece sangrado y el encabezado en negrita. Tenga en
cuenta estas advertencias.
Nota
Estas instrucciones de montaje son aplicables al kit de ampliación (KA) del chasis SL1XX RJ12/MU/IR-Link.
El KA está indicado para los siguientes televisores: Art 32/37/40/46 LED, Xelos 32/40 LED,
Connect 32/40 LED.
Después de montar el kit de ampliación, debe instalar el paquete de software actual que encontrará en las
siguientes páginas web: http://service.loewe.de http://infotip.de
Los números “(X)” que aparecen entre paréntesis hacen referencia a los números de posición del contenido
enumerado en el punto “1”.
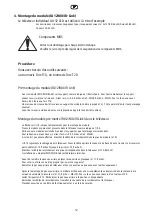
Estas instrucciones describen el montaje del kit de ampliación 70493 080.
1. Contenido – Kit de ampliación 70493 080 Module RJ12/MU/IR-Link
Nº pos.
Cantidad
Denominación
Nº. de referencia
(1)
1 IM
-KA
RJ12/MU/IR-Link
34649
000
(2)
1 RJ12/MU/IR-Link
SL1XX
J
70493
050
(3)
1 Soporte
Module
RJ12/MU/IR-Link 70970
001
(4)
1
Mazo de cables de 14 POL 600LG
70801 001
(5)
1 Espuma
de
contacto
14x14x40
33640
051
(6)
4
Tornillos SF M3 x 8.5 Torx-T10
34018
(7)
1
Tornillos DIN7985 M3 x 8.8 Torx-T10
33100
(8)
1 Tornillos
M4
x
10
T20 33434
(9)
1 Etiqueta
RJ12/MU/IR-Link
70947
101
(10)
1 Bolsa
protectora
165x205
11845
(11)
1 Bolsa
con
autocierre
47019
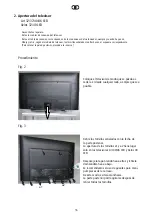
Fig. 1
(7)
(6)
(2)
(5)
(3)
(8)
(4)
(9)
Содержание 70493 080
Страница 2: ...2...
Страница 5: ...5...
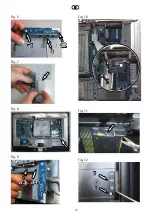
Страница 9: ...9 Abb 6 Abb 7 Abb 8 Abb 9 Abb 10 Abb 11 Abb 12 S K K E c a1 a2 b a3 a4...
Страница 11: ...11...
Страница 15: ...15 Fig 6 Fig 7 Fig 8 Fig 9 Fig 10 Fig 11 Fig 12 S K K E c a1 a2 b a3 a4...
Страница 17: ...17...
Страница 21: ...21 Fig 6 Fig 7 Fig 8 Fig 9 Fig 10 Fig 11 Fig 12 S K K E c a1 a2 b a3 a4...
Страница 23: ...23...
Страница 27: ...27 Afb 6 Afb 7 Afb 8 Afb 9 Afb 10 Afb 11 Afb 12 S K K E c a1 a2 b a3 a4...
Страница 29: ...29...
Страница 33: ...33 Ill 6 Ill 7 Ill 8 Ill 9 Ill 10 Ill 11 Ill 12 S K K E c a1 a2 b a3 a4...
Страница 35: ...35...
Страница 39: ...39 Fig 6 Fig 7 Fig 8 Fig 9 Fig 10 Fig 11 Fig 12 S K K E c a1 a2 b a3 a4...


