Locomotor Kelly Stand 124 Скачать руководство пользователя страница 4

KELLY STAND 


LOCO - 124    USER MANUAL


Page

4


Select Healthcare (UK) Ltd 
Unit 2 Albert Road 
Rushden 
Northants 
NN10 0BU Tel: 

01933 411729 Fax:  01933 410213 

Designed and Developed by: Proto Magic Innovations Ltd  Page 4  ISSUE 4 

KELLY STAND INSTRUCTIONS 07 23/02/2010


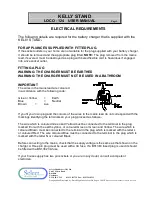
ELECTRICAL REQUIREMENTS 


The following details are required for the battery charger that is supplied with the 
KELLY STAND:- 
 
FOR APPLIANCES SUPPLIED WITH FITTED PLUG.


If the socket outlets in your home are not suitable for the plug supplied with your battery charger, 
it should be removed and the appropriate plug fitted. NOTE: The plug removed from the mains 
lead, if severed, must be destroyed as a plug with bared flexible cord is hazardous if engaged 
into a live socket outlet. 
 

FITTING A PLUG 
WARNING: THE CHARGER MUST BE EARTHED 
WARNING: THE CHARGER MUST NOT BE USED IN A BATHROOM 


IMPORTANT


The wires in the mains lead are coloured  
in accordance with the following code: 
 
Green / Yellow 

Earth 

Blue   


Neutral 

Brown  

Live 


If you fit your own plug and the colours of the wires in the mains lead do not correspond with the 
markings identifying the terminals on your plug proceed as follows:- 
 
The wire which is coloured Green and Yellow must be connected to the terminal in the plug 
marked E or with the earth symbol, or coloured Green or Green and Yellow. The wire which is 
coloured Brown must be connected to the terminal in the plug which is marked with the letter L 
or coloured Red. The wire coloured Blue must be connected to the terminal in the plug which is 
marked with the letter N or coloured Black. 
 
Before connecting to the mains, check that the supply voltage is the same as that shown on the 
charger. A three pin plug must be used with a 3A fuse. If a BS1363 fused plug is used it should 
be fitted with a BS1362 3A fuse. 
 
If your house supply has two pin sockets or you are in any doubt, consult a competent 
electrician.


Содержание Kelly Stand 124

Страница 1: ... STAND INSTRUCTIONS 07 23 02 2010 ENSURE THESE INSTRUCTIONS ARE FULLY READ AND UNDERSTOOD BEFORE USE PLEASE KEEP IN A SAFE PLACE FOR FUTURE REFERENCE HEALTH AND SOCIAL SERVICES THESE INSTRUCTIONS SHOULD BE LEFT WITH THE USER OF THE LOCOMOTOR KELLY STANDTO CONSULT AS REQUIRED CONTENTS PACKING LIST TECHNICAL SPECIFICATION APPROVED SLING LIST SPARE PART LIST Always charge battery when not in use BEFO...

Страница 2: ...ase retain the carton if possible Inside this carton you will find the following A Battery Item 1 B Grey Hand Control Item 3 C Chassis Assembly Item 4 D Mast Assembly Item 5 E Charger Item 7 F Test Certificate G User Manual The TEST CERTIFICATE is valid for ONE year and can be used for your insurance records Once the first year has expired the Locomotor KELLY STAND will require a new inspection an...

Страница 3: ...and Shin pad Handle bars are fitted like this for transit do not attempt to use the Kelly stand with the handle bars in this position Remove by unscrewing the handle bar lock handwheels Refit handle bars in this position and fully tighten bar lock handwheels The shin pad comes assembled in one of it s four positions ready for use To reposition the shin pad remove by unscrewing the shin pad lock ha...

Страница 4: ...IMPORTANT The wires in the mains lead are coloured in accordance with the following code Green Yellow Earth Blue Neutral Brown Live If you fit your own plug and the colours of the wires in the mains lead do not correspond with the markings identifying the terminals on your plug proceed as follows The wire which is coloured Green and Yellow must be connected to the terminal in the plug marked E or ...

Страница 5: ...See diagram 2 1 Place the base chassis 4 on a level floor 2 2 Locate the mast assembly 5 onto the chassis spigot 10 then lock with the mast lock hand wheel 11 2 3 Plug the lead for the powered leg opener 12 onto the leg actuator power socket 13 on the under side of the battery compartment 28 2 4 Plug the lead for the lift actuator 18 onto the lift actuator power socket 6 on the back of the battery...

Страница 6: ...roved sling list please take care to select the best sling for the client s need 3 4 Standing Select a suitable sling Assess the height of the patient in his or her chair and adjust the height of the attachment point karabiner 27 using hand controller 3 Adjust the width of the legs to fit round the clients chair using the leg opening button 21 on the hand controller 3 and position the KELLY STAND ...

Страница 7: ...Proto Magic Innovations Ltd Page 7 KELLY STAND INSTRUCTIONS 07 3 5 Moving the Locomotor KELLY STAND Always make sure the brakes are off when moving the KELLY STAND Try to pull the KELLY STAND rather than push either in a circular motion by pulling sideways on one handle or backwards by pulling on both handles 37 Never move unnecessary distances with the client suspended ...

Страница 8: ... the back of the instruction manual 6 2 DO ensure that you carry out an inspection of the Locomotor KELLY STAND on a regular basis 6 3 DO make sure that when the KELLY STAND is not in use the battery is removed and placed on charge 1 in the charger 7 6 4 DON T let children play with the Locomotor KELLY STAND 6 5 DON T exceed the safe working load of a 203 kgs person 32 stones There is an audible a...

Страница 9: ...ry a newly charged battery o o e Is green battery OK lamp 31 on the battery compartment 28 on If YES GO TO j o o f Is amber change battery lamp on 32 on the battery compartment 28 on If YES charge battery 1 or replace with fully charged battery if NO GO TO d o o g Is KELLY STAND bleeping and red charge battery lamp on 33 on the battery compartment 28 on If YES charge battery or replace with fully ...

Страница 10: ...8 on If YES GO TO f If NO then try a newly charged battery o o f Is green battery OK lamp 31 on the battery compartment 28 on If YES GO TO j o o e Is amber change battery lamp on 32 on the battery compartment 28 on If YES charge battery or replace with fully charged battery GO TO f o o f Is KELLY STAND bleeping and red charge battery lamp on 33 on the battery compartment 28 on If YES charge batter...

Страница 11: ...LL NOT CHARGE a Check green power on lamp 7 is on If NO replace fuse in mains plug with 3 amp fuse If YES GO TO c if NO GO TO b o o b Check mains socket is switched on then try another mains socket If YES GO TO c if NO GO TO d o o c If amber charge light does not come on when battery is inserted GO TO d o o d If charger is still not working CUSTOMER SERVICE ON 01933 411729 IF YOU ARE IN ANY DOUBT ...

Страница 12: ...ble and plug for any damage BATTERY 1 Check for damage to the casing where the battery may have been dropped paying particular attention to the integrity of the weld joints Charge regularly follow the rule of putting the battery on charge after using the KELLY STAND and leaving it on charge when the KELLY STAND is not in use DO NOT ALLOW BATTERY TO BECOME COMPLETELY DISCHARGED HAND CONTROL 3 Check...

Страница 13: ...m 2 3 REAR BRAKED CASTOR DIAMETER 100mm 4 0 REAR BRAKED CASTOR WIDTH 60mm 2 3 TURNING RADIUS 635mm 25 0 WEIGHT OF CHASSIS SECTION 17 5Kg 38 5 lbs WEIGHT OF MAST SECTION 18 0Kg 39 6 lbs WEIGHT OF BATTERY 1 9 Kg 4 2 lbs ELECTRICAL TECHNICAL SPECIFICATION 24 VOLT PLUG IN ELECTRICAL POWER SOURCE TYPE B CHARGER OUTPUT VOLTAGE 27 5V DC 500 mA Max CHARGER INPUT VOLTAGE 220V 240V 50 Hz PLUG TOP FUSE 1 5 A...

Страница 14: ...escription Size Loco 055 Locomotor Stander Sling Small Loco 056 Locomotor Stander Sling Medium Loco 057 Locomotor Stander Sling Large Loco 058 Locomotor Stander Sling Extra Large APPROVED SPARE PARTS LIST Mk2 Issue 1 Product Code Description Size LOCO 103 Battery 24V 2 Ah LOCO 104H Grey Hand Control LOCO 105 Charger APPROVED ACESSORIES Issue 1 Product Code Description Size LOCO 125 Spreader Bar If...

Страница 15: ... USER MANUAL Page15 Select Healthcare UK Ltd Unit 2 Albert Road Rushden Northants NN10 0BU Tel 01933 411729 Fax 01933 410213 Designed and Developed by Proto Magic Innovations Ltd Page 15 KELLY STAND INSTRUCTIONS 07 Diagram ...

Страница 16: ...NS 07 GLOSSARY Attention consult accompanying Full battery documents before use Refer servicing to Low battery servicing personnel only Recyclable product Flat battery Overload check Lead acid battery weight and make sure sling is not trapped Do not dispose Hand controller of in the bin socket Do not dispose Mains on of in a fire Do not allow the Charging Battery to get wet Up Alternating current ...

Страница 17: ...NN10 0BU Tel 01933 411729 Fax 01933 410213 Designed and Developed by Proto Magic Innovations Ltd Page 17 KELLY STAND INSTRUCTIONS 07 GLOSSARY If sounder bleeps when lifting please change battery Emergency manual lowering release lever Type B equipment Protection against electric shock CE Emergency stop ...

Отзывы: