


12
lococookers.com
2. Completely open LP tank valve by turning
hand wheel counterclockwise. If you hear
a rushing sound turn gas off immediately.
This means there is a major leak at the
connection. Correct before proceeding.
3. Using a clean paintbrush and 50/50 soap
and water solution, brush soapy solution
onto areas indicated by arrows below.
Use mild soap and water. DO NOT use
household cleaning agents. Damage to gas
train components could result.
4. If “growing” bubbles appear, there is a
leak. Close LP tank valve immediately and
retighten connections. If leaks cannot be
stopped, do not try to repair.
5. For assistance with any malfunction related
to the LP tank, regulator or hose, contact
your propane dealer or customer service.
INSTRUCTIONS FOR LIGHTING BURNER:
1. Read all instructions before lighting. Only
light burner outdoors.
2. Confirm that the regulator control knob and
LP tank valve are completely closed and in
the OFF position.
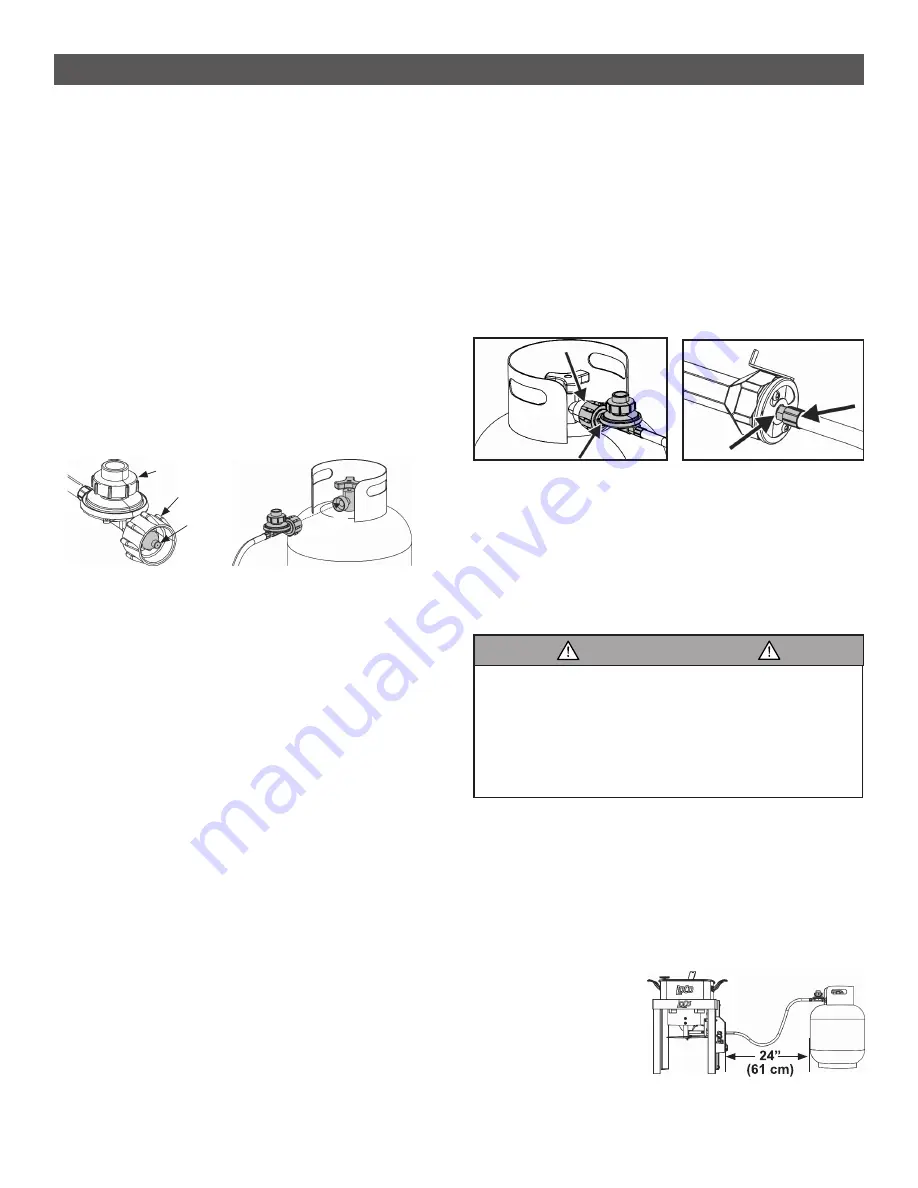
3. Ensure a
minimum of 24
inches (61 cm)
separate the
LP tank and the
appliance.
OPERATING INSTRUCTIONS
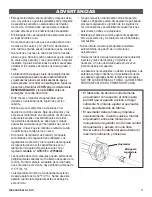
CONNECTING REGULATOR TO LP TANK:
1. Place LP tank on a secure, level and stable
surface.
2. Turn regulator control knob to the OFF
position by rotating counterclockwise to a
full stop.
3. Turn LP tank OFF by turning hand wheel
clockwise to a full stop.
4. Remove the protective cap from LP tank.
Always use cap and strap supplied with
valve. DO NOT use a POL transport plug. It
will defeat the safety feature of the valve.
5. Hold regulator, insert nipple into LP tank
valve. Hand-tighten the coupling nut while
holding the regulator in a straight line with
LP tank valve so as not to cross-thread the
connection.
6. Turn the coupling nut clockwise and tighten
to a full stop. The regulator will seal on
the backcheck. An additional one-half to
three-quarters turn is required to complete.
Tighten by hand only. DO NOT USE
TOOLS.
NOTE: If you cannot complete the
connection, repeat steps 5 and 6. If you are
still unable to complete the connection, DO
NOT use this regulator.
LEAK TESTING VALVES, HOSE AND
REGULATOR:
• Leak test must be repeated each time LP
tank is exchanged or refilled.
• DO NOT smoke or have anything nearby
that can easily ignite, such as lighters or
matches.
• DO NOT use an open flame to check for
gas leaks.
• Appliance must be leak tested outdoors in a
well-ventilated area away from open flames
or sparks.
STEPS TO LEAK TEST:
1. Turn LP tank valve and regulator control
knob to the OFF position and make sure
regulator is tightly connected to LP tank.
If “growing” bubbles appear, there is a leak.
IMMEDIATELY turn off LP tank valve. If
bubbles continue, IMMEDIATELY get away
from the LP tank and contact your FIRE
DEPARTMENT (911).
WARNING
Regulator
Coupling Nut
Center nipple
in LP tank
valve
Straight
Содержание LCFFSS12
Страница 19: ...18 lococookers com...
Страница 39: ...18 lococookers com...


