


9
lococookers.com
HOW TO STEAM
HOW TO FRY
Steaming food in your appliance is very similar to
boiling . . . using much less water. When steaming,
you can place your basket of food into the pot
before starting the appliance to heat the water.
1. Place the basket, with
or without food, into the
cooking pot and
fi
ll the
pot with just enough
water to reach the bottom
of the basket.
2. With the water, basket and food in the cooking
pot, place the lid on and start the appliance
to begin heating the water as indicated in the
“Touch-Screen Controls” section.
Steaming will begin when the water reaches
boiling temperature.
3. Steaming time will vary depending on the type
of food being steamed. Refer to food packaging
instructions for speci
fi
c steaming times.
4. Be sure to monitor the water level in the cooking
pot periodically, particularly during long periods
of steaming.
Do not allow the cooking pot to boil dry.
Add water if necessary to maintain proper
water level. If all water evaporates, you will
hear beeping for 60 seconds and then the
fryer will stop heating once it reaches 248ºF
(120ºC). Press the start/stop button to stop
the fryer from beeping. Add water and restart
to continue steaming.
5. After time has elapsed, remove the lid and use
the lifting hook to remove the basket of food
from the pot.
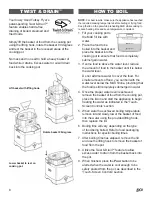
6. Utilize the Twist & Drain
TM
feature to allow
excess water to drain from the basket back into
the pot.
7. When
fi
nished, press the
Pour
button to be
alerted when the water is cool enough to be
safely poured from the pot, as described in the
“Touch-Screen Controls” section.
NOTE:
For best results, make sure the appliance has reached
the required cooking temperature before boiling or frying
food. Keep the lid on the pot while preheating AND while
cooking to reduce heating time and keep temperature
consistent.
1. To determine the amount of oil required to fry
your food, place the basket of food into the
empty pot and add water to the pot until the
food is completely submerged.
2. Remove the basket of food and use the Twist
& Drain
TM
feature to allow excess water to
drain from the basket back into the pot.
3.
The water level should never be above
the MAX
fi
ll line.
If the water level is above
the MAX
fi
ll line once the basket of food is
removed, reduce the amount of food in the
basket until the water level will remain at or
below the MAX
fi
ll line.
4. Measure the amount of water in the pot. This
is the amount of oil required. Empty the water
from the cooking pot and thoroughly dry the
pot, basket and food before you begin frying.
5. Fill the cooking pot with the measured amount
of oil and place the lid on the pot.
Never fry
with oil below the MIN
fi
ll line.
6. Start the appliance to begin heating the oil
as indicated in the “Touch-Screen Controls”
section.
7. When oil has achieved frying temperature,
remove lid and
slowly
lower the basket of food
into the oil using the provided lifting hook, then
replace the lid.
8. Frying time will vary depending on the type of
food being cooked. Refer to food packaging
instructions for speci
fi
c frying times.
9. After boiling time has elapsed, remove the lid
and use the lifting hook to remove the basket
of food from the pot.
10. Utilize the Twist & Drain
TM
feature to allow
excess oil to drain from the basket back into
the pot.
11. When
fi
nished, press the
Pour
button to be
alerted when the water is cool enough to be
safely poured from the pot, as described in the
“Touch-Screen Controls” section.
Содержание LCCFTC
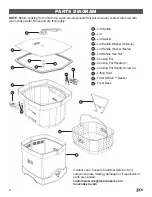
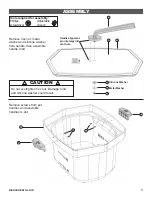
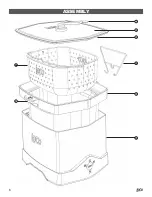
Страница 6: ...6 ASSEMBLY 11 1 2 3 10 7 8 12...


