background image

21

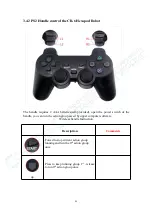
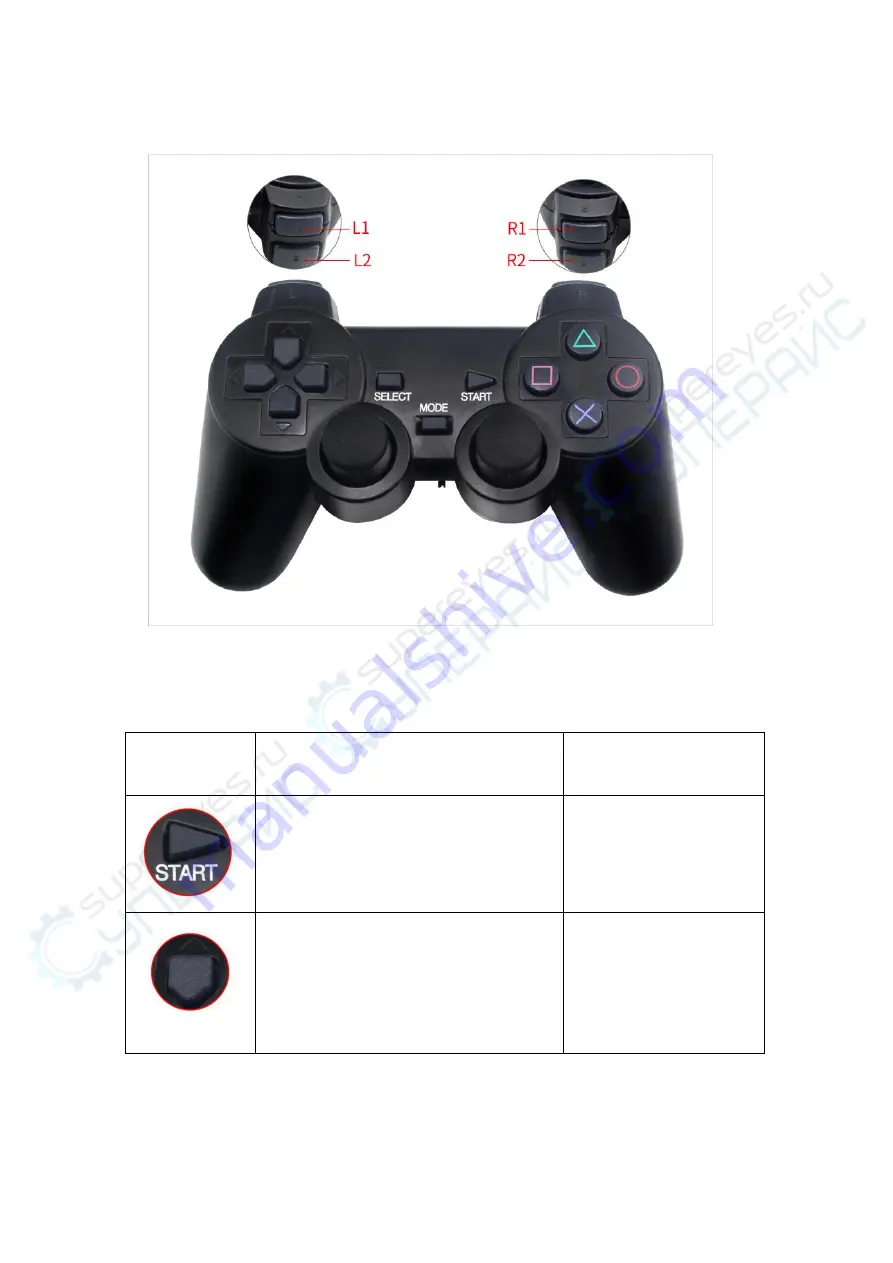
3.4.2 PS2 Handle control the CR-6 Hexapod Robot

The handle requires 2 AAA batteries(self-provided), open the power switch of the

handle, you can run the action group saved by upper computer software.

Wireless handle Instruction

Description

Comments

Forced to stop current action group

running and run the 0

th

action group

once

up

Press to keep running group 1

st

, release

to run 0

th

action group once

Содержание CR-6

Страница 1: ...CR 6 Hexapod Robot User Manual ...

Страница 2: ...ease switch off the electricity and charge it right away 9 If you find the robot moving unsteadily you can check the capacity of battery please remember to charge it when the battery is running out If there is no problem in battery you can check the servo whether it is aging or not Servo is consumables It needs to be replaced after overusing it 10 If you find the individual servo doesn t work whil...

Страница 3: ...nnect to the power supply and only connect to USB the buzzer will send the alarm so be sure to connect the power supply and generally use 7 4v lithium battery for power supply 16 If you have trouble with the instruction manual or the complete video tutorial you can contact our customer service feedback if there is any problem or suggestion that you can t solve ...

Страница 4: ...dule 6 3 2 1 Download Mobile App 6 3 2 2 Mobile phone App control the CR 6 Hexapod Robot 7 3 3 PC operation 15 3 3 1 Overview 15 3 3 2 Software interface introduction 15 3 3 3 About the PC software driver 19 3 4 PS2 handle 20 3 4 1 Connection method for handle receiver and steering board 20 3 4 2 PS2 Handle control the CR 6 Hexapod Robot 21 3 5 Gameplay and Its Corresponding Programs This section ...

Страница 5: ...ht of the body makes the robot more flexible and stronger B Plug in digital servo With the new plug in digital servo the torque is large the precision is high the virtual bit is small the dead zone is small the robot action is more flexible and powerful the new plug type makes the installation or replacement of the servo more convenient C Super long endurance All aspects of the robot are optimized...

Страница 6: ...of bracket for robots 1 LDX 218 High precision digital servo 18 PS2 handle PS2 handle signal receiver 1 7 4V Lithium battery charger 1 Digital servo cord 1 20 channel servo controller 1 USB cable 1 Winding pipe Several Whole set of development kit CR 6 Hexapod Robot body 1 Photosensitive sensor 3 Infrared remote controller Infrared remote receiver 1 OLED LCD screen 1 Ultrasonic module 1 Infrared s...

Страница 7: ...3 LEONARDO controller 1 Dupont cord 60 Bread broad 1 Bluetooth module Separate purchase 1 Charger 1 9g Micro servo 1 Acrylic switchboard 1 Tips 1 The Bluetooth module needs to be purchased separately ...

Страница 8: ...1 92kg Material Extra lightweight aluminum alloy Leg length 23cm Trunk length 17 5cm Width 15 5cm DOF 18 3DOF 6 Running time About 80 min Bluetooth module Support Programming software LSC 20 Control Power supply 7 4V 2200mAh Lithium battery ...

Страница 9: ...ate during assembly If the servo is not successfully installed and happen to rotate please remove it and readjust the servo s P value to 1500 4 Please connect the Bluetooth in the App not setting After the connection is successful it can be operated The android version of the App holds down the icon to change the name of the action Here are the link and QR code concerning installation package of C...

Страница 10: ... 2 1 Download Mobile App Android Only Here are the icon and link and QR code Table 2 Table 2 Icon Link QR code http bit ly 2GeaBAD Tips 1 If you open the Installation package you can find the Mobile App icon as shown in the figure above Here is the icon of CR 6 Hexapod Robot App ...

Страница 11: ...CR 6 Hexapod Robot 1 First turn on the switch of the CR 6 Hexapod Robot 2 Then open the CR 6 Hexapod Robot App that have been download on your mobile phone 3 After connecting the Bluetooth you can start controlling your CR 6 Hexapod Robot ...

Страница 12: ...pp and reconnect several times Please remember using the Bluetooth inside the phone App rather than the one on your phone system If you connect to the CR 6 Hexapod Robot successfully you can do the following Here is the interface of the App ...

Страница 13: ... Icon Meaning Icon Meaning The value is displayed as a voltage value Box shows the power when the box is blue said power is enough when the box was red battery is low This button means that you can import dance actions programs in CR 6 Hexapod Robot ...

Страница 14: ...bot If you click it CR 6 Hexapod Robot will perform wave this action If you click it CR 6 Hexapod Robot will perform catch forward this action If you click it CR 6 Hexapod Robot will perform fighting this action If you click it CR 6 Hexapod Robot will perform kick this action If you click it CR 6 Hexapod Robot will perform catch backward this action ...

Страница 15: ...11 If you click the About button you will see the picture above It shows the version information of the App you installed ...

Страница 16: ...lear all previous program data and back to the factory settings If you click the Custom button or More button you will see the picture above The results presented by these two buttons are the same The Custom button means that you can import dance action the More button means that you can import action group ...

Страница 17: ...gram You will see the picture like below Note 1 Each button corresponds to a specific action group which cannot be repeated and the default is those actions otherwise it will go wrong 2 The action name can be re edited after the long press button but the number cannot be changed because the number is the unique identification mark of the different action group and cannot be changed at will ...

Страница 18: ...14 3 The control part of mobile phone or PS2 handle is secondary development 4 At present we provide the program of action group NO 0 NO 12 NO 21 NO 42 ...

Страница 19: ...icon and link and QR code Table 3 Table 3 Icon Link QR code http bit ly 2jVgf1R You can also refer to 3 1 Overview 3 3 2 Software interface introduction Open the PC software here is the icon of the PC software Here is the interface of the PC software ...

Страница 20: ...When the adjustment is made the adjustment deviation is needed Servo deviation default is 0 the relative position range of the servo is 100 100 Click on the white area of the slider the deviation value slider moves towards the mouse direction the step value is 1 and press and hold will move continuously After adjusting the deviation of each servo click the download deviation button and the deviati...

Страница 21: ...ponding column indicates the position of the servo Time indicates the Time when the servo runs to that position 5 Download action group and debug window 6 Action online debug window Set a single action time Set a single action Delete the selected action Update the selected action action time and servo angle Insert an action above the selected row Loop the action group Run the action online All ser...

Страница 22: ... control board Stop the operation of the action group Erase the action in the set action group Run the action in the set action group Download the action group in the interface to the set action group The previously saved action group is now below the action group that is currently being edited Save the action group you are editing Open the previously saved action group ...

Страница 23: ... to the computer the indicator light of the interface will turn green This indicates that the connection is successful 2 Ensure that the voltage of 7 4V lithium battery is no less than 6 4V 7 4V lithium battery full of electricity is 8 4V please ensure that the voltage is not less than 6 4V preferably full power 3 Pull the slider The pull of the servo will rotate with the rod 5 Placed in the posit...

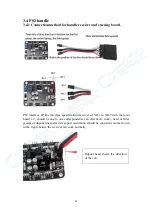
Страница 24: ... specification receiver of NO 1 to NO 9 with the main board 1 9 should be one to one correspondence can effectively work head of three groups of dupont line metal dew export orientation should be consistent and as shown in the figure below the receiver can work normally Dupont head shows the direction of the exit ...

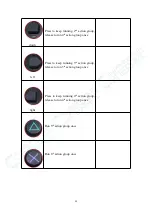
Страница 25: ...ed open the power switch of the handle you can run the action group saved by upper computer software Wireless handle Instruction Description Comments Forced to stop current action group running and run the 0th action group once up Press to keep running group 1st release to run 0th action group once ...

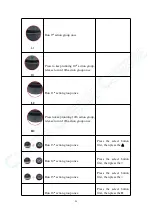
Страница 26: ...elease to run 0th action group once left Press to keep running 3rd action group release to run 3rd action group once right Press to keep running 4th action group release to run 4th action group once Run 5th action group once Run 6th action group once ...

Страница 27: ...eep running 12th action group release to run 12th action group once Run 13th action group once Press the select button first then press the Run 14th action group once Press the select button first then press the Run 15th action group once Press the select button first then press the Run 16th action group once Press the select button first then press the O ...

Страница 28: ...ntrol the NO 0 NO 20 action group and the remaining action group needs to be operated by mobile APP or computer 6 The mode keys and joysticks are not set up the function do not press the these buttons otherwise it is possible to make mistakes SELECT L1 Run 17th action group once Press the select button first then press the L1 SELECT R1 Run 18th action group once Press the select button first then ...

Страница 29: ...and Its Corresponding Programs This section is wrote for 2 times development You can get gameplay and its corresponding programs on the following Here is the icon link and QR code Icon link QR code http bit ly 2jVgf1R ...

Страница 30: ...26 ...

Отзывы: