background image

17

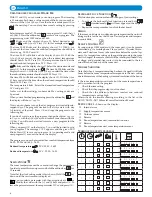
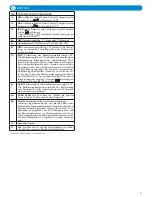
Impostazione della modalità di funzionamento

Il termostato ha tre modalità di funzionamento: 

automatico, comfort


vacanza/timer

, che possono essere selezionati come segue. Abbas-

sare lo sportello. Usare i tasti di navigazione 

 oppure 

 per 

scegliere la modalità di funzionamento. Premere 

OK

 per confermare.

Modalità comfort 

Modalità di funzionamento con temperatura fi ssa tutto il giorno. 

La temperatura può essere modifi cata con (+) o (-). Valore preim-

postato della temperatura comfort è 21 ° C.

Modo automatico


In questa modalità il termostato segue il programma selezionato 

(preimpostato 

P1-P9

 o personalizzato dall’utente 

U1

 o 

U2)

. Per 

impostare/modifi care il programma selezionato vedere la sezione 

Modalità di programmazione 

P

.

I cambiamenti di temperatura programmati possono essere modi-

fi cati temporaneamente usando i tasti (+) o (-). La temperatura 

impostata lampeggia per alcuni secondi. Il simbolo comfort 

lampeggia mostrando che la temperatura del programma in corso

è stata modifi cata. 

Il termostato torna automaticamente al programma a partire dalla 

successiva fase del programma.

Notare che le modifi che apportate alla temperatura nei periodi 

comfort sono permanenti. 

Modalità Vacanze / timer


La modalità Vacanze/Timer consente di impostare la temperatura 

ambiente desiderata da 1 ora a 255 giorni. 

Selezionare la modalità di funzionamento 

. La temperatura 

lampeggia. Impostare la temperatura e premere 

OK

.

 01d 

lampeggia. 

Selezionare la durata desiderata del periodo con (+) e (-) e premere 

OK

. Il simbolo 

 lampeggia per tutto il periodo.

Quando il periodo in modalitá vacanza é terminato, il cronotermo-

stato ritorna alla modalitá precedentemente impostata.

Modalità di programmazione 

Abbassare lo sportello. Usare i tasti di navigazione 

 oppure 

 per selezionare la modalità di programmazione 

P

. Premere 

OK


per confermare.

Con (+) o (-) scegliere uno dei programmi preimpostati da 

P1

 a 

P9


oppure uno dei programmi personalizzati 

U1

 o 

U2

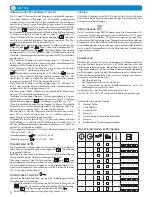
Il periodo di temperatura comfort viene visualizzato nella barra, in 
basso sul display. Un segmento lampeggiante mostra l’orario attuale
 

  = 

Modalità Fuori Casa

 - Temperatura programmata. 

                Valore preimpostato: 17°C

 = 

Modalità Notturna

 - Temperatura programmata. 

                Valore preimpostato: 19°C

Programmi preimpostati da P1 a P9

Programma

Temperatura comfort / programmata

P1 Lavoro a 

tempo pieno

Comfort (giorni 1-5) 06:00 - 09:00, 

16:00 - 23:00, (giorni 6-7) 08:00 - 23:00

P2 Lavoro a 

tempo pieno, 

pranzo a casa

Comfort (giorni 1-5) 06:00 – 09:00, 

11:00 – 13:00, 

16:00 – 23:00, (giorni 6-7) 08:00 – 23:00

P3 A casa tutto 

il giorno

Comfort (giorni 1-5) 06:00 – 23:00, 

(giorni 6-7) 08:00 - 23:00

P5 3 turni, 

turno di giorno

Comfort 04:00 – 06:00, 13:00 – 21:00

P4 3 turni, 

turno di sera

Comfort 07:00 – 14:00, 21:00 – 24:00

P6 3 turni, 

turno di notte

Comfort 05:00 – 08:00, 15:00 – 22:00

P7 Uffi cio

Comfort (giorni 1-5) 07:00 – 18:00

P8 Negozio

Comfort (giorni 1-6) 08:00 – 19:00

P9 Seconda 

casa

Comfort (giorni 1) 06:00 – 09:00, 

(giorni 5) 15:00 – 24:00, (giorni 6-7) 06:00 – 23:00

La temperatura preimpostata per la modalità fuori casa e notturna può 
essere modificata in modalità di servizio.

Impostazione di data e ora 

Abbassare lo sportellino e tenere 

 premuto per 2 secondi per 

accedere al menu data e ora. Il valore che lampeggia può essere 

modifi cato con (+) o (-). Quando l’impostazione è terminata, confer-

mare con OK. Il display mostra automaticamente il valore successivo. 

Nota! Si può tornare al valore precedente premendo  

 .

Ora e giorno:

Le ore

 lampeggiano

Impostare l’ora e premere 

OK

I minuti

 lampeggiano

Impostare i minuti e premere 

OK

Il giorno

 della settimana lampeggia Impostare il giorno della settima-

na e premere 

OK

Data:

Il giorno

 lampeggia

Impostare il giorno e premere 

OK

Il mese

 lampeggia

Impostare il mese e premere 

OK

L’anno

 lampeggia

Impostare l’anno e premere 

OK

Quando appare il messaggio

 Save 

e il led verde lampeggia, premere 

OK

 per confermare l’impostazione di data e ora. 

Il termostato è pronto all’uso.  

La modalità di funzionamento preimpostata é quella con la tem-
peratura comfort per tutto il giorno, se non vengono effettuate altre 
impostazioni.

Si può selezionare un programma preimpostato oppure creare un 
programma personalizzato.
Vedere le sezioni 

Impostazione della modalità di funzionamento 

Modalità di programmazione

.

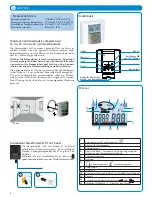
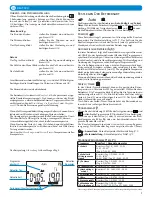
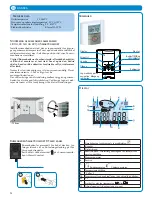
La retroilluminazione del display è normalmente spenta e si attiva 
alla pressione di un tasto qualsiasi. 
Il termostato mostra normalmente l’attuale temperatura ambiente. 
Premendo su 

OK

 il display mostra la temperatura esterna (solo se 

un sensore esterno è collegato all’attuatore). 

Premendo (+) o (-) il display mostra la temperatura impostata.
In questa posizione è possibile regolare la temperatura comfort 
programmata. La temperatura comfort è la temperatura desid-
erata durante le ore diurne. La temperatura desiderata per le ore 
notturne o per le vacanze/timer va impostata separatamente.

L’esempio mostra la temperatura notturna, un mattino presto del 
giorno 3.

IT 

  ITALIANO

Programma 

selezionato

Ora attuale  

Giorno attuale    

Periodi di temperatura comfort

Fase del 

programma

Содержание SmartComfort LK 120

Страница 1: ...INSTRUCTION MANUAL BEDIENUNGSANLEITUNG MANUEL D INSTRUCTION MANUALE DI ISTRUZIONI ASENNUS JA KÄYTTÖOHJE INSTRUKTIONSMANUAL SmartComfort RT ...

Страница 2: ...thermostat Unité d ambiance Affichage 12 Réglage de l heure et de la date Installation du mode de fonctionnement 13 Programme utilisateur U1 et U2 Mode Service Verrouillage clavier Ventilation Commande à distance Problèmes et solutions Calendrier pour programme utilisateur 14 Paramètres et fonctions 15 Pièces de rechange 32 Inhaltsverzeichnis Seite Vorwort Technische Daten Montage der Raumeinheit ...

Страница 3: ...nale qualificato Tutte le istruzioni contenute nel presen te manuale devono essere lette e comprese prima di iniziare il lavoro con SmartComfort Per ragioni di sicurezza non è con sentito apportare modifiche o aggiunte al prodotto Utilizzare solo l alimentatore originale Attenzione Rischio di lesioni personali Scollegare l alimentazione elettrica prima di iniziare l installazione Attenersi alle pr...

Страница 4: ... room about 1 5 m above the floor See mounting picture To ensure good air circulation a spacer ring should be placed between wall and room unit An opening for the cable is made with a suitable tool 1 5 m 20 cm Room Temperature Unit 1 Remote control e g via mobile phone 2 Keyboard s lock function 3 Operating mode 4 Boost function Temporary power boost when raising the temperature setting 5 Program ...

Страница 5: ...00 09 00 day 5 15 00 24 00 day 6 7 06 00 23 00 The factory temperature settings for away and sleep modes can be changed in the Service menu Operating Modes The unit has three operating modes Auto Comfort and Holiday Timer mode Open the cover to have access to the navigation keys and Select the desired operation mode and press OK Comfort mode Operating mode with fixed temperature around the clock T...

Страница 6: ...omfort temperature from 06 00 09 00 and 16 00 24 00 Reduced temperature 20 C 00 00 06 00 Reduced temperature 18 C 09 00 16 00 Service Mode The room temperature unit has a menu to change the parameters In order to enter this menu press and hold the edition key for 10 seconds Note that the clock setting mode is first shown Hold the key down until the service menu is displayed Now you can select a pa...

Страница 7: ... displayed to indicate that no calibration has been made To enter the value shown on the thermo meter use and keys to enter the real value Then press OK to confirm The message YES is displayed and the value will be stored in the internal memory You can cancel the calibration by pressing OK and then 31 OutC Calibration of outdoor temperature sensor 10 C 17 F The same calibration procedure described...

Страница 8: ...rs in der Höhe ca 1 5 m von Boden Sehen Sie das Montagebild Um gute Luftzirkulation sicherzustellen sollte ein Distanz ring zwischen Wand und Raumeinheit angebracht werden Eine Öffnung für das Kabel wird mit geeignetem Werkzeug gemacht 1 5 m 20 cm Raumeinheit Display DE DEUTSCH Technische Daten Betriebstemperatur 0 Cbis40 C 32 Fbis104 F Transport und Lagertemperatur 10 C bis 50 C 14 F bis 122 F Ei...

Страница 9: ...d des Betriebs angezeigt Automatischer Betrieb In dieser Betriebsart folgt die Raumeinheit das ausgewählte stand ard P1 P9 oder benutzerdefinierte U1 oder U2 Programm ent sprechend der jeweiligen Uhrzeit und den eigestellten Sollwerten für die Komfort und die Absenktemperaturen Für Einstellung und Änderung der Programme sehen Sie Kapitel Programmart P Um die Solltemperatur bis zum nächsten Program...

Страница 10: ...eitblinkt00 00 unddie Anzeige zeigt 01A Mit den Tasten oder stellen Sie die Uhrzeit wenn dieAbsenktemperatur diesen Tag starten soll 00 00 und bestäti genSiemitOK Die Uhrzeit 00 30 blinkt und die Anzeige zeigt 01b Mit den Tas ten oder stellen Sie die Uhrzeit wenn die Absenktemperatur stoppten soll 06 00 und bestätig Sie mit OK Die Temperatur blinkt Wählen Sie die gewünschte Absenk temperatur 20 C ...

Страница 11: ...rde keine Kalibrierung durchgeführt Geben Sie mit Hilfe der Tas ten und den vom Thermometer angezeigten Istwert ein Drücken Sie OK Yes erscheint und der Wert wird im internen Speicher abgelegt Um einen Kalibrier ungswert zu löschen drücken Sie OK und dann 31 OutC KalibrierungderAussentemperaturanzeige 10 C Die Kalibrierungsmethode entspricht der Beschreibung zum Parameter 30 AirC weiter oben aber ...

Страница 12: ...un fonctionnement optimal tous les robinets thermostatiques des radiateurs se trou vant dans la pièce du thermostat d ambiance doivent être ouverts Attention Le thermostat n est pas protégé contre les écla boussures ou les gouttes d eau il doit donc être monté dans un endroit sec Pour des perfomances optimales il ne devrait non plus être exposé directement au soleil la chaleur rayon nante ou coura...

Страница 13: ... Mode Automatique Dans ce mode votre thermostat suivra le programme que vous avez choisi préétabli P1 P9 ou utilisateur U1 ou U2 Pour l installation modification du programme sélectionné re portez vous à la partie Mode Programme P Vous pourrez très facilement modifier temporairement la tempéra ture programmée d un palier de votre programme à l aide de ou La consigne clignotera et vous pour rez l a...

Страница 14: ...mme qui a été créé dans l exemple ci dessus a la tempé rature de confort entre les heures 06 00 09 00 et 16 00 24 00 Température programmée 20 C 00 00 06 00 Température programmée 18 C 09 00 16 00 Mode de service Le thermosat possède un mode de service pour vous permettre de modifier les paramètres Afin d accéder à ce menu maintenez enfoncée pendant 10 secondes Note Le menu de l heure et de la dat...

Страница 15: ... indique no pour vous montrer qu aucun calibrage n est fait Saisissez alors la valeur lue sur votre thermomètre à l aide de ou Validez votre réglage avec OK Le message YES devrait être affiché et la valeur est maintenant mise en mémoire Un calibrage peut facilement être effacé Appuyez sur OK et ensuite sur 31 OutC Etalonnage de la sonde extérieure 10 C L étalonnage doit être fait de la même manièr...

Страница 16: ...o regolare sul valore massimo la valvola termostatica dei radiatori o il sis tema di controllo della temperatura dell acqua dell impianto di riscaldamento a pavimento eventualmente presenti nella stessa stanza dove si installa in cronotermostato Importante Il termostato non ha una protezione dagli schizzi o dall acqua quindi va montato in un luogo asciutto Per un funzionamento ottimale non esporre...

Страница 17: ...ieno pranzo a casa Comfort giorni 1 5 06 00 09 00 11 00 13 00 16 00 23 00 giorni 6 7 08 00 23 00 P3 A casa tutto il giorno Comfort giorni 1 5 06 00 23 00 giorni 6 7 08 00 23 00 P5 3 turni turno di giorno Comfort 04 00 06 00 13 00 21 00 P4 3 turni turno di sera Comfort 07 00 14 00 21 00 24 00 P6 3 turni turno di notte Comfort 05 00 08 00 15 00 22 00 P7 Ufficio Comfort giorni 1 5 07 00 18 00 P8 Nego...

Страница 18: ...iderata oppure con o e premere OK In ques to esempio selezionare l orario 00 00 lampeggia e il display mostra 01A Con o si imposta l ora in cui si desidera far par tire la temperatura programmata questa giornata ad esempio 00 00 premere quindi OK L orario 00 30 lampeggia e il display mostra 01b Con o si im posta l ora in cui si desidera far terminare la temperatura program mata ad esempio 06 00 pr...

Страница 19: ...ndicare che non è stata effettuata nessuna taratura Usare o per modificare la temperatura e portarla al valore mostrato dal termometro Premere OK per confermare Appare YES e il valore viene salvato La taratura effettuata può essere cancellata semplicemente premendo OK e dopo 31 OutC Taratura della visualizzazione della temperatura esterna 10 C Stesso metodo di taratura descritto per 30 AirC l unic...

Страница 20: ...keiselle paikalle asuntoon Huonees sa johon säädin on asennettu on vähintään yhden patteriter mostaatin oltava täysin auki Tärkeää Huonesäädin ei ole roiske eikä kosteussuojattu Se täytyy asentaa kuivaan paikkaan Siihen ei saa vaikuttaa veto suora auringonpaiste eikä takan lämpösäteily Sopivinpaikkaonuseinolohuoneensisäseinä Asennahuonesää din noin 1 5 m korkeudelle lattiasta Katso asennuskuvaa Hy...

Страница 21: ...tua esiasetettua tai oma kohtaista ohjelmaa Tässä tilassa huonelämpötila seuraa esiasetettua ohjelmaa P1 P9 tai omakohtaista ohjelmaa U1 tai U2 Valitun ohjel man asetuksia tai muutoksia varten katso kohtaa ohjelmavalikko P Alennetut lämpötilat voidaan helposti ohittaa tilapäisesti muutta malla arvo painikkeilla tai Asetettu lämpötila arvo vilkkuu muutaman sekunnin Mukavuuslämpötila symboli vilkkuu...

Страница 22: ...sa esimerkkiohjelmassa on mukavuuslämpötila 06 00 09 00 ja 16 00 24 00 Alennettu lämpötila 20 C 00 00 06 00 Alennettu lämpötila 18 C 09 00 16 00 Asennusvalikko Huonesäätimessä on asennusvalikko parametrien muutoksille Valikkoon pääsee painamalla painiketta 10 sekuntia Huomaa että kellonajan asetus näkyy ensin Paina kunnes Asennusvalikko on näytössä Parametrit valitaan ja painikkeilla Asetusarvot v...

Страница 23: ...a lämpötila tunnin jälkeen Kalibrointipara metri näyttää no eli kalibrointia ei ole suoritettu Painik keilla ja asetetaan lämpötila samaan arvoon kuin lämpömittari näyttää Paina OK Näytössä YES ja arvo on muistissa Kalibrointi voidaan poistaa painamalla OK ja sen jälkeen 31 OutC Ulkolämpötilanäytön kalibrointi 10 C Kuten 30 AirC mutta lämpömittari sijoitetaan ulos 40 LANG Fr EN Kielen muutos Paini...

Страница 24: ...r medel temperaturen i byggnaden För bästa funktion skall radiatortermo stater vara i fullt öppet läge i det rum där rumsenheten installeras Viktigt Rumsenheten är inte stänk eller droppskyddad den måste därför monteras på en torr plats För bästa funktion bör den inte heller utsättas för direkt solljus värmestrålning eller drag Lämplig plats brukar vara en innervägg i vardagsrummet Mon tera rumste...

Страница 25: ... 00 23 00 P2 Arbetar heldag Lunch hemma Komfort dag 1 5 06 00 09 00 11 00 13 00 16 00 23 00 dag 6 7 08 00 23 00 P3 Hemma hela dagen Komfort dag 1 5 06 00 23 00 dag 6 7 08 00 23 00 P4 Dagskift Komfort 04 00 06 00 13 00 21 00 P5 Kvällsskift Komfort 07 00 14 00 21 00 24 00 P6 Nattskift Komfort 05 00 08 00 15 00 22 00 P7 Kontor Komfort dag 1 5 07 00 18 00 P8 Affär Komfort dag 1 6 08 00 19 00 P9 Stuga ...

Страница 26: ...iden då du vill att den schemalagda temperaturen ska starta innevar ande dygn t ex 00 00 tryck på OK Tiden 00 30 blinkar och displayen visar 01b Med eller ställer du in tiden då du vill att den schemalagda temperaturen ska avslu tas t ex 06 00 tryck på OK Temperaturenblinkar väljdenschemal agda temperatur som önskas t ex 20 C och tryck på OK blinkar och displayen visar 02 Välj önskat läge och tryc...

Страница 27: ...brering har utförts Använd och för att ändra till samma värde som termometern visar Tryck sedan på OK för att bekräfta YES visas och värdet lagras i minnet Ut förd kalibrering kan enkelt tas bort genom att trycka OK och därefter 31 OutC Kalibrering av utetemperaturvisningen 10 C Samma kalibreringsmetod som beskrivs för 30 AirC med undantag för placeringen av termometern 40 LANG Fr EN Ändring av sp...

Страница 28: ...ten ca 1 5 m over gulvet Se montageillustrationen Der skal anbringes en afstandsring mellem væggen og rumen heden for at sikre god luftcirkulation Ved brug af egnet værk tøj er det nemt at lave fordybning til kablet i afstandsringen 1 5 m 20 cm Rumenhed Display Tekniske data Driftstemperatur 0 Ctil 40 C Transport og opbevaringstemperatur 10 C til 50 C Temperaturområde for indstilling 5 C til 37 C ...

Страница 29: ...utomatisk tilstand I denne tilstand følger rumenheden et valgt program indbygget P1 P9 eller et man selv har lavet U1 eller U2 Fremgangsmåden ved indstilling ændring af det valgte program beskrives i afs nittet for programtilstand P Planlagte temperaturændringer kan nemt tilsidesættes midlertidigt ved at ændre værdien med eller Den indstillede temperatur værdi blinker nogle sekunder Komfortsymbole...

Страница 30: ...e lysdiode blinker Tryk på OK for at gemme programmet Auto driftstilstand og U1 bruger programmet vises i displayet Programmet som blev oprettet ovenfor giver komforttilstand i perioderne 06 00 09 00og16 00 24 00 Planlagttemperatur 20 C 00 00 06 00 Planlagttemperatur 18 C 09 00 16 00 Servicetilstand Rumenheden har en servicetilstand til justering af parametre Hold nedtrykket i 10 sekunder for at k...

Страница 31: ...er ikke er udført nogen kalibrering Brug og til at ændre til samme værdi som termometeret viser Tryk derefter på OKfor at bekræfte YES vises og værdien bliver gemt i hukommelsen Udført kali brering kan nemt ophæves ved at trykke på OK og derefter på 31 OutC Kalibrering af visning af udetemperaturen 10 C Samme kalibreringsmetode som beskrevet for 30AIRC bort set fra placeringen af termometeret 40 L...

Страница 32: ...s Monteringspakke 4 025013 Supply temperature sensor Vorlauffühler Sonde de départ Sensore temperatura acqua mandata Menovesianturi Framledningsgivare Fremløbsføler 5 025014 Outdoor temperature sensor Außenfühler Sonde extérieure Sensore esterno Ulkoanturi Utegivare Udeføler 6 025020 Protective casing outdoor sensor Schutzgehäuse für Außenfühler Boîtier pour sonde extérieure Scatola del sensore es...

Отзывы: