
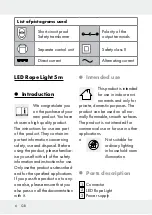


12 GB
LED controller
4
and the
VCC-GND-GND-DI mark on
the LED strip.
Be sure the power supply is
always accessible.
Plug the power supply into
the socket before switching
the product on.
Notice:
If the adhesive pad
has been in place for a long
time, sticky residue may remain
on the surface when removed.
If necessary, use an adhesive
remover. Test a small area prior
to cleaning the respective area.
Follow the manufacturer in-
structions.
Connecting 2 LED
strips (see Fig. B)
Note:
Up to two 5 m LED strips
may be connected using the
eight-pin plug
9
and operated
with the LED controller
4
and a
power supply
3
. Otherwise
there is a risk of overloading the
components and fire!
Note:
When connecting the two
ends of the LED strip using an
eight-pin plug, be sure to match
up the VCC-GND-GND-D0 and
VCC-GND-GND-DI marks at the
ends of the LED strips.
After connecting the two LED
strips, only the first LED strip
is lighting once connected to
electricity supply.
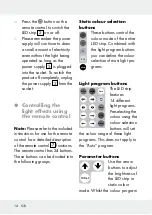
To light up the second LED
strip, press the
IC Set
button and
then press the
button to
switch groups of three lights
on, starting from the begin-
ning of the second LED strip.
You may repeated press the
or
to adjust the ligh-
ting area of the connected
LED strips (max. 10m).
After setting the lighting area,
press
w/cw
button and then
press the
or
to adjust
the luminosity.
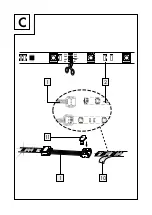
Shortening the LED
strip (see Fig. C)
The LED strip
2
may be trimmed
to size. It can be cut with scissors
at the marked position, as shown
in Fig. C. The trimmed sections
can then be connected as shown
in figure C.


