2
3
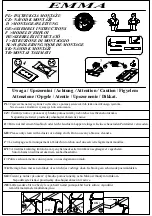
Fig. 4
DEFLATING THE BOUNCER
9. Open the large air outlet near the control panel. (Fig. 4)
10. Turn the knob on the control panel to DEFLATE and the ON/OFF switch to ON.
11. Once deflated, turn the ON/OFF switch to OFF (O), unplug the unit and store the cord inside the
control panel door. (Fig. 5)
Fig. 5
ADULT SUPERVISION AND SET UP REQUIRED. This product should be inflated or deflated by a competent adult.
1. Not for outdoor use. Sudden gusts of wind can lift the product off of the ground.
2. Minimum clearance zones of 6.6 ft. (2 m) in any direction are required.
3. Keep the area around the product clean and clear of objects to prevent slips and falls.
4. DO NOT allow attachment of items such as jump ropes, pet leashes, cables, etc., to product as they may
cause a strangulation hazard.
5. DO NOT drag the unit as doing so may cause irreparable damage.
6. Ensure the play area is free from hazards such as furniture, walls, sharp objects and other hard surfaces
before inflating the unit and playing in it.
7. DO NOT leave children unattended at any time.
8. DO NOT use the unit if it is wet as it may become slippery.
9. DO NOT allow children to play in the product until it is fully inflated.
10. Children must remove helmets, loose clothing, scarves, headgear, shoes and glasses, as well as any sharp
objects from their pockets, as they may puncture the bouncing surface.
11. Toys and other objects should never be allowed inside the bouncer.
12. Keep pets away from the product.
13. Children should bounce away from others and stay away from openings and side walls.
14. DO NOT allow food, drink or gum inside unit.
15. Maximum user weight is 60 lbs. (27 kg). Total weight of children must not exceed 120 lbs. (54 kg).
16. No more than 2 children should play on the bouncer at the same time.
17. DO NOT use extension cords with this product.
18. THIS IS NOT A FLOTATION DEVICE. DO NOT USE IN OR NEAR WATER.
19. DO NOT allow children to play together who are unevenly matched in weight and height.
20. Prior to deflating, remove all children.
21. Always deflate product after use, and store indoors.
22. Users must be discouraged from attempting any unauthorized modification.
23. Remove the plug from the socket before use.
WARNING:
The product should be periodically examined for potentially unsafe conditions such as: damaged cord, plug,
housing, etc. In the event such damage is found, the product should not be used until properly repaired.
Refer to the instructions for set-up, storage, maintenance and care. To clean use mild detergent and water.
MAINTENANCE
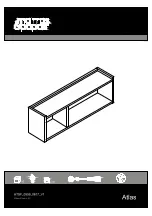
4. With the ON/OFF switch in the OFF (O) position, and the INFLATE/RESET/DEFLATE knob in the RESET position,
open the cord storage area door and carefully extend the cord. (Fig. 2)
5. Plug the cord into the wall outlet.
6. Turn the ON/OFF switch to ON (I) and rotate the INFLATE/DEFLATE knob to INFLATE. (Fig. 2)
7. Allow the Bouncer to inflate until it is firm but the seams still show slight wrinkling then turn the knob to
RESET and turn the ON/OFF switch to OFF (O). (DO NOT over-inflate.)
NOTE: The knob must be completely centered at RESET to prevent deflation. (Fig. 2A)
8. Place the power cord in the control panel cord storage door prior to allowing children to play on the unit.
In the event the bouncer is accidentally punctured, an adult must perform the following steps:
1. Deflate the item, clean the punctured area with water and allow it to dry.
2. Cut a portion of the patch allowing approximately 1
1
/
2
inches of excess patch material on all sides of the
opening to be patched and round the corners.
3. Remove the backing from the patch material, position the patch over the damaged area and smooth out
any bubbles with a paper towel.
4. Allow the item to sit for 30 minutes before re-inflating.
REPAIRING A PUNCTURE
Fig. 2
INFLATING THE BOUNCER
OPEN
FOR
CORD
STORAGE
DEFLATE
INFLATE
RESET
A small pressure release opening (Fig. 3A) is incorporated behind the dinosaur’s head (Fig. 3). This opening
is not connected to the main inflation chamber and poses no risk of deflation. Do not use the included
repair patches to cover this opening, as it is important for maintaining balance in the dinosaur head.
Fig. 3
Fig. 3A
Fig. 2A
ON (I)/OFF (O)
3. Check that the buckles on the slide are properly adjusted. If necessary, twist the connector to tighten. (Fig 1)
ADJUST
BUCKLE
ADJUST
BUCKLE
TWIST TO TIGHTEN
Fig. 1