background image


Page 30 

6.7


OSD


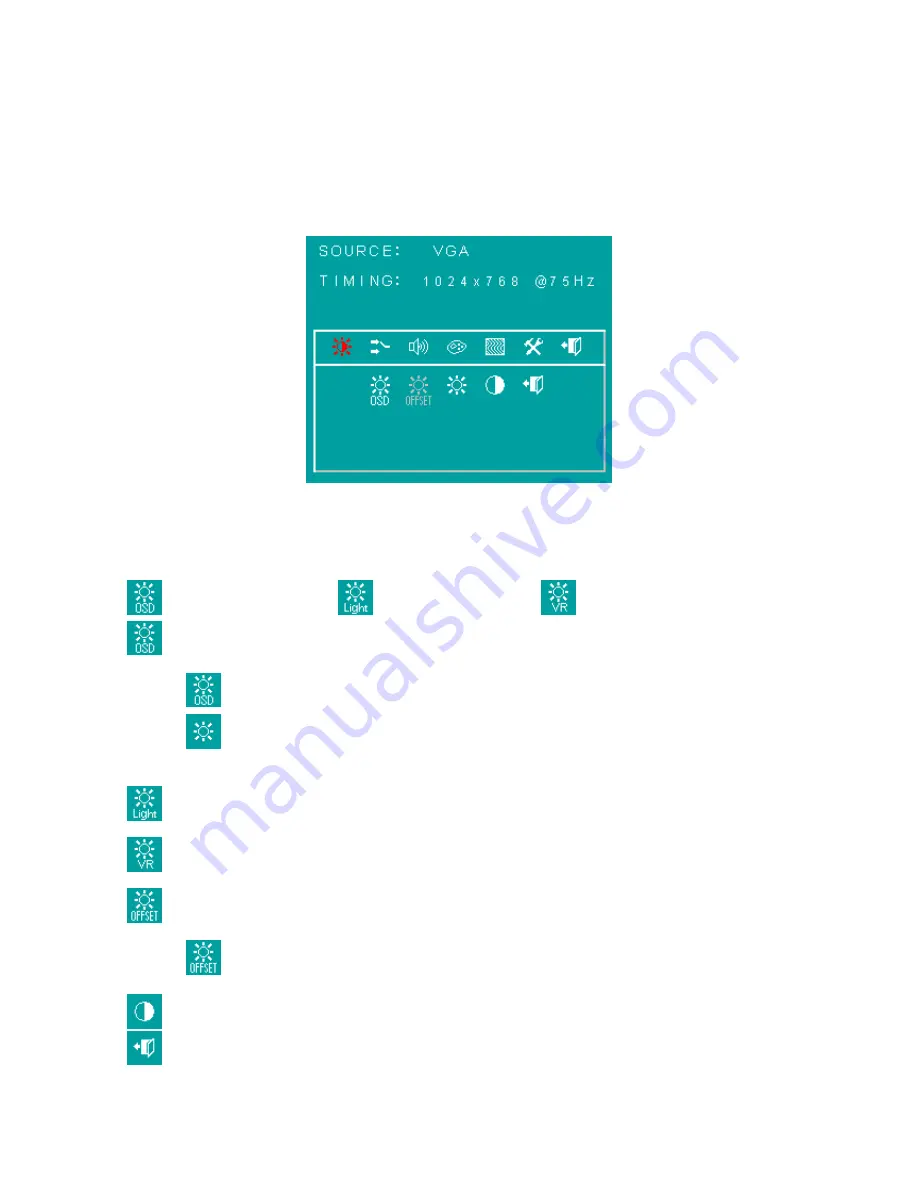
menu


Here


are


some


instructions


for


you


to


use


the


OSD


(On


Screen


Display).


By


pressing


the


“menu”,


you


will


see


the


below


picture.


Timing


shows


resolution,


H

frequency,


and


V

frequency


of


the


panel.


Version


shows


the


firmware


control


version.


This


2


information


is


not


changeable


by


user.


There


are


7


sub


pages


inside


the


OSD


manual,


Brightness,


Signal


select,


Sound,


Color,


Image,


Tools,


and


Exit.


When


you


press


“menu”


button,


you


enter


the


“Brightness”


sub


page.


You


will


see


5


selections:


press


’’menu’’


press


’’menu


press


’’menu’’


OSD


Brightness:


press


’’right’’


key


press


“menu”


once,


you


can


go


into


adjust


the brightness.


Press


“left”


you


can


dim


down


the


brightness


to


“0”,


while


press


“right”


you


can


increase


the


brightness


to


“100”.


Ambient


light


sensor:


press


this


Icon,


must


to


accompany


with


Litemax


ambient


light


sensor


to


auto


dimming.(OPTION)


Potentiometer:


press


this


icon,


adjust


VR


function.(OPTION)


Ambient


light


sensor


with


OSD


offset

:


press


this


Icon


Press


’menu’’


once,


you


can


adjust


min.


luminance


to


fit


your


application


(OPTION)


Contrast:


Press


“menu”


and


“right”


you


can adjust


the contrast from “0” to


“100”


by


pressing


the


“left”


and


“right”.


Exit:


You


can


exit


this


sub


menu


back


to


normal


screen.


Содержание SSF2825 V2

Страница 1: ...tion 2013 3 20 All information is subject to change without notice Approved by Checked by Prepared by LITEMAX Electronics Inc 8F No 137 Lane 235 Bau chiau Rd Shin dian Dist New Taipei City Taiwan R O...

Страница 2: ...Page 2 RECORD OF REVISION Version and Date Page Old Description New Description Remark Mar 20 2011 all Initial Release...

Страница 3: ...D Connector 16pin 2 0mm 25 CN2 Analog RGB Input connector D SUB 15Pin 25 CN4 Analog RGB Input connector 13pin connector 25 JS1 Power DIN 12V 25 JS1 Power Jack 12V 25 J1 Power connector 12V 6PIN 2 0mm...

Страница 4: ...ide Screen 16 3 LED Backlight High Brightness 1000nits Low Power Consumption Wide Viewing Angle High Uniformity Wide Dimming Life Expectancy 1 2 GENERAL SPECIFICATIONS Model No SSF2825 V2 SSH2825 V2 D...

Страница 5: ...Page 5 1 3 ABSOLUTE MAXIMUM RATINGS...

Страница 6: ...Page 6 2 0 Electrical characteristics...

Страница 7: ...Page 7...

Страница 8: ...Page 8...

Страница 9: ...Page 9...

Страница 10: ...Page 10...

Страница 11: ...Page 11 3 0 TIMING Characteristics...

Страница 12: ...Page 12...

Страница 13: ...Page 13...

Страница 14: ...Page 14...

Страница 15: ...0 331 Green Gx 0 313 Gy 0 635 Blue Bx 0 145 By 0 043 White Wx 0 290 Wy 0 322 Center Luminance of White Lc 1000 cd Uniform Lu 80 Contrast Ratio CR x 0 y 0 Klein K 10 2000 1 Test Mode 1 4 Color Saturat...

Страница 16: ...Page 16 2 Definition of Test Point B A C 2 1 3 Active Area 3 BM 7 Measurement Setup 4 Klein K 10 Measurement Setup...

Страница 17: ...IinL VIN 12V Vadj 5V 0 0 mA Input Current High Brightness IinH VIN 12V Vadj 0V 2 08 1 71 1 45 A LED Current Low Brightness IoutL VIN 12V Vadj 5V 0 0 Arms LED Current High Brightness IoutH VIN 12V Vad...

Страница 18: ...ription 1 Vin DC 12V 2 Vin DC 12V 3 Vin DC 12V 4 GND Ground 5 GND Ground 6 GND Ground 7 Brightness Brightness Control 5V 0V 8 Control ON OFF Control 0 8V OFF 2 5V ON Output Connector J2 J3 JST S2B EH...

Страница 19: ...Page 19 Mechanical Characteristics Dimension 124mm 50mm 15mm 15mm INPUT CONNECTOR J1 PIN1 VIN PIN2 VIN PIN3 VIN PIN4 GND PIN5 GND PIN6GND PIN7 BRIGHTNESS PIN8 ON OFF...

Страница 20: ...1 is European RoHS compliant 6 1 General Description Max Resolution Up To WUXGA Analog RGB Input up to 205MHz ULTRA RELIABLE DVI INPUT Dual single LVDS interface Support Panel DC5V or 3 3V 12V Output...

Страница 21: ...Page 21 6 2 Outline Dimensions AD2662GD 150mmX100mmX20mm...

Страница 22: ...Page 22 I O BOARD 160mmX25mmX15mm...

Страница 23: ...Page 23 AD2662GDVAR 272mmX100mmX20mm...

Страница 24: ...E1 30 PANEL VCC CN3 DVI D INPUT Connector Pin No Function Pin No Function Pin No Function 1 T M D S Data2 9 T M D S Data1 17 T M D S Data0 2 T M D S Data2 10 T M D S Data1 18 T M D S Data0 3 T M D S D...

Страница 25: ...NC VGA_CAB 13 HSYNC Horizontal Sync 6 RED_RTN Red Return 14 VSYNC Vertical Sync 7 GREEN_RTN Green Return 15 SCL DDC Data Clock 8 BLUE_RTN Blue Return CN4 Analog RGB Input connector 13pin connector Pin...

Страница 26: ...on Pin No Symbol Description 1 ON OFF Backlight ON OFF 5 GND GND 2 BRIGHT Dimming adjust 6 12VDC Input 12VDC 3 GND GND 7 12VDC Input 12VDC 4 GND GND 8 12VDC Input 12VDC J7 J9 FAN 2PIN 2 0mm Pin No Fun...

Страница 27: ...ND 17 GND 18 GND 19 Audio L 20 Audio R 24 GND 22 GND J5 Ambient 3PIN 2 0mm Pin No Function Pin No Function 1 3 3VDC 2 Sensor Out J4 VR connector 3PIN 2 0mm Pin No Function Pin No Function 1 3 3VDC 2 V...

Страница 28: ...Function 1 GND 2 GND 3 Luminance 4 Chrominance J5 Composite Pin No Function Pin No Function 1 Y 2 GND J6 D SUB9 RS232 Pin No Function Pin No Function 1 NC 2 TXD 3 RXD 4 NC 5 GND 6 NC 7 NC 8 NC 9 NC C...

Страница 29: ...Define J1 IR Connector Pin No Function Pin No Function 1 DATA OUT 2 GND 3 VCC 4 NC 6 6 DC Characteristics Power Consumption 10W Note1 Operation Temperature 0 70 Storage Temperature 20 85 Note These v...

Страница 30: ...ns press menu press menu press menu OSD Brightness press right key press menu once you can go into adjust the brightness Press left you can dim down the brightness to 0 while press right you can incre...

Страница 31: ...page Audio Volume Audio volume adjustment Mute You can mute the speaker by pressing this option Exit back to the normal screen Auto Color by press this Auto Color option you can get the optimal color...

Страница 32: ...e 3 options in this selection Color Tempture User Color Tempture_6500K Color Tempture_93OOK user mode 6500K Warm color scheme 9300K Cold color scheme Def ault is user and inside all R G and B are set...

Страница 33: ...n for around 3 seconds Clock If you are not satisfied about the Autotune result you can adjust manually by Clock The screen will be wider if you adjust this function Phase If you see double image on c...

Страница 34: ...OSD from 2 sec to 16 sec D Osd_HPos You can move the OSD horizontally over the screen Osd_VPos You can move the OSD Vertically over the screen Exit back to main menu Factory_Reset By pressing this th...

Страница 35: ...re plug the power connector to exit the burn in mode KEY LOCK MODE OSD Lock Function It is possible to lock all the OSD buttons to prevent unauthorized changes to occur by pressing Menu and right butt...

Страница 36: ...Page 36 7 0 MECHANICAL DRAWING...

Страница 37: ...Page 37...

Страница 38: ...iquid crystal material leaks from the panel it should be kept away from the eyes or mouth In case of contacting with hands legs or clothes it must be washed away thoroughly with soap 8 Protect the mod...

Отзывы: