Artea Montageanleitung 3
1. Zum Öffnen der Leuchte drehen Sie den Deckel, bis dieser sich vom LED-Modul löst.
2. Schalten Sie die Spannungsversorgung aus und führen Sie die Anschlussleitung durch die vorhandene
Öffnung in der Montageplatte.
3. Bohren Sie die Löcher und montieren Sie die Montageplatte an der gewünschte Position. Achten Sie dar-
auf, dass die Montageplatte gut befestigt ist.
4. Schließen Sie die Kabel, wie in der Darstellung (Elektrischer Anschluss) gezeichnet ist an.
5. Verbinden Sie die Batterie mit dem Notlicht-Treiber.
6. Verdecken Sie die Lampe mit dem Deckel, und drehen Sie den Deckel, bis der fest ist.
7. Schalten Sie die Spannungsversorgung an.
1. To open the lamp, turn the cover until it detaches from the LED module.
2. Switch off the power supply and guide the connection cable through the opening in the mounting plate.
3. Drill the holes and mount the mounting plate in the desired position. Make sure that the mounting plate is
firmly attached.
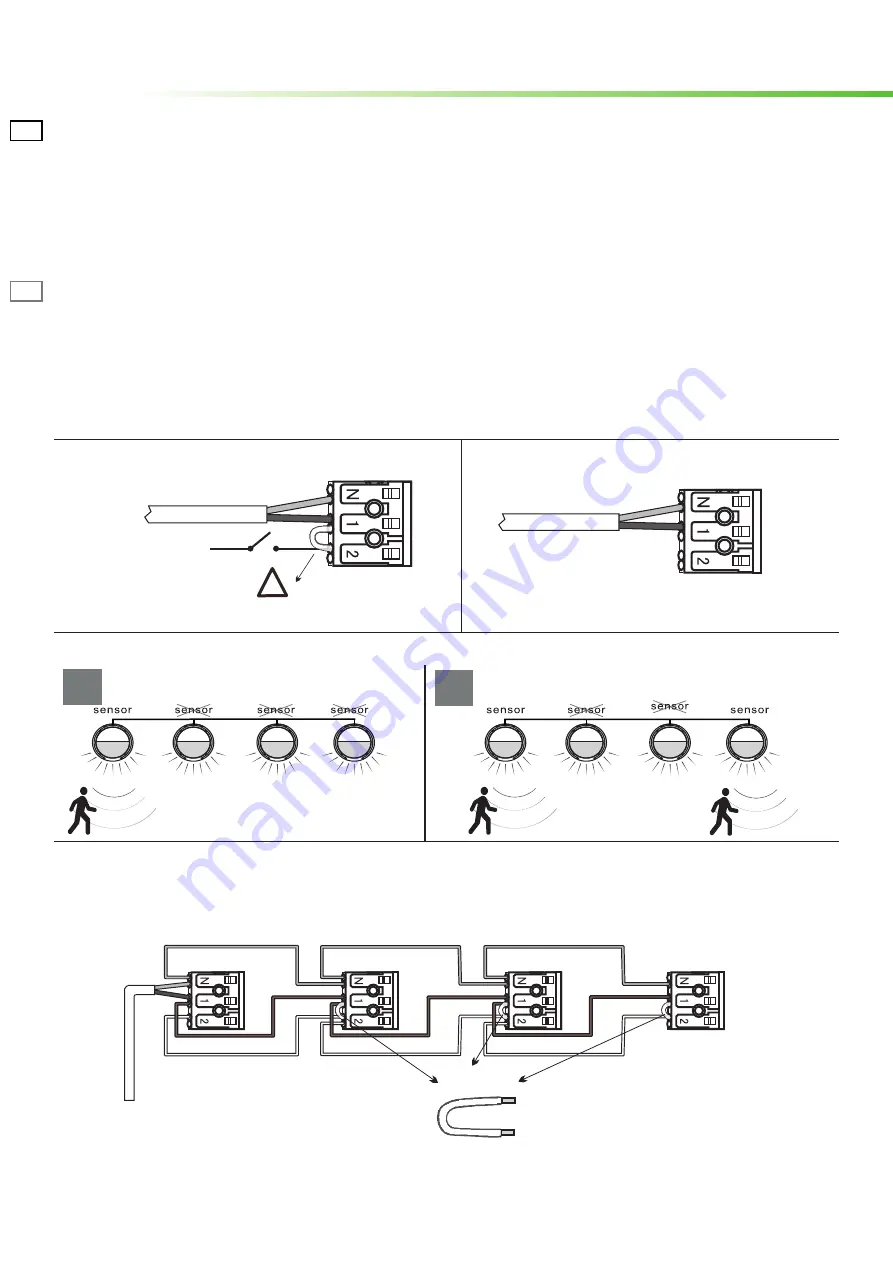
4. Connect the cables as shown in the illustration (electrical connection)
5. Cover the lamp with the cover and turn the cover until it is tight.
6. Switch on the power supply.
Elektrischer Anschluss /
Electrical connection:
Master-Slave Modus /
Master-slave mode:
Funktion A /
Function A:
Notleuchte - ohne Sensor /
Emergencylight-
Without Sensor
Notleuchte - mit Sensor /
Emergencylight-
With Sensor
Entfernen Sie die Brücke bei Master-Slave Modus /
Remove switched live in master-slave mode
Ohne Brücke /
Without switched live
Installation und Montage
Installation
DE
EN
!
A
B
Mit Sensor /
With sensor
Ohne Sensor /
Without sensor
Ohne Sensor /
Without sensor
Ohne Sensor /
Without sensor


