background image

20


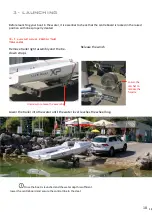
3 – LAUNCHING 


20 


Launching using the wheels 


Guide the boat to the water and remove the wheels next to the boat for greater convenience. 


Wheel supports 


To remove the wheels, first unscrew the top nut without moving the wheel support, then unscrew the 

bottom nut completely. Finally, it is necessary to lower the wheel support downwards taking care to keep 

is straight. Do not pull the support at an angle.

Содержание LiteXP

Страница 1: ...WWW LITEBOAT COM CONTACT LITEBOAT COM 334 76 40 46 76 2 8 4 RUE DE LA V I S C A M I N E 3 8 5 3 0 P O N T C H A R R A 2 USER S GUIDE by LITEBOAT ...

Страница 2: ... trailer 3 2 Launching using the wheels 4 MOUNTING THE RUDDER 4 1 Positioning 4 2 Securing 4 3 Locking 4 4 Removal 5 SETTING UP THE ROWING STATION 5 1 Seat 5 2 Foot stretcher 5 3 Oarlock pins 5 4 Oarlocks 6 ASSEMBLING THE OARS 6 1 Assembly 6 2 Positioning the rings 6 3 Adjustment 7 NAVIGATION 7 1 Sailing 7 2 Rowing 3 6 3 3 5 7 16 7 8 10 11 17 21 17 19 20 20 20 20 20 21 23 21 21 22 23 24 25 24 24 2...

Страница 3: ...e middle of the two cradles Winch hook Handle Protective foam During trailering the centreboard should be resting on the rear cradle It is important that both lines for raising and lowering centreboard are free and that the centreboard is in the raised position to prevent damage during transport or storage ...

Страница 4: ...he winch hook Protect the bow from the metal of the winch assembly Adjust the tension with the winch handle The hook should extend about 10cm in front to avoid damaging the boat When towing we recommend that you secure the end of the winch handle with a bungee or rope Winch hook Handle Protective foam ...

Страница 5: ... forwards Apply moderate tension to the tie down straps taking care to not compress the deck of the boat do not over tighten Also ensure that no metal parts are in contact with the boat during transport The metal ratchet mechanisms of the tie down straps must not be in contact with the boat Use a piece of carpet or foam to protect the gelcoat straps positioned in front of oarlock Protected boat wi...

Страница 6: ...board is housed in the centreboard well and is controlled by two lines positioned below the sill of the companionway Before launching the centreboard is locked in the raised position using the cam cleat and adjacent jam cleat ...

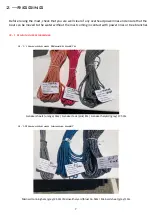
Страница 7: ...ed to the water without the mast coming in contact with power lines or tree branches 2 1 RUNNING RIGGING 2 1 1 Halyards and Genaker sheets Genaker sheets orange 16m Genaker tack pink 8m Genaker halyard grey 17 50m 2 1 2 Halyards and Mainsail sheet Mainsail Cunningham grey 2 50m Mainsail halyard blue 16 50m Mainsail sheet grey 13m ...

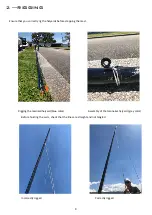
Страница 8: ... mast from the trailer once the tail light rack has been removed Align the stainless steel pin when connecting the two sections of the carbon mast Upper part longer fixing rope Pin lower part shorter circular base Sail track for the bolt rope ...

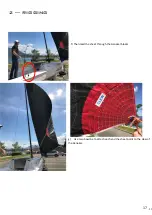
Страница 9: ... rig the halyards before stepping the mast Rigging the mainsail halyard blue color Assembly of the Gennaker halyard gray color Before hoisting the sails check that the lines are straight and not tangled Incorrectly rigged Correctly rigged ...

Страница 10: ...well Care must be taken to ensure that the end of the mast is properly seated The middle of the reinforced section of the mast should be aligned with the opening of the mast well Rotate the mast in the mast well so that the sail track is oriented towards the stern of the boat ...

Страница 11: ...2 RIGGING 11 The mast can be stepped before or after launching the boat 5 cm limit Mast correctly positioned in mast well ...

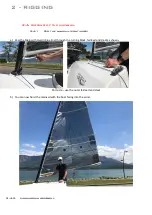
Страница 12: ...ainsail continued a Pass the Mainsail halyard blue line through the turning block fairlead and cleat as shown Port side use the outer fairlead and cleat b You can now hoist the mainsail with the boat facing into the wind 2 4 2 cunninghan Assembly 2 RIGGING ...

Страница 13: ... starboard side of the mast Rigged for light wind Rigged for strong wind One pass through grommet two passes through grommet 2 4 3 Rigging the mainsail sheet a First pass the sheet grey through the cam cleat while making sure it is correctly aligned with the ratchet block ...

Страница 14: ... sheave of the fiddle block then thread the sheet down and around the traveler block Then thread the sheet back up and through the smaller sheave of the fiddle block and finish by securing the end of the sheet to the traveler block using a bowline d Make it pass again in the 2nd pulley smaller sheave then secure it with a bowline to the traveler block ...

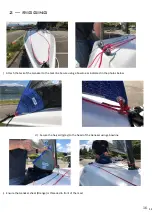
Страница 15: ...he traveler the mainsheet to the traveler 2 4 4 Rigging the Gennaker a Follow the same procedure as the Mainsail Pass the Genaker halyard grey halyard through the inside cleat and fairlead located on the starboard side of the foredeck b Pass the tack line pink sheet through the eye strap located at the nose of bow ...

Страница 16: ... tack of the Genaker to the tack line Secure using a bowline as indicated in the photos below d Secure the halyard grey to the head of the Genaker using a bowline e Ensure the Genaker sheet Orange is threaded in front of the mast ...

Страница 17: ...17 2 RIGGING 17 f Then lead the sheet through the Genaker blocks g Use two bowline to attach each end the sheet point to the clew of the Genaker ...

Страница 18: ...ng from the trailer Remove trailer light assembly and the tie down straps Release the winch Lower the ratchet to release the handle Lower the trailer into the water until the water level reaches the wheel hug Once the boat is launched and the water depth is sufficient lower the centreboard and secure the control line in the cleat Unscrew to release the assembly 3 LAUNCHING ...

Страница 19: ...19 3 LAUNCHING 19 Position yourselves as a pair to support the boat Carefully lift and gently slide the boat off the cradles and into the water ...

Страница 20: ...t to the boat for greater convenience Wheel supports To remove the wheels first unscrew the top nut without moving the wheel support then unscrew the bottom nut completely Finally it is necessary to lower the wheel support downwards taking care to keep is straight Do not pull the support at an angle ...

Страница 21: ...he raised position 4 2 SECURING Adjust the rudder in the down or up position using the two lines Be sure to run the tiller under the traveler 4 3 LOCKING A sound will be produced to confirm the latch is positioned correctly 4 4 REMOVAL Push the blue button on the gudgeon forward to release the pintle of the rudder Remove Attach ...

Страница 22: ...The seat should be positioned with curved portion facing the bow of the boat 5 2 FOOT STRETCHER Insert the foot stretcher into one of the three slots provided Use the slot that best matches the height of the rower FRONT BACK 1m 90 1m 75 1m 90 1m 75 ...

Страница 23: ...ning nuts from the underside of the deck Unscrew the plastic hatch of the inner partition inside the boat to access the retaining bolt of the oarlock pin 1 person next to the boat to hold the oarlock pin with a wrench 1 person inside the boat loosen and tighten the retaining bolt Screw nut through the inside of the boat Hold the upper part with a spanner ...

Страница 24: ...by placing more washers under the left oarlock than the right Make sure the right oarlock is lower than the left by about 10 mm 4 2 2 4 SPECIFIC SETTING The adjustment of the oarlock thanks to the washers makes it possible to define the height of the hands during the gestures of the rowing At the end of the rowing stroke the hands should be under the lower ribcage If the hand level is incorrect to...

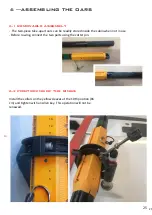
Страница 25: ...be readily stored inside the cabin when not in use Before rowing connect the two parts using the cotter pin 6 2 POSITIONING OF THE RINGS Install the collars on the yellow sleeves at the 10th position 86 cm and tighten with an Allen key This operation will not be renewed 10 13 12 11 6 5 ...

Страница 26: ...d towards the stern of the boat see photo The Liteboat oarlocks accommodate other brands of oars other than Liteboat Make sure the oars move easily in the oarlock before launching If the oars do not move freely adjust by loosening and moving the adjustment nut farther out on the threaded portion of the oarlock gate ...

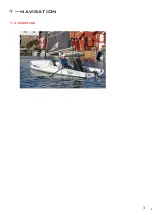
Страница 27: ...1 TRANSPORT 7 1 SAIL If you are in shallow water or close to the coast avoid locking the centreboard in the down position so that it can pivot upwards in case of impact with a rock or the ocean floor ...

Страница 28: ...3 7 NAVIGATION 3 7 2 ROWING ...

Отзывы: