Lionelo Babyline 5.1 Скачать руководство пользователя страница 5

‑ 5 ‑

EN

EN

Dear Customer! 

In case of any questions or comments on the purchased product, please 
contact us:

 [email protected] 

Producer:

BrandLine Group Sp. z o. o.
ul. A. Kręglewskiego 1, 61-248 Poznań, Poland
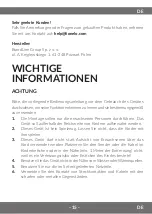
IMPORTANT 

INFORMATION

NOTE

Please read this manual before you use the device for the first time to see all 

its functions and use it in accordance with intended use.

1. 

Only adults are allowed to install the device. Keep the device out of 

reach of children.

2. 

This device is not a toy. Do not let children play with it.

3. 

This product does not serve to replace adult supervision.

4. 

Do not place a baby unit or cables in the baby’s cot or within its reach 

(at least 1 meter of distance must be kept) because the child may get 

injured or be strangled!

5. 

Do not use the product near water or sources of heat.

6. 

Use feeder cables supplied only.

7. 

Make sure plug contacts and cables do not contact sharp or metal items.

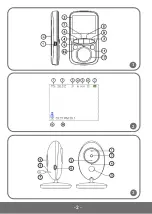
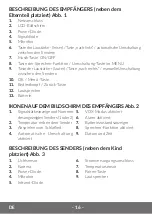
DESCRIPTION OF PARENT UNIT (located near parent) fig.1

1. 

Power connector

2. 

LCD display

3. 

Power LED

4. 

Signal LED

5. 

Microphone

Содержание Babyline 5.1

Страница 1: ...de usuario Handleiding Naudojimo instrukcija N vod k obsluze Haszn lati utas t s Manual utilizare User manual Instrukcja obs ugi Bedienungsanleitung Manuale d uso Manuel de l Utilisateur Monitor de v...

Страница 2: ...2 1 2 13 3...

Страница 3: ...3 4 7 5 6 8...

Страница 4: ...4 9 10 11...

Страница 5: ...ep the device out of reach of children 2 This device is not a toy Do not let children play with it 3 This product does not serve to replace adult supervision 4 Do not place a baby unit or cables in th...

Страница 6: ...e provided power supply 3 Blue LED suggests that the baby unit is active How to provide power supply and switch the unit on fig 5 It is advisable to charge the parent unit fully before you use it By d...

Страница 7: ...ot close to other electric equipment Pairing units The baby unit and parent unit are paired by default It is not necessary to pair them again unless the baby unit has lost connection with the parent u...

Страница 8: ...e main menu You can find 6 items there To move a cursor and select an item press left or right button Next press OK Menu button to enter the item you have selected Press power return button to return...

Страница 9: ...anual press right button to move a cursor and select either mode You can also set modes with left right buttons see Automatic manual camera switching LCD backlight It is possible to adjust the brightn...

Страница 10: ...To urz dzenie nie jest zabawk Nie pozw l aby dzieci si nim bawi y 3 Niniejszy produkt nie zast puje nadzoru osoby doros ej nad dzieckiem Nie umieszczaj nadajnika lub przewod w w eczku dziecka lub w je...

Страница 11: ...tawie 2 Nadajnik uruchomi si automatycznie po pod czeniu zasilania 3 Niebieska dioda wskazuje e nadajnik jest aktywny Zasilanie i w czenie odbiornika rys 5 Zaleca si pe ne na adowanie odbiornika przed...

Страница 12: ...W przypadku zak ce obrazu lub d wi ku nale y umie ci urz dzenia w innym miejscuorazupewni si enieznajduj si wpobli uinnychurz dze elektrycznych Parowanie nadajnik w Nadajniki i odbiornik s domy lnie s...

Страница 13: ...Wci nij i przytrzymaj przycisk w prawo aby r cznie prze czy obraz z jednej kamery na drug MENU G wne menu rys 7 Wci nij przycisk OK Menu na ekranie aby wej do g wnego menu znajduje si tam 6 pozycji A...

Страница 14: ...Tryb prze czania kamery rys 11 Dost pne s dwa tryby prze czania kamery automatyczny i r czny wci nij przycisk w prawo aby przesun kursor oraz wybra jeden z tryb w Tryby mo na r wnie ustawia przyciska...

Страница 15: ...durchf hren Das Ger t soll au erhalb der Reichweite von Kindern aufbewahrt werden 2 Dieses Ger t ist kein Spielzeug Lassen Sie nicht dass die Kinder mit ihm spielen 3 Dieses Ger t darf nicht statt Au...

Страница 16: ...endern 10 OK Men Taste 11 Bedienknopf Zur ck Taste 12 Lautsprecher 13 Batterie IKONENAUF DEM BILDSCHIRM DES EMPF NGERSAbb 2 BESCHREIBUNG DES SENDERS neben dem Kind platziert Abb 3 1 Signalst rkeanzeig...

Страница 17: ...n paar Sekunden leuchten Es erscheint eine Ladeikone was bedeutet dass die Batterie aufgeladen wird 3 Dr cken und halten Sie den Bedienknopf um den Empf nger einzuschalten 4 Um den Empf ngerauszuschal...

Страница 18: ...beginnen m chten dr cken und halten Sie die Sprechen Taste Das Gespr ch Symbol wird am unteren Teil des Bildschirms angezeigt Einstellung der Lautst rke W hrend des Abspielens von Musik dr cken Sie d...

Страница 19: ...Sender mit dem Empf nger gepairt Alarm Abb 9 W hlen Sie die Alarm Funktion aus dr cken Sie die Taste der Sprechen Funktion um den Zeiger zu verschieben und die Taste nach rechts nach links um den Wert...

Страница 20: ...it des LCD Bildschirmes und den Standby Modus anzupassen VOX Modus In diesem Men befinden sich 2 Positionen Einstellungen des Arbeitsmodus des Ger tes normal oder VOX nderung der Empfindlichkeit vom V...

Страница 21: ...21 RU 1 2 3 4 1 5 6 7 1 1 2 LCD 3 4 5 6 7 ON OFF 8 9 10 11 12 13...

Страница 22: ...22 RU 2 3 4 1 2 3 5 1 2 3 1 1 2 2 3 4 5 VOX 6 7 8 9 1 2 3 4 5 6 7 8 9 10...

Страница 23: ...23 RU 4 6 1 VOX VOX VOX 1 2...

Страница 24: ...24 RU 5 7 6 8 1 9 1 2 3 4 VOX 5 6...

Страница 25: ...25 RU 10 2 50 60 11 LCD LCD VOX 2 VOX VOX...

Страница 26: ...o dispositivo non un giocattolo Non lasciare che i bambini ci giochino 3 Questo prodotto non sostituisce la supervisione di un adulto su un bambino non collocare il trasmettitore o dei cavi in un lett...

Страница 27: ...a spina dell alimentatore nel trasmettitore e l altra estremit in una presa di corrente NOTA Utilizzare solo l alimentatore in dotazione 2 Il trasmettitore si avvia automaticamente dopo averlo acceso...

Страница 28: ...a direzione che si desidera monitorare fig 6 NOTA Non posizionare il trasmettitore o i cavi in un lettino o a portata di sua mano distanza di almeno 1 metro poich esiste il rischio di lesioni o soffoc...

Страница 29: ...ale della videocamera Premere e tenere premuto il pulsante sinistra per abilitare disabilitare la commutazione automatica tra i trasmettitori La modalit attivata verr segnalata dall icona A sul displa...

Страница 30: ...fig 10 In questo menu ci sono 2 posizioni Impostazione del tempo data Impostazione del formato Unit di temperatura Impostazione del valore di temperatura in gradi Celsio o Fahrenheit Riduzione dei dis...

Страница 31: ...agini FR Cher client Si vous avez des questions ou remarques relatives au produit achet n h sitez pas nous contacter l adresse help lionelo com Producteur BrandLine Group Sp z o o ul A Kr glewskiego 1...

Страница 32: ...yant d alimentation lectrique 4 Voyant de signale 5 Microphone 6 Bouton de volume plus bas bouton vers la gauche commutateur automatique entre les metteurs 7 Bouton de musique ON OFF 8 Bouton de fonct...

Страница 33: ...u 1 Branchez la fiche de l adaptateur secteur au r cepteur et l autre bout la prise lectrique ATTENTION N utilisez que l adaptateur secteur fourni avec le produit 2 L cran s allumera apr s quelques se...

Страница 34: ...omiser la batterie Quand l metteur enregistra un son le r cepteur r agira cette situation activera l cran et la vue de l metteur qui a enregistr le son Lecteur de musique Appuyez sur le bouton de musi...

Страница 35: ...ra fig 8 Appuyez sur le bouton OK Menu pour acc der la fen tre d enregistrement s lectionnez l enregistrement de la cam ra 1 puis appuyez sur le bouton de couplage sur l metteur S lectionnez l enregis...

Страница 36: ...des modes Vous pouvez aussi r gler les modes l aide des boutons vers la gauche vers la droite voir Commutation automatique manuelle de la cam ra Luminosit LCD Il est possible d ajuster la luminosit d...

Страница 37: ...ivo fuera del alcance de los ni os 2 Este dispositivo no es un juguete No dejes que los ni os jueguen con l 3 Este producto no reemplaza la supervisi n del ni o por parte de un adulto No coloques el t...

Страница 38: ...r en el transmisor y el otro extremo en la toma de corriente ATENCI N Utiliza solo el adaptador incluido en el kit 2 El transmisor se pondr en marcha autom ticamente tras conectarse al suministro de c...

Страница 39: ...I N No coloques el transmisor o los cables en la cuna o al alcance del ni o m n a un metro de distancia ya que hay riesgo de lesiones o asfixia En caso de interferencias de imagen o sonido coloca los...

Страница 40: ...r con el icono A en la pantalla del receptor La imagen de las c maras de los transmisores cambiar cada 5 segundos Presiona y mant n presionado el bot n derecha para cambiar manualmente la imagen de un...

Страница 41: ...os Celsius o Fahrenheit Reducci n del ruido de la imagen En esta opci n se puede establecer una frecuencia de 50 60Hz para reducir el ruido en la imagen mostrada Modo de cambio de c mara fig 11 Hay do...

Страница 42: ...stel in gebruik neemt om vertrouwd te raken met de functies en het toestel te gebruiken waarvoor het bedoeld is 1 Alleen volwassenen zijn bevoegd om het apparaat te installeren Houd het apparaat buite...

Страница 43: ...p OK Menu 11 Aan uit terug knop 12 Luidspreker 13 Baterij PICTOGRAMMEN OP HETSCHERMVAN DE ONTVANGER afb 2 BESCHRIJVINGVANDEZENDERS geplaatstbijhetkind afb 3 1 Signaalsterkte indicator en weergegeven z...

Страница 44: ...lichten en het oplaadicoon zal verschijnen wat aangeeft dat de batterij wordt opgeladen 3 Houd de aan uit knop ingedrukt om de ontvanger aan te zetten 4 Om de ontvanger uit te schakelen houdt u de aan...

Страница 45: ...reeksymbool verschijnt onderaan op het scherm Volumeregelaar Druk tijdens het afspelen op de volumetoets om het volume te verlagen of op de volumetoets om het volume te verhogen Het huidige volumenive...

Страница 46: ...s om te activeren druk dan op de spreekfunctietoets om de cursor te verplaatsen en op de rechts links toets om de waarde te wijzigen INSTELLINGEN Datum en tijd Afb 10 Er zijn 2 items in dit menu Inste...

Страница 47: ...ezen Informatie over het systeem Toont systeem informatie De beelden zijn slechts voor illustratie het daadwerkelijke uiterlijk van producten kan verschillen die in de beelden wordt voorgesteld LT Ger...

Страница 48: ...s alia t v 1 pav 1 Maitinimo jungtis 2 LCD ekranas 3 Maitinimo viesos diodas 4 Signalinis viesos diodas 5 Mikrofonas 6 Garsumo mygtukas tyliau mygtukas kair automatinis perjungimas tarp si stuv 7 Muzi...

Страница 49: ...2 Ekranas u sidegs po keli sekund i ir pasirodys krovimo piktograma nurodanti kad akumuliatorius kraunamas 3 Paspauskite ir palaikykite maitinimo mygtuk kad jungtum te imtuv 4 Nor dami i jungti imtuv...

Страница 50: ...oma 1 arba 2 piktograma rodanti kuris si stuvas iuo metu rodomas ekrane Jei norite prad ti pokalb su k dikiu paspauskite ir palaikykite kalbos funkcijos mygtuk Pokalbio simbolis bus rodomas ekrano apa...

Страница 51: ...u b du si stuvai bus suporuoti su imtuvu Garsinis signalas 9 pav junkite garsinio signalo funkcij paspauskite mygtuk de in kad suaktyvintum te tada paspauskite kalbos funkcijos mygtuk kad perkeltum te...

Страница 52: ...o ry kum ir laik po kurio ekranas u ges VOX re imas iame meniu yra 2 pozicijos renginio veikimo re imo nustatymas normalus arba VOX VOX re imo jautrumo keitimas Kalba i parinktis leid ia pasirinkti ka...

Страница 53: ...liko hroz nebezpe poran n nebo udu en d t te 4 Nepou vejte v robek v bl zkosti vody nebo zdroj tepla 5 Pou vejte pouze s dodan m nap jec m adapt rem 6 Zabra te kontaktu kontakt z str ky a kabel s ostr...

Страница 54: ...v hradn dodan nap jec adapt r 2 Displej se po n kolika sekund ch rozsv t a zobraz se ikona nab jen indikuj c signalizuj c nab jen baterie 3 Stiskn te a podr te tla tko nap jen pro zapnut p ij ma e 4...

Страница 55: ...a e kter zvuk zaznamenal Hudebn p ehr va Stisknut m tla tka hudby aktivujete na vys la ch ukol bavku Op tovn m stisknut m tla tka ji vypnete Funkce mluven Na obrazovce se zobraz ikona 1 nebo 2 signali...

Страница 56: ...s la i Vyberte registraci kamery 2 a stiskn te p rovac tla tko na druh m vys la i T mto zp sobem budou vys la e sp rov ny s p ij ma em Bud k obr 9 P ejd te do funkce bud k stiskn te tla tko vpravo pro...

Страница 57: ...razovka zhasne Re im VOX V tomto menu se nach z 2 polo ky Nastaven provozn ho re imu za zen norm ln nebo VOX Zm na citlivosti re imu VOX Jazyk Tato mo nost umo uje v b r jazyka Syst mov informace Zobr...

Страница 58: ...ls gbe minimum 1 m ter t vols g mivel fenn ll a gyermek s r l s nek vagy fullad s nak vesz lye 4 Ne haszn lja a term ket v z vagy h forr sok k zel ben 5 Kiz r lag a mell kelt h l zati adaptert haszn l...

Страница 59: ...a a t pegys g dug j t a vev egys ghez a m sik v g t pedig a h l zati aljzathoz FIGYELEM Kiz r lag a k szlethez mell kelt h l zati adaptert haszn lja 2 A kijelz n h ny m sodperc m lva felgyullad s megj...

Страница 60: ...a az ad elvesztette a kapcsolatot a vev vel Ha sz ks ges l sd a MEN kamera regisztr ci szakaszt VOX funkci A VOX zemm dot a k sz l k men j ben kell be ll tani A VOX m d automatikusan aktiv lja a kijel...

Страница 61: ...t s hoz nyomja meg a balra vagy a jobbra gombot Ezut n nyomja meg az OK Men gombot a kiv lasztott opci ba val bel p shez Nyomja meg a bekapcsol vissza gombot a f k perny re val visszat r shez A kamera...

Страница 62: ...eg a jobbra gombot a kurzor mozgat s hoz s az egyik m d kiv laszt s hoz Az zemm dok a balra jobbra gombok seg ts g vel is be ll that k l sd Automatikus manu lis kamerav lt s LCD megvil g t s A men pon...

Страница 63: ...ul la ndem na copiilor 2 Acest dispozitiv nu este juc rie Nu l sa i copiii s se joace cu el 3 Acest produs nu nlocuie te supravegherea unui copil de c tre o persoan adult Nu a eza i transmi torul sau...

Страница 64: ...numai adaptorul de alimentare furnizat 2 Emi torul va porni automat dup conectarea sursei de alimentare 3 LED ul albastru indic faptul c emi torul este activ Alimentare i pornire a receptorului fig 5...

Страница 65: ...i transmi torul sau cablurile n p tu ul copilului sau n raza de ac iune a acestuia min 1 metru distan deoarece exist riscul de r nire sau sufocare a copilului Dac imaginea sau sunetul sunt perturbate...

Страница 66: ...l curent al volumului Comutare automat manual a camerei Ap sa i i ine i ap sat butonul st nga pentru a activa dezactiva comutarea automat ntre emi toare Modul activat va fi indicat prin pictograma A d...

Страница 67: ...rsorul i butonul dreapta st nga pentru a schimba valoarea SET RI Data i ora Fig 10 Exist 2 elemente n acest meniu Setarea orei datei Setarea formatului Unitate de temperatur Seta i valoarea temperatur...

Страница 68: ...unc ionare a dispozitivului normal sau VOX Modificarea sensibilit ii modului VOX Limb Aceast op iune v permite s selecta i limba Informa ii despre sistem Afi eaz informa ii despre sistem Fotografiile...

Страница 69: ...se erh ltlich RU EC Brandline Group BABYLINE 5 1 2014 53 EU RED Directive 2014 30 EU EMC Directive 2014 35 EU LVD Directive 2011 65 EU RoHS Directive EC CE IT EU Dichiarazione di conformit semplificat...

Страница 70: ...ABYLINE 5 1 vyhovuje sm rnici 2014 53 EU RED Directive 2014 30 EU EMC Directive 2014 35 EU LVD Directive 2011 65 EU RoHS Directive pln zn n EU prohl en o shod je k dispozici na n sleduj c internetov a...

Страница 71: ...je Podrobn z ru n podm nky jsou k dispozici na webov ch str nk ch A r szletes garanci lis felt telek el rhet k a weboldalon Condi ii detaliate de garan ie sunt disponibile pe site www lionelo com Tha...

Страница 72: ...www lionelo com...

Отзывы: