background image

Connecting your CW-80 Transformer

7

Creating your layout

C

onnect your FasTrack terminal section to the CW-80 Transformer. Use the wires that 
are already attached to the terminal section. Make sure that all connections are secure. 

Loose connections can produce extremely high temperatures. For this reason, do not touch 
the terminals or track connections during use. Also, do not locate scenery materials such as 
lichen or ground foam near the terminals.

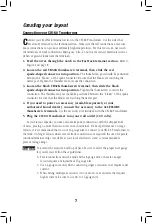
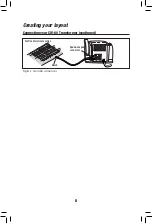
1.  Feed the wires through the notch in the FasTrack terminal section. 

Refer to 

Figure 4 on page 8.

2.  Loosen the red TRACK thumbscrew terminal, then slide the red  

spade-shaped connector into position. 

The thumbscrew post should be positioned 

between the “blades” of the spade connector. Be sure that the blades are touching the 
metal post. Tighten the thumbscrew to secure the connection.

3.  Loosen the black TRACK thumbscrew terminal, then slide the black  

spade-shaped connector into position. 

Tighten the thumbscrew to secure the 

connection.


The thumbscrew post should be positioned between the “blades” of the spade 

connector. Be sure that the blades are touching the metal post.

4.  If you need to power an accessory (available separately at your 

authorized Lionel dealer), connect the accessory to the ACCESSORY 
thumbscrew terminals. 

Use the accessory wire included with the CW-80 Transformer.

5.  Plug the CW-80 Transformer into your wall outlet (120 volts).

As your layout expands, you may also make power connections with the stripped ends 

of wires, placing no more than two wires on each terminal. For best performance on large 
layouts, it is recommended that you use 16-gauge wire to connect your CW-80 Transformer to 
the track. On larger layouts where several track connections are required, the use of separate 
junctions/terminal strips (available at your local electronics store) is recommended to 
prevent voltage drops. 

To prevent the excessive build up of heat, be sure to select the proper wire gauge 
for your layout. Follow these guidelines:

•  Track connections must be made with 18-gauge wire or heavier. Larger 

layouts require a minimum of 16-gauge wire.

•  Use 24-gauge wire only when connecting single accessories that require lower 

current.

•  When wiring multiple accessories (two or more) or accessories that require 

higher current, be sure to use 18- to 16-gauge wire.

Caution!

Содержание The Polar Express Streamliner

Страница 1: ...ARSOFAGE AS WITH ALL ELECTRIC PRODUCTS PRECAUTIONS SHOULD BE OBSERVED DURINGHANDLINGANDUSETOPREVENTELECTRICSHOCK TRANSFORMERRATINGS INPUT 120VAC 60HZONLY ACOUTPUT 18V 80VA Lionel FT Passenger Ready to...

Страница 2: ...n how to set up operate and maintain your train set for years of reliable operation The transformer included with this set should be periodically examined for conditions that may result in the risk of...

Страница 3: ...sformer 10 11 Reverse unit procedure 12 13 Operating the RailSounds RTR sound system 14 Adjusting the volume 15 CW 80 Transformer operation Powering your layout with the CW 80 Transformer 16 Setting t...

Страница 4: ...o not use this device if water is present Serious or fatal injuries may result Use the CW 80 Transformer only for its intended purpose The CW 80 Transformer was meant to operate on 120 volt 60 Hertz p...

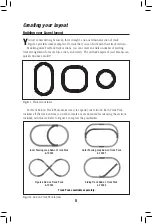
Страница 5: ...reams can quickly become a reality Creating your layout Figure 1 Track layout ideas 5 FasTrack Add on Track Packs make it easy to expand your railroad Each Track Pack includes all the track sections y...

Страница 6: ...fits together securely so you always get good electrical contact Take a look at Figure 3 to see how to join the track sections 1 Line up your two sections of track 2 Insert the rail tabs into the ope...

Страница 7: ...ade connector Be sure that the blades are touching the metal post 4 If you need to power an accessory available separately at your authorized Lionel dealer connect the accessory to the ACCESSORY thumb...

Страница 8: ...reating your layout 8 Connecting your CW 80 Transformer continued U 120 60z 0 18VAC A B U 0 18VAC TRACK ACCESSORY Figure 4 Controller connections FasTrack terminal section Notch Spade shaped connector...

Страница 9: ...to operate on 7 15 volts alternating cur rent Virtually all Lionel and Lionel compatible alternating current transformers are suitable Do not power your locomotive with direct current DC transformers...

Страница 10: ...The WHISTLE button will activate your locomotive s horn or whistle sounds The sound will continue until the button is released No external sound activation buttons are needed BELL The BELL button will...

Страница 11: ...comotive equipped with this fea ture Press BELL to begin the sound again to stop it Direction Press the DIRECTION button to go forward or reverse or to place the locomotive in neutral no movement head...

Страница 12: ...ntrols Also the locomotive can be locked into a certain mode of operation by throwing the reverse unit switch located on the underside of the frame see Figure 7 When the switch is thrown to the OFF po...

Страница 13: ...Running your train 13 Reverse unit procedure continued Figure 8 Direction control button location Direction control button Whistle control button Bell control button Throttle...

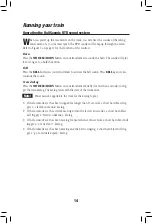
Страница 14: ...sound Crew dialog Press the WHISTLE HORN button on your transformer briefly for less than a second to trig ger the train dialog The dialog varies with the state of the locomotive Power must be applie...

Страница 15: ...train 15 Adjusting the volume Use the volume control knob on the underside of the locomotive to adjust the volume Refer to Figure 9 Figure 9 Volume control knob and switch locations RUN LOCK Volume c...

Страница 16: ...ory voltage are 0 18 volts AC each This Transformer is capable of operating trains up to and including dual motored AC locomotives To operate at this level of track power it may be necessary to discon...

Страница 17: ...sformer as discussed on page 7 2 Bring the throttle all the way back to the OFF position 3 Press and hold down the DIRECTION WHISTLE and BELL buttons on the transformer Refer to Figure 6 on page 11 fo...

Страница 18: ...oil on the locomotive s wheels contact rollers or your track You ll know your locomotive requires lubrication when visual inspection reveals dryness on the parts indicated in Figure 10 Remove accumul...

Страница 19: ...rubber tires increase the tractive effort of your locomotive allowing it to pull more cars at once During the course of normal operations the traction tires may become worn out Because you must remove...

Страница 20: ...your locomotive s lamp Your locomotive is illuminated by four lamps During the course of normal operations you may find that the lamps require replacement Lamp replacement should be performed by a Fa...

Страница 21: ...ey may require replacement To replace the lamp inside the car remove the two screws under the car See Figure 11 below Once this screw is removed you can lift the roof off remove the expired lamp and i...

Страница 22: ...tional track resistance may cause reduced track voltage as the trains move away from the power terminal section Install additional FasTrack terminal sections around your layout and connect them to you...

Страница 23: ...t installed and used in accordance with the instructions may cause harmful interference to radio communications However there is no guarantee that interference will not occur in a particular installat...

Страница 24: ...This warranty gives you specific legal rights and you may have other rights which vary from state to state Instructions for Obtaining Service If service for this Lionel LLC product is required bring...

Отзывы:

Похожие инструкции для The Polar Express Streamliner