background image

Wiring your CW-80 Transformer

7

Creating your layout

C

onnect your FasTrack terminal section to the CW-80 Transformer. Use the wires that are
already attached to the terminal section. Make sure that all connections are secure. Loose

connections can produce extremely high temperatures. For this reason, do not touch the
terminals or track connections during use. Also, do not locate scenery materials such as
lichen or ground foam near the terminals.

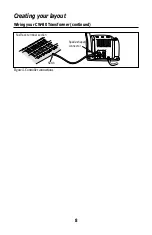
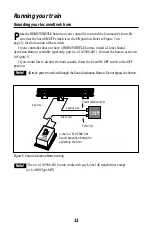
1.  Feed the wires through the notch in the FasTrack terminal section. 

Refer to

Figure 4 on page 8.

2.  Loosen the red TRACK thumbscrew terminal, then slide the red 

spade-shaped connector into position. 

The thumbscrew post should be positioned

between the “blades” of the spade connector. Be sure that the blades are touching the
metal post. Tighten the thumbscrew to secure the connection.

3.  Loosen the black TRACK thumbscrew terminal, then slide the black 

spade-shaped connector into position. 

Tighten the thumbscrew to secure the

connection. The thumbscrew post should be positioned between the “blades” of the spade
connector. Be sure that the blades are touching the metal post.

4.  If you need to power an accessory (available separately at your

authorized Lionel dealer), connect the accessory to the ACCESSORY
thumbscrew terminals. 

Use the accessory wire included with the CW-80 Transformer.

5.  Plug the CW-80 Transformer into your wall outlet (120 volts).

As your layout expands, you may also make power connections with the stripped ends of

wires, placing no more than two wires on each terminal. For best performance on large
layouts, it is recommended that you use 16-gauge wire to connect your CW-80 Transformer to
the track. On larger layouts where several track connections are required, the use of separate
junctions/terminal strips (available at your local electronics store) is recommended to
prevent voltage drops. 

To prevent the excessive build up of heat, be sure to select the proper wire gauge
for your layout. Follow these guidelines:

• Track connections must be made with 18-gauge wire or heavier. Larger

layouts require a minimum of 16-gauge wire.

• Use 24-gauge wire only when connecting single accessories that require lower

current.

• When wiring multiple accessories (two or more) or accessories that require

higher current, be sure to use 18- to 16-gauge wire.

Caution!

Содержание Pepsi-Cola

Страница 1: ...l 73 0033 250 7 05 CAUTION ELECTRICTOY NOT RECOMMENDED FOR CHILDREN UNDER EIGHTYEARS OFAGE ASWITH ALL ELECTRIC PRODUCTS PRECAUTIONS SHOULD BE OBSERVED DURING HANDLINGANDUSETOREDUCETHERISKOFELECTRICSHO...

Страница 2: ...n your train set for years of reliable operation The transformer included with this set should be periodically examined for conditions that may result in the risk of fire electric shock or injury to p...

Страница 3: ...FasTrack track sections 6 Wiring your CW 80 Transformer 7 8 Running your train Running your train set 9 Coupling 9 Experiencing the features of the CW 80 Transformer 10 11 Locking your locomotive into...

Страница 4: ...not use this device if water is present Serious or fatal injuries may result Use the CW 80 Transformer only for its intended purpose The CW 80 Transformer was meant to operate on 120 volt 60 Hertz pow...

Страница 5: ...reams can quickly become a reality Creating your layout Figure 1 Track layout ideas 5 Figure 2 Add on Track Pack layouts FasTrack Add on Track Packs make it easy to expand your railroad Each Track Pac...

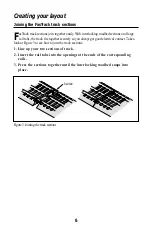
Страница 6: ...fits together securely so you always get good electrical contact Take a look at Figure 3 to see how to join the track sections 1 Line up your two sections of track 2 Insert the rail tabs into the ope...

Страница 7: ...e connector Be sure that the blades are touching the metal post 4 If you need to power an accessory available separately at your authorized Lionel dealer connect the accessory to the ACCESSORY thumbsc...

Страница 8: ...Creating your layout 8 Wiring your CW 80 Transformer continued U 120 60z 0 18VAC A B U 0 18VAC TRACK ACCESSORY Figure 4 Controller connections FasTrack terminal section Notch Spade shaped connector...

Страница 9: ...gned to operate on 8 18 volts alternating cur rent Virtually all Lionel and Lionel compatible alternating current transformers are suitable Do not power your locomotive with direct current DC transfor...

Страница 10: ...ill activate your locomotive s horn The sound will continue until the button is released No external sound activation buttons are needed BELL The BELL button will activate the bell sounds on locomotiv...

Страница 11: ...omotive equipped with this fea ture Press BELL to begin the sound again to stop it Direction Press the DIRECTION button to go forward or reverse or to place the locomotive in neutral no movement headl...

Страница 12: ...ed direction then slow it down without stopping Set the reverse unit switch to OFF Refer to Figure 7 for the location of the switch The locomo tive is now locked into your chosen direction When you no...

Страница 13: ...sure that the horn ON OFF switch is in the ON position Refer to Figure 7 on page 12 for the location of that switch If your controller does not have a HORN WHISTLE button install a Lionel Sound Activa...

Страница 14: ...sory voltage are 0 18 volts AC each This Transformer is capable of operating trains up to and including dual motored AC locomotives To operate at this level of track power it may be necessary to disco...

Страница 15: ...sformer as discussed on page 7 2 Bring the throttle all the way back to the OFF position 3 Press and hold down the DIRECTION WHISTLE and BELL buttons on the transformer Refer to Figure 6 on page 11 fo...

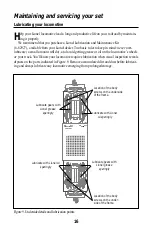
Страница 16: ...your track You ll know your locomotive requires lubrication when visual inspection reveals dryness on the parts indicated in Figure 9 Remove accumulated dirt and dust before lubricat ing and always lu...

Страница 17: ...r tires increase the tractive effort of your locomotive allowing it to pull more cars at once During the course of nor mal operations the traction tires may become worn out Because you must remove the...

Страница 18: ...ard while pulling up on the window shell until the tabs are released from the windows 4 Pull the lamp straight up and out of the socket Replace it with Lionel lamp no 600 8352 311 available at your au...

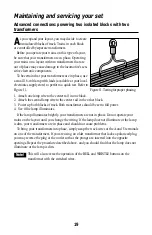
Страница 19: ...lamp wire to the center rail in the other block 3 Power up both blocks of track Both transformers should be set to full power 4 See if the lamp illuminates If the lamp illuminates brightly your transf...

Страница 20: ...th your dated sales receipt and completed warranty information to the nearest Authorized Lionel Service Center Your nearest Lionel Service Center can be found by calling 1 800 4 Lionel or by accessing...

Отзывы:

Похожие инструкции для Pepsi-Cola