background image

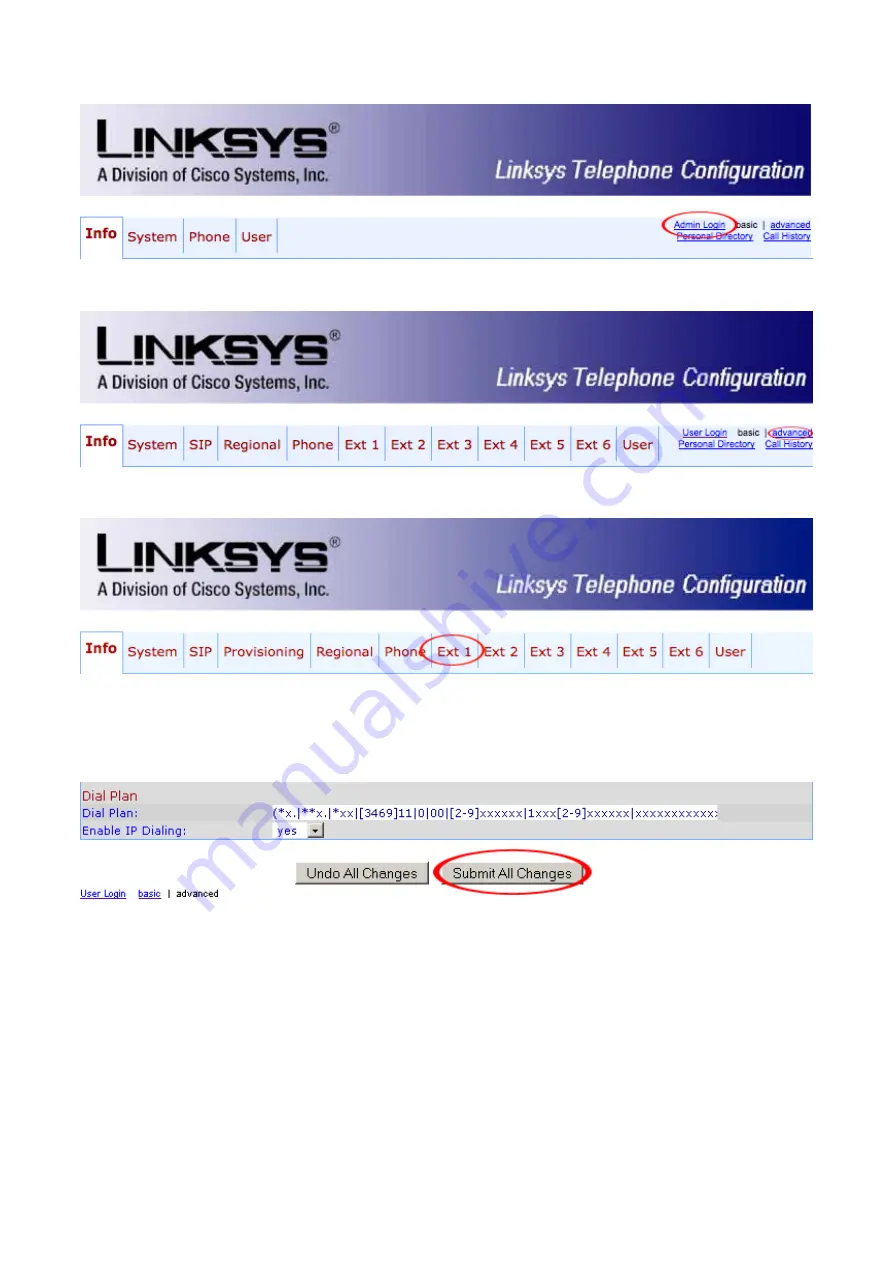
1. Click on the "Admin Login" link.

2. Click on "advanced" link.

3. Click on "Ext 1" link.

4. Navigate down to the "Dial Plan" group. Clear "Dial Plan" field, then copy and paste the
following value.

(*x.|**x.|*xx|[3469]11|0|00|[2-9]xxxxxx|1xxx[2-9]xxxxxx|xxxxxxxxxxxx.)

5. Click on the "Submit All Changes" button. The Linksys SPA-962 will reboot for changes to
take effect.

Manual Configuration

UAD Settings

STEP ONE: PBXware IP address.

1. Find out the IP address of PBXware server.

Содержание SPA962

Страница 1: ...istering Linksys SPA 962 2 1 Requirements 2 2 Manual Configuration 2 3 Auto Provisioning 3 Paging 4 Glossary Introduction How to use the Linksys SPA 962 with PBXware This How to is written as a genera...

Страница 2: ...n field value needs to be changed using the web interface STEP ONE Linksys SPA 962 Web Interface 1 Open a new browser window and enter the IP address in order to access the Linksys SPA 962 administrat...

Страница 3: ...Dial Plan field then copy and paste the following value x x xx 3469 11 0 00 2 9 xxxxxx 1xxx 2 9 xxxxxx xxxxxxxxxxxx 5 Click on the Submit All Changes button The Linksys SPA 962 will reboot for change...

Страница 4: ...erface login screen Example http 192 168 1 2 an example with IP address 2 Hit Enter on your keyboard 3 Login to PBXware with your e mail address and password STEP THREE UAD status 1 Make sure the UAD...

Страница 5: ...2 Make sure Status is set to Active Auto provisioning is set to No and DHCP is set to Yes...

Страница 6: ...3 Click on the Save button to save changes Creating Extension STEP ONE Add Extension 1 Navigate to Extensions Click on Add Extension 2 The standard options window will be shown below...

Страница 7: ...ext button STEP TWO Extension values 1 Enter values into the required field text boxes REQUIRED FIELDS Name Enter a name for the extension being created Example John Smith E mail Enter the e mail addr...

Страница 8: ...ted with the UAD is auto generated in order to allow the UAD to successfully register with the system The secret value can be changed PIN An auto generated PIN will allow access to voicemail and onlin...

Страница 9: ...962 Web Interface Registering Phone 2 Hit Enter on your keyboard STEP FOUR Configuring Linksys SPA 962 1 Click on Admin Login link 2 Click on Ext 1 link 3 Enter following details into their respectiv...

Страница 10: ...y the same number as the account Other fields Other options or fields should be left blank or as is by default they have no importance for registering your Linksys SPA 962 to PBXware Conclusion If eve...

Страница 11: ...screen Example http 192 168 1 2 an example with IP address 2 Hit Enter on your keyboard 3 Login to PBXware with your e mail address and password STEP THREE UAD status 1 Make sure the UAD is enabled To...

Страница 12: ...2 Make sure Status is set to active Auto provisioning is set to Yes and DHCP is set to Yes...

Страница 13: ...3 Click on the Save button to save changes Creating Extension STEP ONE Add Extension 1 Navigate to Extensions Click on Add Extension 2 The standard options window below will be shown...

Страница 14: ...ter values into the required field text boxes REQUIRED FIELDS Name Enter a name for the extension being created Example John Smith E mail Enter the e mail address associated with this extension This e...

Страница 15: ...other important operations Secret A secret value associated with the UAD is auto generated in order to allow the UAD to successfully register with the system The secret value can be changed PIN An aut...

Страница 16: ...l to IP address using the Up and Down button 3 Press the Menu button Registering Phone One Extension STEP THREE Linksys SPA 962 Web Interface 1 Open a new browser window and enter the IP address in or...

Страница 17: ...with TFTP server value Example 192 168 1 2 MA cfg an example with details filled in 5 Click on the Phone link 6 Navigate down to Line Key 1 2 3 and 4 and select values Line Key 1 Extension select 1 L...

Страница 18: ...hould have successfully registered the Linksys SPA 962 to PBXware Dial 123 to verify registration For further information please contact the manufacturer or check their website www cisco com LAN And W...

Страница 19: ...P Enter your PBXware wide WAN IP address Example 89 146 131 130 an example with details filled in 3 Click on the Save button You ll be prompted to click on the OK button to restart the PBXware for cha...

Страница 20: ...n the Submit All Changes button NOTE At the time the paging option is set for all lines and works once the handset is picked up Paging was tested with Firmware version 4 1 12 a Glossary DHCP Dynamic H...

Страница 21: ...nected Router A device that forwards data packets from one local area network LAN or wide area network WAN to another Switch Network device that selects a path or circuit for sending a unit of data to...

Отзывы: