background image

23

Chapter 5: Setting Up and Configuring the Router
Setup Tab - Forwarding

10/100 8-Port VPN Router

Port Range Forwarding

1. Select the Service from the pull-down menu, shown in Figure 5-15.

2. If the Service you need is not listed in the menu, please click the 

Service Management

 button to add the 

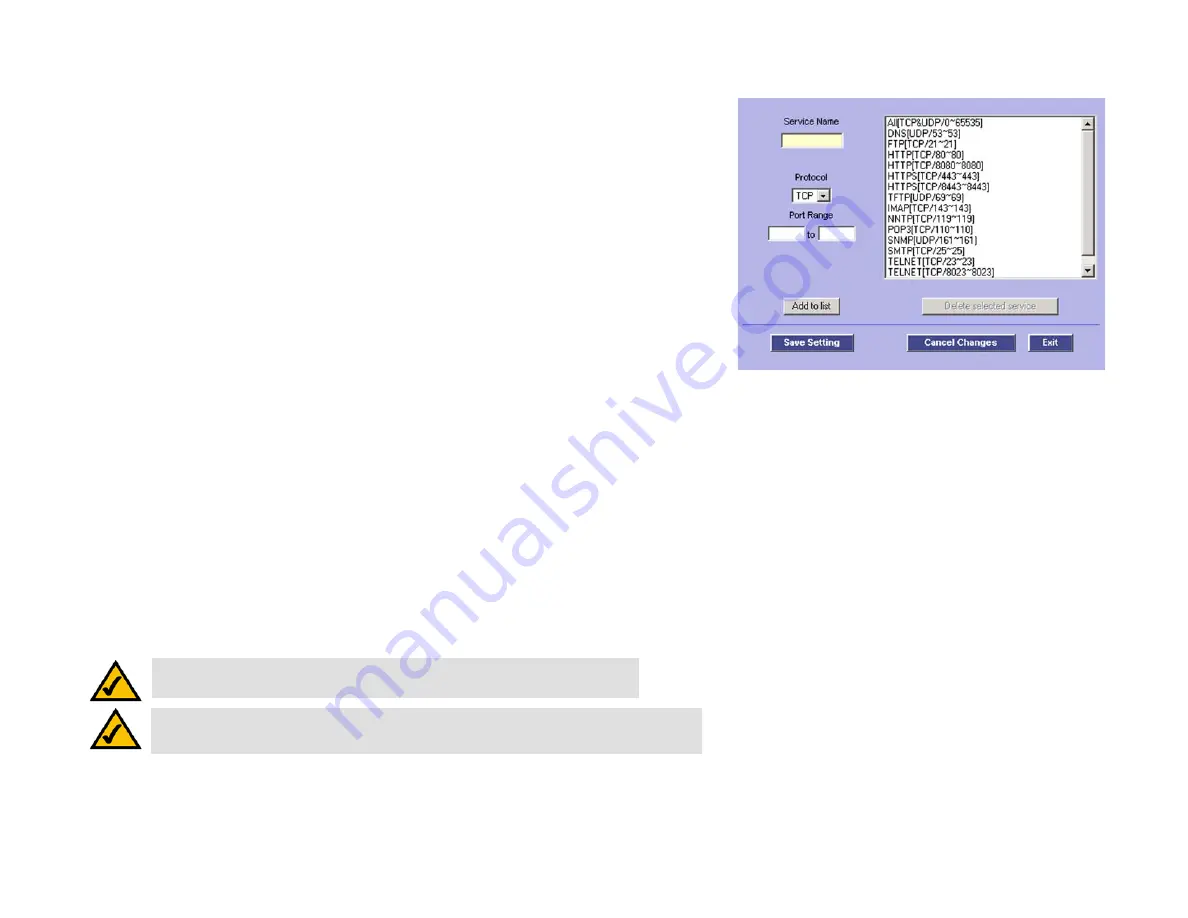
new Service Name, and enter the Protocol and Port Range. This will open the Service Management screen. 
Click the 

Add to List

 button. Then, click the 

Save Setting

 button. Click the 

Exit

 button.

3. Enter the IP Address of the server that you want the Internet users to access. Then enable the entry.

4. Click the 

Add to List

 button, and configure as many entries as you would like. You also can 

Delete selected 

application

.

Port Triggering 

Some Internet applications or games use alternate ports to communicate between server and LAN host. When 
you want to use those applications, enter the triggering (outgoing) port and alternate incoming port in this table. 
The Router will forward the incoming packets to the LAN host.

1. Enter the application name, range of port numbers, and the incoming port range.

2. You can click the 

Add to List

 button, shown in Figure 5-15, to add Port Triggering or 

Delete selected 

application

.

Click the 

Save Settings

 button to save the settings, click the 

Cancel Changes

 button to undo your changes, click 

the Show Tables to see the details.  

NOTE:

The Router’s WAN IP (NAT Public) Address may not be included in a range.

NOTE:

One-to-One NAT does not change the way the firewall functions work. Access to 

machines on the LAN from the Internet will not be allowed unless Network Access Rules are set.

Figure 5-16: Port Range Forwarding - 

Service Management

Содержание RV082

Страница 1: ...A Division of Cisco Systems Inc Model No WIRED VPN Router 10 100 8 Port RV082 User Guide ...

Страница 2: ... presented like this Also each figure diagram screenshot or other image is provided with a figure number and description like this Figure numbers and descriptions can also be found in the List of Figures section in the Table of Contents This exclamation point means there is a Caution or Warning and is something that could damage your property or the Router word definition This checkmark means ther...

Страница 3: ...he Router 10 Overview 10 Connection Instructions 11 Chapter 5 Setting Up and Configuring the Router 12 Overview 12 How to Access the Web based Utility 15 System Summary Tab 15 Setup Tab Network 18 Setup Tab Time 21 Setup Tab DMZ Host 22 Setup Tab Forwarding 22 Setup Tab UPnP Page 24 Setup Tab One to One NAT 24 Setup Tab MAC Clone 25 Setup Tab DDNS 25 Setup Tab Advanced Routing 26 DHCP Tab Setup 28...

Страница 4: ...N Pass Through 55 VPN Tab PPTP Server 55 Log Tab System Log 56 Log Tab System Statistics 57 Wizard Tab 58 Support Tab 63 Logout Tab 63 Appendix A Troubleshooting 64 Common Problems and Solutions 64 Frequently Asked Questions 74 Appendix B Installing the Linksys VPN Client 78 Appendix C Finding the MAC Address and IP Address for Your Ethernet Adapter 80 Windows 98 or Me Instructions 80 Windows 2000...

Страница 5: ...10 100 8 Port VPN Router Appendix H Glossary 89 Appendix I Specifications 93 Appendix J Warranty Information 94 Appendix K Regulatory Information 95 Appendix L Contact Information 96 ...

Страница 6: ...ure 5 5 Setup Tab Network 18 Figure 5 6 WAN Connection Type Obtain an IP Automatically 18 Figure 5 7 WAN Connection Type Static IP 19 Figure 5 8 WAN Connection Type PPPoE 19 Figure 5 9 WAN Connection Type PPTP 19 Figure 5 10 WAN Connection Type Transparent Bridge 20 Figure 5 11 WAN Connection Type Heart Beat Signal 20 Figure 5 12 Setup Tab Password 21 Figure 5 13 Setup Tab Time 21 Figure 5 14 Setu...

Страница 7: ...rt 34 Figure 5 34 System Management Tab Setting Backup 34 Figure 5 35 Port Management Tab Port Setup 34 Figure 5 36 Port Management Tab Port Status 35 Figure 5 37 Firewall Tab General 36 Figure 5 38 Firewall Tab Access Rules 37 Figure 5 39 Firewall Tab Add a New Access Rule 38 Figure 5 40 Settings are Successful 38 Figure 5 41 Firewall Tab Content Filter 39 Figure 5 42 VPN Tab Summary 40 Figure 5 ...

Страница 8: ...ard Selecting WAN Connection Types 59 Figure 5 64 Basic Setup Wizard Save Settings 59 Figure 5 65 Access Rule Wizard What is Access Rules 60 Figure 5 66 Access Rule Wizard Select the Action 60 Figure 5 67 Access Rule Wizard Select the Service 61 Figure 5 68 Access Rule Wizard Select the Source 61 Figure 5 69 Access Rule Wizard Select the Destination 62 Figure 5 70 Access Rule Wizard When it Works ...

Страница 9: ...ddress 81 Figure C 4 MAC Address Clone 81 Figure D 1 Mounting Brackets 82 Figure D 2 Attaching the Brackets to the Router and Rack Mounting the Router 83 Figure D 3 Wall Mounting the Router 84 Figure D 4 Wall Mounting Hardware 85 Figure F 1 Upgrade Firmware 87 ...

Страница 10: ...low users on your small office network to securely connect out to a corporate network The 10 100 8 Port VPN Router can serve as a DHCP Server and has a powerful SPI firewall to protect your PCs against intruders and most known Internet attacks It can be configured to filter internal users access to the Internet and has IP address filtering so you can specify exactly who has access to your network ...

Страница 11: ...allation and use of the 10 100 8 Port VPN Router Appendix B Installing the Linksys VPN Client This appendix instructs you on how to install the Linksys QuickVPN Client for remote users Appendix C Finding the MAC Address and IP Address for your Ethernet Adapter This appendix describes how to find the MAC address for your computer s Ethernet adapter so you can use the Router s MAC address cloning fe...

Страница 12: ...cations This appendix provides the Router s technical specifications Appendix J Warranty Information This appendix supplies the Router s warranty information Appendix K Regulatory Information This appendix supplies the Router s regulatory information Appendix L Contact Information This appendix provides contact information for a variety of Linksys resources including Technical Support ...

Страница 13: ...tic IP addressing ensures that the device assigned it will always have that same IP address until you change it Static IP addresses are commonly used with network devices such as server PCs or print servers If you use the Router to share your cable or DSL Internet connection contact your ISP to find out if they have assigned a static IP address to your account If so you will need that static IP ad...

Страница 14: ...of your local network when e mails are sent to their destination or when you have to connect to your company s network when you are out on the road How is your data protected That is when a VPN can help VPNs are called Virtual Private Networks because they secure data moving outside of your network as if it were still within that network When data is sent out across the Internet from your computer...

Страница 15: ...ong way to go for unsecured data and this is when a VPN serves its purpose What is a VPN A VPN or Virtual Private Network is a connection between two endpoints a VPN Router for instance in different networks that allows private data to be sent securely over a shared or public network such as the Internet This establishes a private network that can send data securely between these two locations or ...

Страница 16: ...ings When he connects to his office s router the two routers create a VPN tunnel encrypting and decrypting data As VPNs utilize the Internet distance is not a factor Using the VPN the telecommuter now has a secure connection to the central office s network as if he were physically connected Computer using VPN client software that supports IPSec to VPN Router The following is an example of a comput...

Страница 17: ...second Internet port or DMZ port When used as an additional Internet port it connects to a cable or DSL modem When used as a DMZ port it connects to a hub switch or public server Internet WAN1 The Internet port connects to a cable or DSL modem LEDs Diag Red The Diag LED lights up when the system is not ready The LED goes off when the system is ready System Green The System LED lights up when the R...

Страница 18: ... the Router is actively sending or receiving data over that port Reset Button The Reset button can be used in one of two ways If the Router is having problems connecting to the Internet press the Reset button for just a second with a paper clip or a pencil tip This is similar to pressing the Reset button on your PC to reboot it If you are experiencing extreme problems with the Router and have trie...

Страница 19: ...hen you will not need to configure your PCs Set up and configure the Router with the setting s provided by your Internet Service Provider ISP according to Chapter 5 Setting up and Configuring the Router The installation technician from your ISP should have left the setup information with you after installing your broadband connection If not you can call your ISP to request the information Once you...

Страница 20: ...g the DMZ Internet port connect a second cable to it and the other end to the network device e g modem or public server 4 Power on the cable or DSL modem and the other network device if using one 5 Connect the included power adapter to the Router s Power port on the back of the Router as shown in Figure 4 4 and then plug the power adapter into an electrical outlet The System LED on the front panel...

Страница 21: ...rd Setup Tab From this tab you can set the basic settings on your network The screens available from this tab include Network Enter the Internet connection and network settings on this screen Password From this screen you can change the Router s password on this screen For network security you should always change the password from its default setting Time Change the time shown on the network from...

Страница 22: ... Link Backup and using both connections in concert with Load Balance SNMP SNMP or Simple Network Management Protocol is a network protocol that provides network administrators with the ability to monitor the status of the Router and receive notification of any critical events as they occur on the network SNMP can be managed from this screen Diagnostic From this screen you can use the Router s two ...

Страница 23: ...n displays a quick view of VPN activity and status Gateway to Gateway From this screen users can administer tunnels between two VPN devices Client to Gateway From this screen tunnels between a Local VPN device and a mobile user can be administered VPN Client Access From this screen you can manage the use of the Linksys QuickVPN Client the VPN Client software that came with this Router This allows ...

Страница 24: ...tton System Summary Tab The first screen that appears is System Summary Tab This screen displays the Router s current status and settings This information is read only Words that are underlined will when clicked open the Setup page for that feature On the right side of the screen and all other screens in the Utility will be a link to the Site Map which has links to all of the Utility s tabs Click ...

Страница 25: ...page of the LAN Management Tab Network Setting Status LAN IP This shows the Router s current LAN IP Address and hyperlinks to that section of the Setup Tab WAN1 IP This shows the IP Address of the WAN1 IP port hyperlinked to that section of the Setup Tab When WAN1 is set up to Obtain an IP automatically two buttons will be shown here Release and Renew Click the Release button to release the curren...

Страница 26: ...s displays the amount of VPN users connected via GroupVPN1 Current Connected The Group Name of GroupVPN2 users This displays the amount of VPN users connected via GroupVPN2 If GroupVPN is disabled it will show No Group VPN was defined Log Setting Status This hyperlink will take you to the System Log page of the Log Tab If you have not set up the Log s mail server this will show E mail cannot be se...

Страница 27: ...ct two Broadband connections to the Router at once specifying between using one as a Primary connection with Smart Link Backup and using both connections in concert with Load Balance These settings can be found on the Dual Wan screen of the Systems Management Tab The DMZ setting allows one network PC to be exposed to the Internet to use special purpose services such as Internet gaming or video con...

Страница 28: ... Time setting 3 By selecting the Keep Alive option the Router will keep the connection alive by sending out a few data packets at the Redial Period so your Internet service thinks that the connection is still active PPTP Point to Point Tunneling Protocol 1 Enter the WAN IP Address Subnet Mask and Default Gateway Address provided by your ISP 2 Enter the User Name and Password you use to access your...

Страница 29: ...network segments including the range of IP addresses each network includes When this is selected the WAN and LAN must be in the same subnect and only one WAN port can be set in Transparent Bridge mode Heart Beat Signal Heart Beat Signal is a service used in Australia only If you are using a Heart Beat Signal connection check with your ISP for the necessary setup information Figure 5 10 WAN Connect...

Страница 30: ... the changes Setup Tab Time Time The Router uses the time settings to time stamp log events to automatically update the Content Filter List and for other internal purposes Set the local time with Set the local time using Network Time Protocol NTP automatically or Set the local time Manually When you choose to have the time set by using Network Time Protocol the Router will automatically connect to...

Страница 31: ...to set up public services on your network When users outside your network i e from the Internet make certain requests on your network the Router can forward those requests to the appropriate computers equipped to handle the requests If for example you set port number 80 HTTP to be forwarded to IP Address 192 168 1 2 then all HTTP requests from outside users will be forwarded to 192 168 1 2 You may...

Страница 32: ...ome Internet applications or games use alternate ports to communicate between server and LAN host When you want to use those applications enter the triggering outgoing port and alternate incoming port in this table The Router will forward the incoming packets to the LAN host 1 Enter the application name range of port numbers and the incoming port range 2 You can click the Add to List button shown ...

Страница 33: ...vice you ve added by clicking the Show Tables button Setup Tab One to One NAT One to One NAT opens the firewall for one network user a lot like the DMZ host feature In this feature however the network user is restricted to a single website To enable One to One NAT check the Enable box at the top of the screen To set this up you must define internal and external address ranges of equal length Set t...

Страница 34: ...r in your LAN Before configuring DDNS you need to visit www dyndns org or www 3322 org and register a domain name The DDNS service is provided by DynDNS org DDNS Service The DDNS feature is disabled by default To enable this feature just select DynDNS org or 3322 org from the pull down menu and enter the User name Password and Host Name of the account you set up with the DDNS service Your IP Addre...

Страница 35: ...uter is hosting your network s connection to the Internet Select Router mode if the Router exists on a network with other routers including a separate network gateway that handles the Internet connection When this Router is in Router Mode you must have another router function as the gateway in order for any computer connected to the Router to be able to connect to the Internet RIP Routing Informat...

Страница 36: ...IP is the Router s IP Address If you have another router handling your network s Internet connection enter the IP Address of that router instead 4 Hop Count max 15 This value gives the number of nodes that a data packet passes through before reaching its destination A node is any device on the network such as switches PCs etc 5 Interface LAN WAN1 WAN2 DMZ This setting directs where the static rout...

Страница 37: ...e is 5 43 200 Minutes Range Start End Enter a starting IP address and ending IP address to make a range to assign dynamic IPs The default range is 100 149 Static IP The Static IP section of this screen is provided in the event you want the IP Addresses of certain PCs on your network to remain static In this event enter the Static IP Address in the space provided along with that PC s MAC Address Cl...

Страница 38: ...hich WAN port is the primary leaving the other as backup Load Balance automatically manages the Internet connection through both WAN ports Network Service Detection Network Service Detection helps manage your connection and can report when your connection experiences problems To utilize this service select Enable Network Service Detection Select Remove the Connection if you do not wish to utilize ...

Страница 39: ... new Service Name and enter the Protocol and Port Range This will open the Service Management screen Click the Add to List button Then click the Save Setting button Click the Exit button 3 Enter the IP Address of the server that you want the Internet users to access Then enable the entry 4 Click the Add to List button and configure as many entries as you would like You also can Delete selected app...

Страница 40: ... of the network administrator who can be contacted with updates about the Router System Location The network administrator s contact information is placed into this field Enter an E mail address telephone number or pager number Get Community Name Create a name no more than 64 alphanumeric characters in length for a group or community of administrators who can view SNMP data The default value is Pu...

Страница 41: ... if the Router is able to contact the remote host If users on the network are having problems accessing services on the Internet try pinging the DNS server or another machine at the ISP s location If this test is successful try pinging other IP Addresses This will show if the problem lies with the ISP s connection or the other IP Address Enter the IP address being pinged and click the Go button Th...

Страница 42: ...ther screen will then appear to show that the system is rebooting System Management Tab Firmware Upgrade Firmware Upgrade Use this function to upgrade the Router s firmware to the newest version If you have already downloaded the firmware into your computer then click the Browse button to look for the file Then click the Firmware Upgrade Right Now button Firmware Download Click the Firmware Downlo...

Страница 43: ...der for the changes to take effect Export Configuration File Click the Export button and choose where you would like to store your Preferences file This file will be called RV082 exp by default but you may rename it if you wish This process may take up to a minute Port Management Tab Port Setup From this screen you can configure the connection status for each port such as Priority Speed Duplex and...

Страница 44: ...r click the Cancel Changes button to undo your changes Port Management Tab Port Status Users can choose the port number from the pull down menu to see the status of the selected port The Summary table will show the settings for the selected port such as Type Link Status up or down Port Activity Enabled or Disabled Priority High or Normal Speed Status 10Mbps or 100Mbps Duplex Status Half or Full Au...

Страница 45: ...outer will drop both the unaccepted TCP request and ICMP packets from the WAN side The hacker will not find the Router by pinging the WAN IP address If DMZ is enabled this function will be disabled Remote Management This Router supports remote management If you want to manage this Router through the WAN connection click Enable Then specify which port you wish to use for remote management eg 80 or ...

Страница 46: ...elect from this pull down menu which page of Rules you wish to display Entries Per Page From this pull down menu you can select how many entries will be displayed per page Priority This shows depending upon the number of Rules entered the numeric order of Rules having higher or lower priority Enable Enable or disable Rules by clicking on the corresponding box Action Allow or Deny traffic to or fro...

Страница 47: ...deny access Service Select the service from the Service pull down menu If the service you need is not listed in the menu click the Service Management button to add a new Service Enter the Service Name Protocol and Port Range and then click Add to list Source Interface Select the source to which this service will apply WAN sources are over the Internet LAN sources are within your network Source Des...

Страница 48: ...ing websites those in your network can access Click the Block Forbidden Domains box to enable this function Then enter in the IP Address es for those websites you wish to restrict clicking the Add to List button after you enter each IP Address Website Blocking by Keywords This allows a further increase to network security by blocking websites that use keywords designated by you in this list Click ...

Страница 49: ...of tunnels and also select how many tunnels you would like listed per page These tunnels will then be displayed here with the following information about each tunnel Tunnel No As the tunnels are listed here they are put in order 1 50 Tunnel Name This is the Tunnel Name or Group ID Name that you entered when creating the tunnel Status This will show the status of the tunnel whether it is Connected ...

Страница 50: ...ES Authentication MD5 SHA1 and Group 1 2 5 selected from the IPSec Setup sections of the Gateway to Gateway and Client to Gateway screens Local Group This will show the IP address and Subnet Mask of the Local Group set up Remote Client This column will show the remote client authentication type that is used for this specific GroupVPN Remote Clients Status Clicking Detail List will display the Grou...

Страница 51: ...uthentication IP E mail Addr USER FQDN Authentication Dynamic IP Domain Name FQDN Authentication Dynamic IP E mail Addr USER FQDN Authentication The type of Local Security Gateway Type must match the Remote Security Gateway Type of VPN devices in the other end of tunnel The first three options are easier to use because the IP Addresses are static and do not change IP Only If you select IP Only onl...

Страница 52: ...figures the remote settings for the VPN tunnel you are creating Remember all settings for the Remote Group must be exactly the same as those for the Local Group Remote Security Gateway Type There are five types They are IP Only IP Domain Name FQDN Authentication IP E mail Addr USER FQDN Authentication Dynamic IP Domain Name FQDN Authentication Dynamic IP E mail Addr USER FQDN Authentication The ty...

Страница 53: ...t match the Local Secure Group on the other end of the tunnel Selecting IP Address allows only one computer with the spe cific IP Address access to the tunnel The default IP is 192 168 1 0 If you select Subnet all computers on the local subnet can access the tunnel The default IP is 192 168 1 0 and default Subnet Mask is 255 255 255 192 If you select IP Range you can specify a range of IP Addresse...

Страница 54: ... the same Authentication key If MD5 is selected the Authentication Key is 32 bit If users do not fill up to 32 bit this field will be filled up to 32 bit automatically by 0 If SHA1 is selected the Authentication Key is 40 bit If users do not fill up to 40 bit this field will be filled up to 40 bit automatically by 0 IKE with Preshared Key automatic IKE is an Internet Key Exchange protocol that use...

Страница 55: ...Both sides must use the same Encryption method If users enable the AH Hash Algorithm in Advanced then it is recommended to select Null to disable encrypting decrypting ESP packets in Phase 2 but both sides of the tunnel must use the same setting Phase 2 Authentication There are two methods of authentication MD5 and SHA The Authentication method determines a method to authenticate the ESP packets B...

Страница 56: ...ault standards for packet structure With the use of AH as the security protocol protected is extended forward into IP header to verify the integrity of the entire packet by use of portions of the original IP header in the hashing process There are two algorithms MD5 and SHA1 MD5 produces a 128 bit digest to authenticate packet data and SHA1 produces a 160 bit digest to authenticate packet data Bot...

Страница 57: ...utomatically appear in this field IP Domain Name FQDN Authentication This selection affords a greater amount of security because each side of the tunnel must use the same IP Address as well as the same domain name Only one domain name can be used for one tunnel and may not be applied to another tunnel These settings must match the Remote Group Setup on the other end of the tunnel IP E mail Addr US...

Страница 58: ...able to access the tunnel It s the IP Address of the remote VPN Router or device which you wish to communicate The remote VPN device can be another VPN Router or a VPN Server If you know the static IP address of remote VPN device select IP address from drop down menu If you don t know the static IP address of remote VPN device but the domain name of remote VPN device is known you can select IP by ...

Страница 59: ...enabled Further Remote Client Setup options become available when you select GroupVPN There are three types of Remote Client Domain Name FQDN E mail Address User FQDN and Microsoft XP 2000 VPN Client Domain Name FQDN Fully Qualified Domain Name Enter the Domain Name of the Remote Client When the Remote Client requests to create a tunnel with the Router the Router will act as a responder The Domain...

Страница 60: ...t digest SHA is recommended because it is more secure and both sides must use the same Authentication method Encryption Key This field specifies a key used to encrypt and decrypt IP traffic and the Encryption Key is generated yourself The hexadecimal value is acceptable in this field Both sides must use the same Encryption Key If DES is selected the Encryption Key is 16 bit If users do not fill up...

Страница 61: ...e force to break encryption keys is not able to obtain other or future IPSec keys Phase 2 DH Group There are three groups of different prime key lengths Group1 is 768 bits Group2 is 1 024 bits and Group 5 is 1 536 bits If network speed is preferred select Group 1 If network security is preferred select Group 5 You can choose the different Group with the Phase 1 DH Group you chose If Perfect Forwar...

Страница 62: ...be limited as Aggressive Mode If you select Dynamic IP in Remote Client Type in tunnel mode it will also be limited as Aggressive Mode Compress Support IP Payload compression Protocol IP Comp The Router supports IP Payload Compression Protocol IP Payload Compression is a protocol to reduce the size of IP datagrams If Compress is enabled the Router will propose compression when initiating a connect...

Страница 63: ...e user s password here Confirm New Password Confirm that password by re entering it here Change Password Allowed If you want to allow users the right to change their password click the radio button beside Yes If not click the radio button beside No Active Clicking this box will make the new user active Add to List Clicking this button adds the user to the list at the bottom of the screen All of th...

Страница 64: ...ging in remotely with Windows XP or 2000 using PPTP to create VPN connections Enable PPTP Server Checking this box enables the PPTP Server IP Address Range Enter the internal IP Address Range for remote users connecting to your Local Network The Router supports up to five PPTP connections The default IP range is 200 204 Users Setting Enter the remote users User Name and Password Then enter the pas...

Страница 65: ...ert which are emailed log entries and alerts Mail Server If you wish to have any log or alert information E mailed to you then you must enter the name or numerical IP address of your SMTP server Your Internet Service Provider can provide you with this information Send E mail To This is the E mail address where the log files will be sent Log Queue Length entries This instructs the Router how often ...

Страница 66: ...t the outgoing logs LAN IP Destination URL IP and Service Port number Incoming Log Table Click this button to view information about the incoming logs Source IP and Destination Port number Clear Log Now This button will clear out your log without e mailing it Clicking this button will delete all log information Log Tab System Statistics This tab displays the system statistics including the Device ...

Страница 67: ...rity policy or Access Rule Basic Setup 1 Click the Launch Now button to run the Basic Setup Wizard to quickly set up the Router to access the Internet 2 The first screen that appears requests whether the WAN2 DMZ Internet port will be used as a WAN Internet port or DMZ port Select Dual WAN to use the port as a WAN port or select DMZ to use the port as a DMZ port Click Next to continue Click Exit i...

Страница 68: ...specific IP Click Next to continue Click Previous if you want to return to the previous screen Click Exit if you want to exit the wizard If you chose Static IP enter the Static IP Subnet Mask and Default Gateway provided by your ISP Click Next to continue Click Previous if you want to return to the previous screen Click Exit if you want to exit the wizard If you chose PPPoE enter the User Name and...

Страница 69: ...ess Rule Wizard to help you easily set up the Firewall security policy for the Router 2 The first screen to appear explains the Access Rules Click Next to continue Click Exit if you want to exit the wizard 3 From the next screen choose if you d like to Allow or Deny the action you ll be choosing for the rule Click Next to continue Click Previous if you want to return to the previous screen Click E...

Страница 70: ...t to return to the previous screen Click Exit if you want to exit the wizard 5 From the next screen select the Source from the Ethernet drop down menu Then select the users from the drop down menu Any single or Range Click Next to continue Click Previous if you want to return to the previous screen Click Exit if you want to exit the wizard Figure 5 68 Access Rule Wizard Select the Source Figure 5 ...

Страница 71: ...always in effect or Scheduling if you want to define a range for a specific time and day of the week Click Next to continue Click Previous if you want to return to the previous screen Click Exit if you want to exit the wizard 8 At the final screen if you don t need to make any changes click Save Settings Click Previous if you want to return to the previous screen Click Exit if you want to exit the...

Страница 72: ...then click Downloads for this Product Click User Guide Linksys Web Site Click the Linksys Web Site button and it will link to the Support page of the Linksys Web Site www linksys com Logout Tab The Logout tab is located on the upper left corner of the Web Interface Clicking this tab will terminate the management session After you click the Logout tab you will be asked to confirm that you want to t...

Страница 73: ...ng network components are installed box select the TCP IP associated with your Ethernet adapter If you only have one Ethernet adapter installed you will only see one TCP IP line with no association to an Ethernet adapter Highlight it and click the Properties button C In the TCP IP properties window select the IP address tab and select Specify an IP address Enter a unique IP address that is not use...

Страница 74: ...ion Properties window I Restart the computer if asked For Windows XP The following instructions assume you are running Windows XP with the default interface If you are using the Classic interface where the icons and menus look like previous Windows versions please follow the instructions for Windows 2000 A Click Start and Control Panel B Click the Network and Internet Connections icon and then the...

Страница 75: ... window 5 Restart the computer if asked 6 Click the OK button in the Internet Protocol TCP IP Properties window and click the OK button in the Local Area Connection Properties window 7 Restart the computer if asked For Windows XP The following instructions assume you are running Windows XP with the default interface If you are using the Classic interface where the icons and menus look like previou...

Страница 76: ...a problem with the connection Try the ping command from a different computer to verify that your original computer is not the cause of the problem 3 I am not getting an IP address on the Internet with my Internet connection A Refer to Problem 2 I want to test my Internet connection to verify that you have connectivity B If you need to register the MAC address of your Ethernet adapter with your ISP...

Страница 77: ...imitations due to occasional incompatibility with the NAT standard Change the IP address for the Router to another subnet to avoid a conflict between the VPN IP address and your local IP address For example if your VPN server assigns an IP address 192 168 1 X X is a number from 1 to 254 and your local LAN IP address is 192 168 1 X X is the same number used in the VPN IP address the Router will hav...

Страница 78: ...many entries as you like When you have completed the configuration click the Save Settings button 7 I need to set up online game hosting or use other Internet applications If you want to play online games or use Internet applications most will work without doing any port forwarding or DMZ hosting There may be cases when you want to host an online game or Internet application This would require you...

Страница 79: ...sable all the forwarding entries if you want to successfully use DMZ hosting since forwarding has priority over DMZ hosting In other words data that enters the Router will be checked first by the forwarding settings If the port number that the data enters from does not have port forwarding then the Router will send the data to whichever PC or network device you set for DMZ hosting Follow these ste...

Страница 80: ... gain access Please follow these directions to verify that you do not have any proxy settings and that the browser you use is set to connect directly to the LAN For Microsoft Internet Explorer 5 0 or higher A Click Start Settings and Control Panel Double click Internet Options B Click the Connections tab C Click the LAN settings button and remove anything that is checked D Click the OK button to g...

Страница 81: ...192 168 1 50 Subnet Mask 255 255 255 0 Gateway 192 168 1 1 D Perform the upgrade using the Router s Web based Utility through its System Management Firmware Upgrade tab If the firmware upgrade failed the Router will still work using its current firmware If you want to use a backup firmware version go to System Management Restart Select Backup Firmware Version Click the Restart Router button to res...

Страница 82: ...ettings button to continue If your difficulties continue change the Size to different values Try this list of values one value at a time in this order until your problem is solved 1462 1400 1362 1300 16 I need to use port triggering Port triggering looks at the outgoing port services used and will trigger the Router to open a specific port depending on which port an Internet application uses Follo...

Страница 83: ...ns What is the maximum number of IP addresses that the Router will support The Router will support up to 253 IP addresses Is IPSec Passthrough supported by the Router Yes enable or disable IPSec Passthrough on the VPN VPN Pass Through tab Where is the Router installed on the network In a typical environment the Router is installed between the cable DSL modem and the LAN Plug the Router into the ca...

Страница 84: ... Can multiple gamers on the LAN get on one game server and play simultaneously with just one public IP address It depends on which network game or what kind of game server you are using For example Unreal Tournament supports multi login with one public IP How do I get Half Life Team Fortress to work with the Router The default client port for Half Life is 27005 The computers on your LAN need to ha...

Страница 85: ...uration screen for the Router What can I do You may have to remove the proxy settings on your Internet browser e g Netscape Navigator or Internet Explorer Or remove the dial up settings on your browser Check with your browser documentation and make sure that your browser is set to connect directly and that any dial up is disabled Make sure that your browser is set to connect directly and that any ...

Страница 86: ...e Router is compatible with virtually any cable or DSL modem that supports Ethernet What is the maximum number of VPN sessions allowed by the Router The maximum number depends on many factors At least one IPSec session will work through the Router however simultaneous IPSec sessions may be possible depending on the specifics of your VPNs How can I check whether I have static or DHCP IP addresses A...

Страница 87: ...pe D Linksys_QuickVPN_1028 exe where D is your CD ROM drive Then click the OK button The Client will immediately begin installing the software onto your hard drive at C Program Files Linksys Linksys VPN Client 3 The License Agreement screen will appear Read the agreement and click the Yes button to proceed Clicking the Back or No buttons will close the installation 4 The Linksys VPN Client softwar...

Страница 88: ...Server Address of the VPN connection onto which you will be logging Once you re done click the Connect button to connect to the VPN connect you can save your VPN connection information by clicking the Save button or delete it by clicking the Delete button Clicking the Help button will open a help screen For future connections there is an icon that gets placed on the desktop labeled Linksys QuickVP...

Страница 89: ...ipcfg Then press the Enter key or the OK button 2 When the IP Configuration screen appears select the Ethernet adapter you have connected to the Router via a CAT 5 Ethernet network cable 3 Write down the Adapter Address as shown on your computer screen This is the MAC address for your Ethernet adapter and is shown as a series of numbers and letters The MAC address Adapter Address is what you will ...

Страница 90: ...AC address cloning or MAC filtering The example in Figure C 3 shows the Ethernet adapter s IP address as 192 168 1 100 Your computer may show something different For the Router s Web based Utility For MAC address cloning enter the MAC Address in the User Defined WAN1 or WAN2 MAC Address field or select MAC Address from this PC Click Save Settings to save the MAC Cloning settings or click the Cance...

Страница 91: ...rackets Setting up the Router You can set the Router on a desktop install it in a rack with attached brackets or mount it on the wall Placement of the Router Set the Router on a desktop or other flat secure surface Do not place excessive weight on top of the Router that could damage the Router Rack Mounting the Router The Router comes with two brackets and eight screws for mounting on a 19 inch ra...

Страница 92: ...oles with the holes in the Router and attach with the screws using four on each side of the Router After the brackets are attached to the Router by screws you can rack mount it Attach the Router to the rack with two screws on each side Figure D 2 Attaching the Brackets to the Router and Rack Mounting the Router ...

Страница 93: ... The horizontal distant between the two holes is 3 701 in 94mm Install two screws or nails into the wall 3 701 in 94 mm apart After the nails are secured on the wall line up the Router s holes with the screws on the wall to wall mount it The wall mount holes are shown below in Figure D 3 The suggested mounting hardware is shown in Figure D 4 Figure D 3 Wall Mounting the Router ...

Страница 94: ...85 Appendix D Physical Setup of the Router Setting up the Router 10 100 8 Port VPN Router Figure D 4 Wall Mounting Hardware ...

Страница 95: ...rge the Router cannot update the correct time except when connected to the NTP Server Do not attempt to replace this battery yourself You must call Linksys Technical Support to replace the battery Danger of explosion exists if the lithium battery is incorrectly replaced The battery can only be replaced with the same or equivalent type of CR2032 lithium battery WARNING The lithium battery can explo...

Страница 96: ...le from the Linksys website www linksys com or click the Firmware Download from Linksys Web Site button Select the Router from the pull down menu and choose the firmware from the options 2 Extract the file on your computer 3 Click the System Management Tab and then the Firmware Upgrade page 4 On the Firmware Upgrade screen enter the location of the extracted firmware upgrade file or click the Brow...

Страница 97: ... instructions or protocol all PCs follow to communicate over a wired or wireless network Your PCs will not be able to utilize networking without having TCP IP enabled Windows Help provides complete instructions on enabling TCP IP Shared Resources If you wish to share printers folders or files over your network Windows Help provides complete instructions on utilizing shared resources Network Neighb...

Страница 98: ...r e mail server with a dynamic IP address use a fixed domain name Default Gateway A device that forwards Internet traffic from your local area network DHCP Dynamic Host Configuration Protocol A protocol that lets one device on a local network known as a DHCP server assign temporary IP addresses to the other network devices typically computers DMZ Demilitarized Zone Removes the Router s firewall pr...

Страница 99: ...n that can occur in two directions over a single line but only one direction at a time Hardware The physical aspect of computers telecommunications and other information technology devices HTTP HyperText Transport Protocol The communications protocol used to connect to servers on the World Wide Web IP Internet Protocol A protocol used to send data over a network IP Address The address used to iden...

Страница 100: ...thernet A type of broadband connection that provides authentication username and password in addition to data transport PPTP Point to Point Tunneling Protocol A VPN protocol that allows the Point to Point Protocol PPP to be tunneled through an IP network This protocol is also used as a type of broadband connection in Europe Router A networking device that connects multiple networks together such a...

Страница 101: ...used for accessing remote PCs TFTP Trivial File Transfer Protocol A version of the TCP IP FTP protocol that uses UDP and has no directory or password capability Topology The physical layout of a network TX Rate Transmission Rate Upgrade To replace existing software or firmware with a newer version Upload To transmit a file over a network URL Uniform Resource Locator The address of a file located o...

Страница 102: ...MZ Internet DMZ Mode Diag 1 8 UPnP able cert Yes Security Features SPI Firewall DES and 3DES Encryption for IPSec VPN Tunnel Dimensions 11 x 1 75 x 9 50 W x H x D 279 4 mm x 44 45 mm x 241 3 mm Unit Weight 52 oz 1 47 kg Power Input AC100 240V 0 4A Output DC 3 3V 3A Certifications FCC Class B CE Class B Operating Temp 0ºC to 40ºC 32ºF to 104ºF Storage Temp 0ºC to 70ºC 32ºF to 158ºF Operating Humidi...

Страница 103: ...nd handling charges ALL IMPLIED WARRANTIES AND CONDITIONS OF MERCHANTABILITY OR FITNESS FOR A PARTICULAR PURPOSE ARE LIMITED TO THE DURATION OF THE WARRANTY PERIOD ALL OTHER EXPRESS OR IMPLIED CONDITIONS REPRESENTATIONS AND WARRANTIES INCLUDING ANY IMPLIED WARRANTY OF NON INFRINGEMENT ARE DISCLAIMED Some jurisdictions do not allow limitations on how long an implied warranty lasts so the above limi...

Страница 104: ...oes cause harmful interference to radio or television reception which is found by turning the equipment off and on the user is encouraged to try to correct the interference by one or more of the following measures Reorient or relocate the receiving antenna Increase the separation between the equipment or devices Connect the equipment to an outlet other than the receiver s Consult a dealer or an ex...

Страница 105: ...king with Linksys products Give our advice line a call at 800 546 5797 LINKSYS Or fax your request in to 949 261 8868 If you experience problems with any Linksys product you can call us at 800 326 7114 Don t wish to call You can e mail us at support linksys com If any Linksys product proves defective during its warranty period you can call the Linksys Return Merchandise Authorization department fo...

Отзывы: