

Quick Installation Guide
Applicable models: LDV-DM202AUSK/LDV-DM204AUSK 2/4-port Dual Monitor DVI KVM Switch w/ Audio&Mic
Rev. 1.7 Copyright© All rights reserved
Stop Auto-scan
(While autoscanning) Right-click the KVM Switcher icon to
evoke the operation menu, then select
Stop Auto-Scan
to de-
activate autoscanning. Or you can press any button on the
face-panel to stop Auto-scan.
KVM Switcher configuration
Right-click the KVM Switcher icon and select
Settings
or
double-click the icon to bring up the configuration dialog box.
Hot Key to Switch to:
You can specify the command key as you like by typing it in.
For example, you can specify the hotkey for switching to PC 1
as CTRL - ALT - A by typing an A (not case-sensitive) in the
editable field.
Hotkey Sequence = CTRL - ALT - [command key]*
* The command key is user-definable via the configuration dialog box
Please note that if you intend to modify the command key, you
have to modify them on each and every of the connected computers,
since the hotkey setting is stored within each connected computer.
Except those control keys such as Alt, Ctrl, Shift, CAPS, Tab, Esc
and those functions keys and edit keys, all other keys on the keyboard,
including those number keys on the number pad, are all other keys
qualified to be used as hotkey command keys. In addition to the
software KVM Switching by the operation menu and the user-defined
hotkeys, you can always use the universal hotkey for PC switching –
ScrLk + ScrLk + (x), x = port number
Turn On Buzzer [grayed-out if not-available]
Check this option to turn on the buzzer sound.
Fix Audio to Port
x
[grayed-out if not-available]
Check this option and then select the PC to fix the audio/mic
channel to it. Once this option is checked, the audio/mic
channel will be fixed and become non-switchable.
Fix Hub Ports to Port
x
[grayed-out if not-available]
Check this option and then select the PC to fix the hub ports to
it. Once this option is checked, hub ports will be fixed to that
PC port and become non-switchable.
Auto Scan Period
Select the Autoscan period from 10 ~ 60 seconds with an
increment of 5 seconds. The Autoscan period is the time your
KVM Switch will wait before switching to next PC.
Universal Hotkey [grayed-out if not-available]
Select the universal hotkey among Scroll, CAPS, Numlock,
F12, Escape. Two consecutive keystrokes of the selected key
and a number key will switch to corresponding port.
Switching – ScrLk + ScrLk + (x), x = port number.
Troubleshooting
Q. My monitor will show off some aberrations (such as speckles,
stripes, shuddering, smearing or ghosting, and even sync loss,
etc) when the resolution goes up to over 1280 x 1024 (or starting
from 1024 x 768 up). What has caused the problem?
A:
Sometimes, video artifacts such as speckles, stripes, shuddering,
and even sync loss, etc. might arise due to an incompatibility between
Dual Link DVI monitor display mode and Single Link video card
display output. To prevent these video problems from happening,
make sure you use a Single Link display mode on your
LCD/monitor Display (no matter your LCD monitor is a Dual Link
or Single Link one) and a Single Link video card on any of the
connected computers
. Note that this Single Link KVM Switch is
designed primarily for use with Single Link display cards and Single
Link monitors.
■
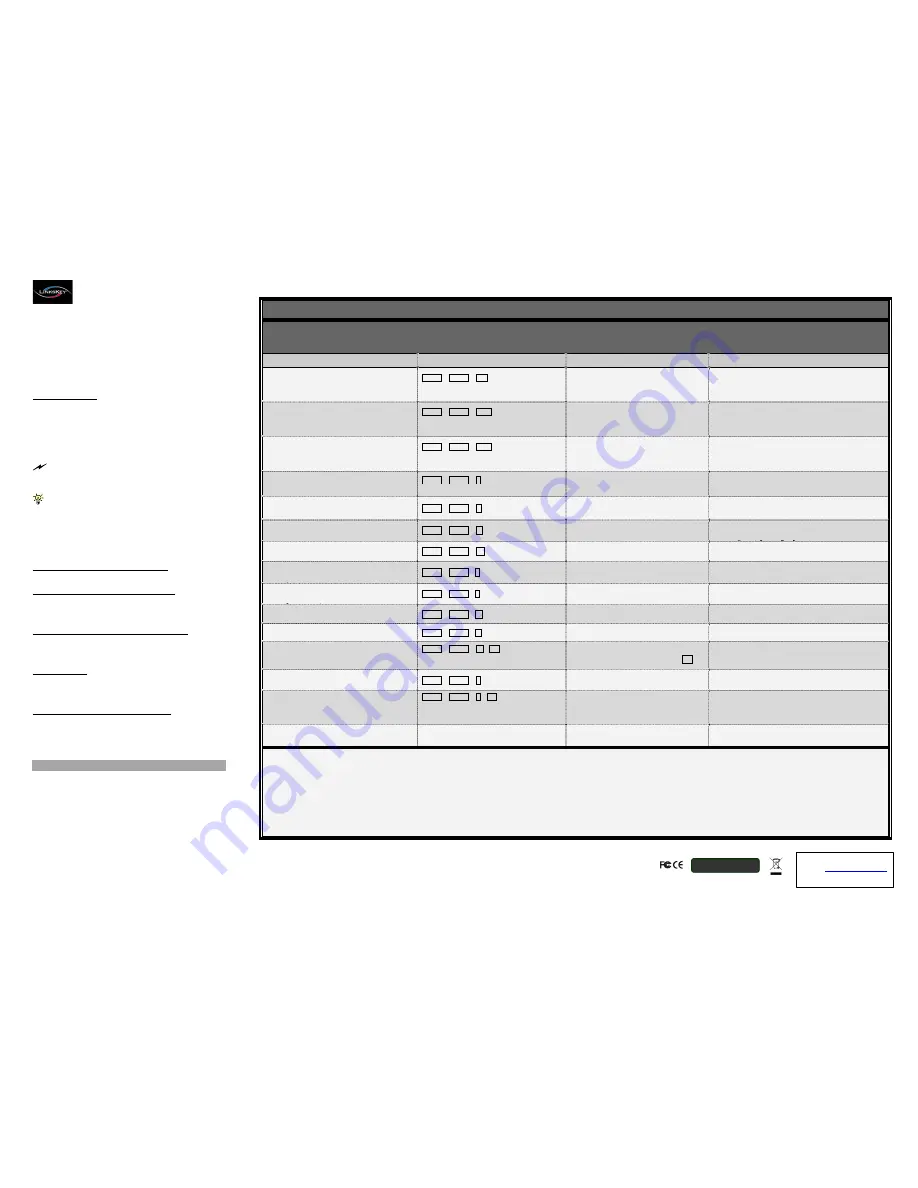
Q u i c k R e f e r e n c e S h e e t
2/4-port Dual Monitor DVI KVM Switch w/ Audio & Mic -- Operation Commands for Hotkeys / Front-Panel Buttons
Hotkey sequence = [ScrLk]
*
+ [ScrLk]
*
+
Command key(s)
* User-definable Preceding sequence = SCROLL LOCK, CAPS, ESC, F12 or NUM LOCK
Command
Hotkeys
1
Front-panel Buttons
Description
Select PC Channel
2
(Joint-select PC port/hub port control/audio&mic,
if binding is enabled)
ScrLk + ScrLk + (x)
(x is a top-row number key)
x = 1~2 / x = 1~2 for PC channel no
Press the corresponding button to select the
active PC channel
Select the active PC channel
(Joint-select
PC port/hub port control/audio&mic
, if binding
is enabled)
Select Hub Port Control
2
(Joint-select PC & Hub port control, if binding is
enabled)
ScrLk + ScrLk + (Fx)
Fx = F1~F2
/
Fx = F1~F4 ;
Fx is a function key ;
x = 1~2/ x = 1~4 for PC channel no
(Press the corresponding button to select the
specific PC+USB hub port control --works only if
PC port/hub port control binding enabled)
Select the PC channel that control all USB hub ports
(Joint-select PC & Hub port control, if PC/hub port control
binding is enabled)
Select Audio&Mic Channel
4
(Joint-select
PC port & audio/mic
, if binding is
enabled)
ScrLk + ScrLk + (Fy)
Fy = F5~F6/ Fy = F5~F8 ;
Fy is a function key ;
y = 1~2/ y = 1~4 for audio channel no
--
Select the active Audio&Mic channel
(Joint-select PC & audio&mic channel, if binding is enabled)
Bind PC & Hub Port Control Switching
2
[Default]
ScrLk + ScrLk + Z
--
Enable the binding of PC port and hub port control switching.
(Once this feature is enabled, any pc and/or hub port control
switching is bound together)
(factory default)
Unbind PC & Hub Port Control Switching
2
ScrLk + ScrLk + X
--
Disable the binding of PC port and hub port control switching
Bind PC & Audio/Mic Switching
4
[Default]
ScrLk + ScrLk + Q
--
Enable the binding of PC port and audio&mic switching. (Once
this feature is enabled, any pc and/or audio&mic switching is
bound together)
(factory default)
Unbind PC & Audio/Mic Switching
4
ScrLk + ScrLk + W
--
Disable the binding of PC port and audio&mic switching
Next lower PC channel
2
(Joint-select PC /hub port control/audio&mic,
if binding is enabled)
ScrLk + ScrLk +
↑
(arrow up)
--
Select the next lower connected PC channel
(Joint-select PC/hub port control/audio&mic, if binding is
enabled)
Next higher PC channel
2
(Joint-select PC /hub port control/audio&mic,
if binding is enabled)
ScrLk + ScrLk +
↓
(arrow down)
--
Select the next higher connected PC channel
(Joint-select PC/hub port control/audio&mic , if binding is
enabled)
Previous PC channel
ScrLk + ScrLk +
(Backspace)
-
-
Toggle between the previous channel and current channel
Beep Sound On/Off
ScrLk + ScrLk + B
--
Toggle on/off the beep sound while autoscanning
Define Hotkey Preceding Sequence
ScrLk + ScrLk + H + (y)
y
=
SCROLL LOCK, CAPS, ESC,
F12 or NUM LOCK
Press and hold down last button (Button 2) till
two beeps, release the button, then press
(y)
key
Select the hotkey preceding sequence among 5 alternative keys
Autoscan
ScrLk + ScrLk + S
--
Autoscan through every connected channel for quick screen
browsing of each channel (scan delay = 5 sec.).
Autoscan with Programmable Delay Time
ScrLk + ScrLk + S
+
(z)
z
= 0~9
1
10” ; 2
20” ; 3
30” ; 4
40” ; 5
50”
6
60” ; 7
70” ; 8
80” ; 9
90” ; 0
100”
-
-
Autoscan with a user-defined delay time within a range of
10 ~ 100 seconds
Stop Autoscan
Press any key on keyboard
Press any button
Terminate Autoscan activity
Notes:
1. The USB keyboard hotkeys allows you a faster and broader control for your KVM switching operation in addition to the front-panel buttons.
If you have configured a hotkey preceding sequence other than two
consecutive scroll locks, you should change your hotkey sequence accordingly.(For preceding sequence key configuration, please refer to Quick Installation Guide)
2. When the binding of PC & USB hub port control switching is enabled by the hotkey sequence: ScrLk + ScrLk + Z, any PC and hub port control switching are bound together.
To remove this binding, use the hotkey sequence: ScrLk + ScrLk + X.
3. When the binding of PC & Audio&Mic switching is enabled by the hotkey sequence: ScrLk + ScrLk + Q, any PC and audio&mic switching are bound together.
To remove this binding, use the hotkey sequence: ScrLk + ScrLk + W.
LED Information:
Green LED indicates PC port status: solid green – active port; flashing green – PC not connected; Red LED indicates hub port control status: solid red – that PC has the control of all hub ports.
Important Note
: The USB hub control status LED (red) indicates not the connected status of each USB device, but indicates which PC port has the control of all hub ports and their connected devices.
For example, when USB LED 1 is lit, it means PC port 1 has the current control of all hub ports and their connected USB devices.
Technical Support
E-mail:
Website: www.linkskey.com
RoHS Compliant


