background image


9

Operating Instructions


Step 1: Make sure the Transmitter and PC are in the same domain. 

Access the Network Setting Control Panel in Windows and locate your  
Lan connection. Under Windows 7, this can be done by clicking Start > 
Control Panel >Network Sharing center>Change adapter settings > 
Properties >Internet Protocol Version4 (TCP/IPv4). Change the IP address fi
eld to 192.168.1.1 
(0-255). After that press "OK" to save the configuration.   
 

 The PC and TX/RX should be in the same domain. 

 The IP address of PC should be different from the IP address of 

TX and RX. 


Step 2:

 Use an Ethernet Cable to connect the PC (or laptop) and the 

extender. the power LED for the extender is red and the green status is 
blinking. 

 
Step 3:

 Login in IE: 192.168.1.11 (default IP for TX) or 192.168.1.12(default 

IP for RX), You can setup IP address for the TX and RX. TX requires user 
name: admin and password: admin 
Please set IP address for each TX and each RX, IP: 192.168.1.XX (XX:1-255. 
all IP address for TX and RX must be different and can’t be same as the PC’s 
address.) 

 
Step 4: 

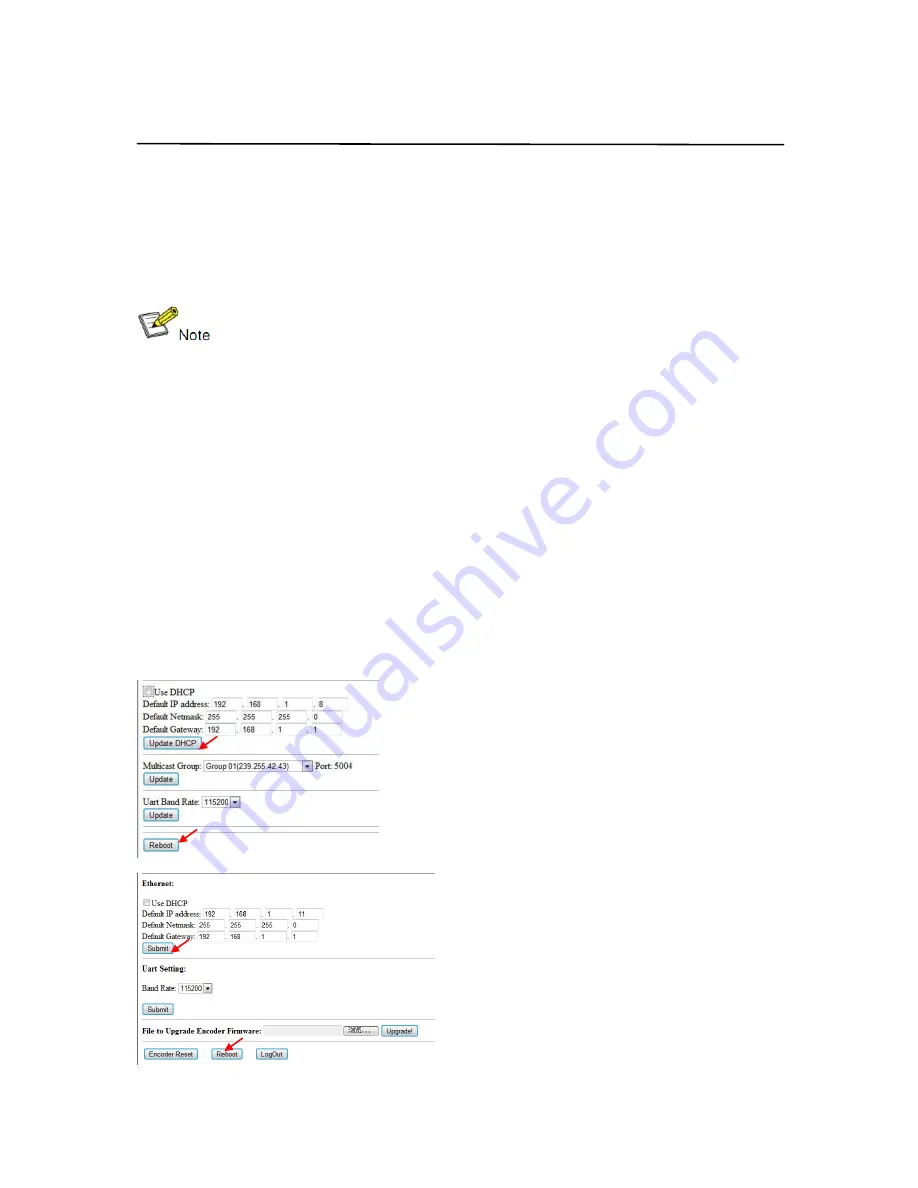
After selecting “Use DHCP” or reset the IP Address, click “Submit” 

(transmitter) or “update DHCP” (Receiver). 

 
Step 5: 

Click “Reboot”.


Step 6: 

Restart the extender after resting the IP Address. 

Содержание LM-EP36

Страница 1: ...1 Operating Instructions H 264 HDMI Extender over IP Extender With LED Remote POE RS232 Operating Instruction ...

Страница 2: ... 60hz 2 Transmit up to 120m over single Cat5e 6 cable with 1x looping HDMI output 3 With IR Remote to choose the source with LED to show the Group ID 4 Comply with TCP IP protocol streaming bit rate is up to 15Mbps 5 Support LPCM audio format 6 Smart IP Address Setting Dynamic Host Configuration Protocol DHCP 7 Wide band IR pass through to control the source 38khz to 56khz 8 By pass 2 way UART RS2...

Страница 3: ...ch Router Support IGMP support DHCP Connectors on Transmitter Input 1xHDMI Female port Output 1x RJ45 output 1x HDMI looping output RS232 Phoenix RS232 port IR IR TX port Support 38K 56KHz IR Ext port Support 38KHz Connectors on Receiver Input 1xRJ45 input Output 1x HDMI Female port looping output RS232 Phoenix RS232 port IR IR RX port Support 38K 56KHz IR Ext port Support 38KHz Environmental Powe...

Страница 4: ...cy Resolution 576i 576P 720P 1080P 50Hz 1080i 480i 480P 720P 60Hz 59 94Hz 1080P 30Hz 29 97Hz 1080P 24Hz 1080P 25Hz 1080P VESA Resolution Frequency Resolution 576i 576P 720P 1080P 50Hz 1080i 480i 480P 720P 60Hz 59 94Hz 1080P 30Hz 29 97Hz 1080P 24Hz 1080P 25Hz 1080P ...

Страница 5: ...dapter 5V 1A 4 Panel description 1 TX 1 DC 5V 1A input 2 Green indicator of data status 3 Red indicator of power input 4 HDMI output for local display 5 HDMI input 6 CAT5e 6 output 7 IR TX 8 RS232 port 9 IR Ext 10 LED to show the Group ID 11 Press the button for the previous Group ID 12 Press the button for the next Group ID 13 Reset button The green LED will blink once the unit is working The LED...

Страница 6: ...RS232 port 8 IR Ext 9 LED to show the Group ID 10 Press the button for the previous Group ID 11 Press the button for the next Group ID 12 Reset button The green LED will blink once the unit is working The LED indicator will glow bright red once the power supply is connected 3 How to connect the IR Cable Remote of the source Remote of the HDMI extender ...

Страница 7: ...7 Operating Instructions 4 1 Panel Drawing Transmitter Receiver ...

Страница 8: ...roup ID following bellowing steps 5 1 1 Setting the IP address A DHCP Dynamic host configuration protocol If you are using a Switch that supports DHCP please enable DHCP so that the Switch will assign an unique IP for TX and RX and you don t need to change the IP for the units manually B Set the IP via web browser If you are using a Switch that doesn t support DHCP please change the default IP for...

Страница 9: ...be different from the IP address of TX and RX Step 2 Use an Ethernet Cable to connect the PC or laptop and the extender the power LED for the extender is red and the green status is blinking Step 3 Login in IE 192 168 1 11 default IP for TX or 192 168 1 12 default IP for RX You can setup IP address for the TX and RX TX requires user name admin and password admin Please set IP address for each TX a...

Страница 10: ...o to change Group ID For example if you need change to 01 press 0 then press 1 Choose the Baud Rate Press the Button switch to Baud Rate mode press or to change the Baud Rate F0 2400 default F1 4800 F2 9600 F3 19200 F4 28800 F5 38400 F6 57600 F7 115200 3 How to choose the source For example when the connection is Source DVD1 TX TX1 Gigabit Switch RX RX1 TV1 Source DVD2 TX TX2 Gigabit Switch RX RX2...

Страница 11: ...te receiver When you change the group ID on both Web browser and Remote controller the units will follow the latest one If you change the Group ID on web browser it can t be shown on the LED 5 2 Preparing the switch When doing point to many and many to many it requires a switch to distribute the sources We suggest you use the Switch that supports IGMP and DHCP IGMP feature help to manage the group...

Страница 12: ...6 Connect one RS 232 Cable from the PC or automation system to the RS 232 port on the Transmitter Connect one RS 232 cable from the Receiver to the RS 232 device to be controlled 7 Power on Transmitter and Receiver with adapter 5V 1A NOTE Insert Extract cables gently 5 3 2 Compatible with Video Player such as VLC etc 5 3 3 Point to many 1 Setting the IP address for Transmitter Receiver and prepari...

Страница 13: ...t is not enough The quantity of Receiver is up to 255pcs 5 3 4 Many to many 1 Setting the IP address for Transmitter Receiver and preparing the switch following the steps as instructed above 5 1 1 5 2 2 Connect the source device and the Transmitter unit with HDMI Cable 3 Connect the HDMI looping output of the Transmitter to the local HDMI Display 4 Connect the transmitters and the switch router wi...

Страница 14: ...isy chain the switch if its RJ45 port is not enough The quantity of Transmitter is no more than 64 pcs The total quantity of Transmitter and Receiver is less than 256 pcs The total qty of TX RX Switch is less than 256pcs 6 RS232 and Baud rate The unit provides a path to pass through the RS232 signal RS232 passes ...

Страница 15: ...the latest one Please send the data in the same group ID 7 Firmware update We provide the firmware to upgrade the units when it is necessary Please follow up bellowing steps to update the firmware Step1 Connect TX RX to the PC with a short Cat5e cable Step2 Power on TX RX with power adapter 5V1A Step3 Login TX or RX with their default IP TX 192 168 1 11 RX 192 168 1 12 on web browser TX requires u...

Страница 16: ...16 Operating Instructions 9 PC Tool Instructions Step 1 Make sure the Transmitter and PC are in the same domain Refer to 5 1 1 Step 2 Open the PC Tool Step 3 Click Start Scan ...

Страница 17: ...17 Operating Instructions Step 4 Choose the TX or RX Name 9 1 Firmware Upgrade Upgrade for TX Step 1 Click Firmware Upgrade ...

Страница 18: ...18 Operating Instructions Step 2 Click Upgrade Encoder FW first ...

Страница 19: ...19 Operating Instructions Step 3 After the step 2 is finished click Firmware Upgrade again then click Upgrade TX FW Upgrade for RX Step 1 Click Firmware Upgrade ...

Страница 20: ...20 Operating Instructions Step 2 Click Upgrade Rx FW ...

Страница 21: ...ating Instructions 9 2 Other settings Step 1 Change the IP Netmask Gateway DHCP Uart Baudrate Group ID Mac Address Device name on the PC tool interface Step 2 Click Update after Update is finished click Reboot ...

Страница 22: ...22 Operating Instructions 9 2 Click Factory Reset on TX or RX 10 After sale Service and Warranty ...

Страница 23: ...o 5 1 1 Step2 Connect the HDMI Source without HDCP with the transmitter and power on the device Step3 Connect the transmitter to the PC Step4 Check the Multicast Group on the web refer to 5 1 3 Step5 Open the VLC media Player click Stream Network Input UDP 239 255 42 42 5004 239 255 42 42 Multicast Group 5004 Port ...

Страница 24: ...24 Operating Instructions Step 6 Click Next Step 7 Choose RTP MPEC Transport Strcan ...

Страница 25: ...25 Operating Instructions Step 8 Click Next Step 9 Click Stream ...

Страница 26: ...26 Operating Instructions Step 10 Click Open Network Stream then you can click Play to view the video ...

Страница 27: ...ere you can be reached LIMITED WARRANTY LIMITS AND EXCLUSIONS a This Limited Warranty ONLY COVERS failures due to defects in materials or workmanship and DOES NOT COVER normal wear and tear or cosmetic damage The Limited Warranty ALSO DOES NOT COVER damages which occurred in shipment or failures which are caused by products not supplied by warrantor or failures which result from accidents misuse a...

Отзывы: