background image

19

Internal Controls

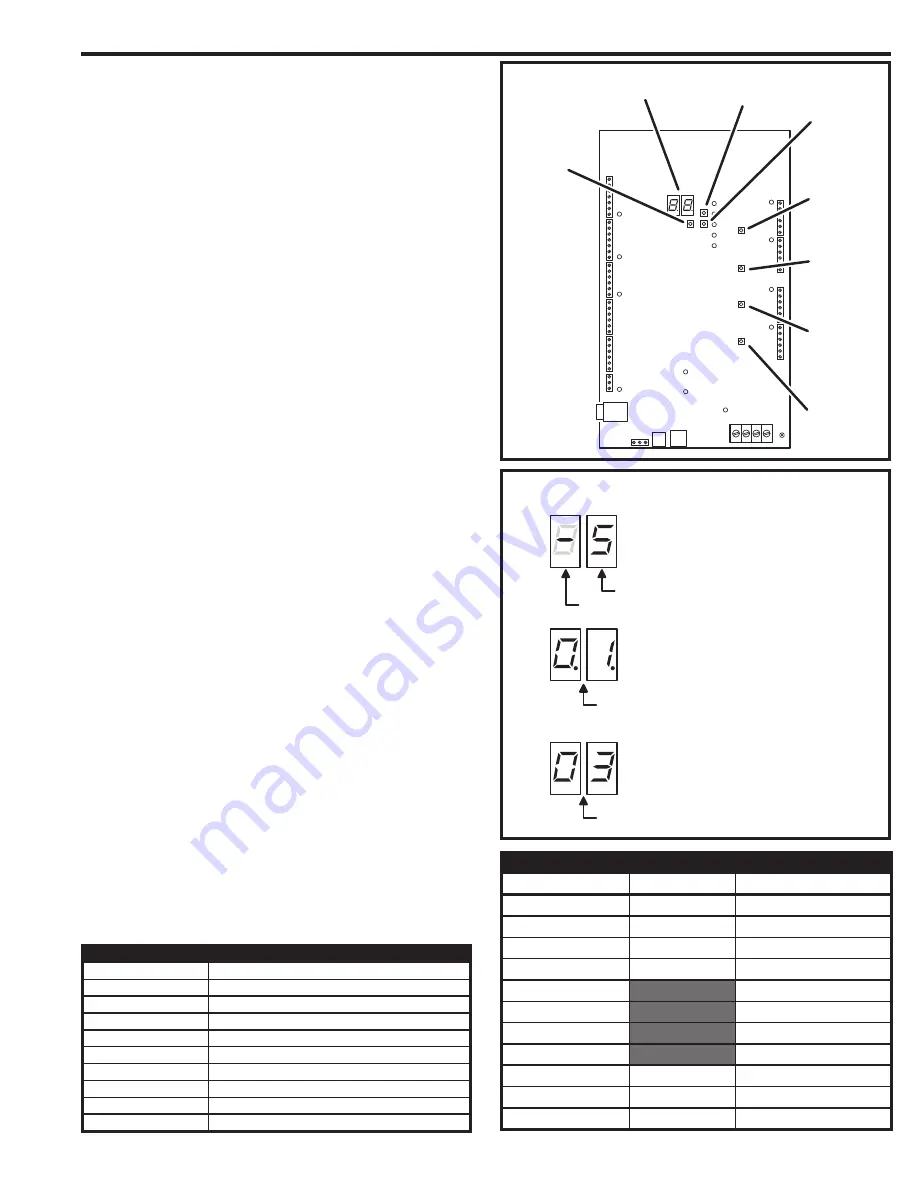
On-board Pushbuttons

Seven pushbuttons are on the main circuit board. Refer to the fi gure for 
the location of each pushbutton.

• 

UP 

button adds one to the value on the STATUS/PROGRAM display.

• 

DOWN 

button subtracts one from value on the STATUS/PROGRAM display. 

Press with the 

UP

 button for one second to enter Programming Mode.

• 

ENTER 

button accepts the value on the STATUS/PROGRAM display 

during programming, clears an indication during the supervisory display.

• 

RELAY “A” LATCH

 press to latch relay “A”, press again to unlatch.

• 

RELAY “B” LATCH

 press to latch relay “B”, press again to unlatch.

• 

RELAY “C” LATCH

 press to latch relay “C”, press again to unlatch.

• 

RELAY “D” LATCH

 press to latch relay “D”, press again to unlatch.

On-board Display

The STATUS/PROGRAM display shows the current system conditions 
and is used for system setup.

Power-up

When power is applied, the display will show the current mode of operation 
(AXNET “

An

” or AccessBase2000 “

Ab

”) and the version number of the 

fi rmware installed. The default mode of operation is AccessBase2000.

Program Mode

Program Mode uses the display and the UP, DOWN, and ENTER 
pushbuttons. The setting the network node address, operation mode, and 
clearing the memory can be performed in Program Mode.
Refer to the following steps to change the system settings:

1.  To enter Program Mode, press and hold the UP and DOWN 

pushbuttons together for one second. While in Program Mode, both 
decimal points on the display are lit.

2.  The display shows the current network node number setting.
3.  Press the UP or DOWN button to cycle the display through the 

options that can be selected (see Program Mode Display Table).

4.  When the desired option is displayed, press the ENTER button to 

select the option.

 NOTE:


In network installations, a unique network address 

(1-8 for Access

B

ase

2

000, 1-4 for AXNET) must be set before 

communicating with network.

 NOTE:


If using AXNET for programming the system, select the 

An

 programming option, for Access

B

ase

2

000 select 

Ab

After the option is selected, the system will restart.

Status Mode

While the system is running, the display will show the current system 
status. Normally the left digit will show a moving pattern and the right digit 
will show the unit’s Network Node number.
When a supervisory condition exists, the display will cycle to show the 
condition(s). When an item is displayed, press the ENTER button to clear 
the display (clears the display only, the condition may still exist). Refer to 
the following table for the supervisory condition display codes.

STATUS MODE DISPLAY

DISPLAY

CONDITION

01

MGT TRANSMITTER STATUS EXCEPTION

02

MGT TRANSMITTER LOW BATTERY

03

MGT TRANSMITTER TAMPER

04

AC POWER FAIL (BACKUP BATTERY RE

Q

UIRED)

05

CHANNEL “A” LOCKED CLOSED

06

CHANNEL “B” LOCKED CLOSED

07

CHANNEL “C” LOCKED CLOSED

08

CHANNEL “D” LOCKED CLOSED

09

MODEM FAILURE

AE1000PLU

S

MAIN CI

R

CUIT 

B

OA

R

D

R

ELAY "

B

"

LATCH

R

ELAY "A"

LATCH

R

ELAY "C"

LATCH

R

ELAY "D"

LATCH

"UP"

B

UTTON

"DOWN"

B

UTTON

"ENTE

R

"

B

UTTON

S

TATU

S

/P

R

O

GR

AM

DI

S

PLAY

PRO

G

RAM MODE DISPLAY

AccessBase2000 MODE

AXNET MODE

FUNCTION

0

.

1

.

0

.

1

.

SET UNIT TO NODE #1

0

.

2

.

0

.

2

.

SET UNIT TO NODE #2

0

.

3

.

0

.

3

.

SET UNIT TO NODE #3

0

.

4

.

0

.

4

.

SET UNIT TO NODE #4

0

.

5

.

SET UNIT TO NODE #5

0

.

6

.

SET UNIT TO NODE #6

0

.

7

.

SET UNIT TO NODE #7

0

.

8

.

SET UNIT TO NODE #8

A

.

N

.

A

.

b

.

SWITCH OPERATION MODE

B

.

L

.

B

.

L

.

RESERVED (DO NOT USE)

C

.

L

.

C

.

L

.

CLEAR UNIT’S MEMORY

S

Y

S

TEM IDLE

LEFT DI

G

IT CI

R

CULATE

S

R

I

G

HT DI

G

IT 

S

HOW

S

 NETWO

R

K NODE ADD

R

E

SS

DI

G

IT

S


S

HOW 

S

UPE

R

VI

S

O

R

Y CODE

S

TATU

S

 MODE

STATUS/PROGRAM

DISPLAY

DECIMAL POINT

S

 LI

G

HT, DI

G

IT

S


S

HOW P

R

O

GR

AMMIN

G

 OPTION

P

R

OG

R

AM MODE

Содержание AE1000Plus

Страница 1: ...USA Canada 800 421 1587 800 392 0123 760 438 7000 Toll Free FAX 800 468 1340 www linearcorp com AE1000Plus Telephone Entry Access Control System Installation Instructions ...

Страница 2: ...emote keypads Also remote receivers card readers and interior and exterior keypads can be used with the system BlockcodedMegaCode transmitterscanbeusedtogainaccessthrough the AE1000Plus s built in or remote radio receivers Each transmitter can be individually suspended or re activated The system s clock calendar can control access based on specific times and dates Automatic relay activation can be...

Страница 3: ...y outputs are provided to activate access devices such as door strikes magnetic locks automatic doors barrier gates and automatic sliding gates The relay outputs can also be used as specialty outputs for alarm contact shunting operator obstacle triggering and alarm activation Each of the relays can also be manually activated from buttons on the AE1000Plus circuit board LED indicators display the s...

Страница 4: ...ndard single gang electrical box Tamper resistant screws secure the keypad to its mounting plate The die cast keys have bright easy to read yellow graphics and is illuminated with white LEDs The keypad is supplied with a satin chrome bezel and three interchangeable colored bezels white ivory bronze to customize the keypad appearance for the installation AM CRI Card Reader Interface The Model AM CR...

Страница 5: ...ANTENNA CONNECTOR MICROPHONE DISPLAY POSTAL LOCK MOUNTING PLATE SPEAKER DISPLAY CONTRAST ADJUSTMENT CPU INTERFACE CONNECTOR VIDEO CONNECTOR CAMERA CONNECTOR OPTIONAL CAMERA PBUS TERMINALS NETWORK TERMINALS AM MIO INTERFACE TELEPHONE INTERFACE CONNECTOR RS 232 PORT PROCESSOR MODULE POWER CONNECTOR TAMPER MAGNET SYSTEM RESTART BUTTON SPEAKER VOLUME ADJUSTMENT FOR EASY WIRING THE UNIT S TERMINAL BLOC...

Страница 6: ... COM N C RTE C RELAY CHANNEL C TERMINALS RELAY CHANNEL D TERMINALS RELAY RATING 3 AMPS 30 VOLTS AC DC MAXIMUM EARTH GROUND STAKE GROUND STUD WIEGAND DEVICE LED2 HOLD LED1 DAT 1 DAT 0 GND PWR WIEGAND DEVICE LED2 HOLD LED1 DAT 1 DAT 0 GND PWR PBUS DEVICE PCLK DVAL DAT0 DAT1 GND PWR PBUS DEVICE PCLK DVAL DAT0 DAT1 GND PWR PBUS DEVICE PCLK DVAL DAT0 DAT1 GND PWR NETWORK UNIT MULTIPLE NETWORK UNITS REF...

Страница 7: ...e isolated from the AE1000Plus NEVER MOUNTTHE UNIT DIRECTLYTO A MOVING DOOR OR GATE Gate Installations If the AE1000Plus is used to control a gate operator connected to a vehicular gate the unit MUST be mounted AT LEAST 10 feet away from the gate open and closed and gate operator AT NO TIME SHOULD A PERSON BE ABLETOTOUCHTHE GATE OR GATE OPERATOR AND THE AE1000Plus ATTHE SAMETIME Vehicle Traffic Do...

Страница 8: ...ift up on the mounting plate removing the circuit board mounting plate Set it aside in a safe place Reverse these steps to replace the circuit board mounting plate after the cabinet mounting is complete Surface Mounting The cabinet can be mounted on a wall or any suitable flat surface The four 3 8 mounting holes or the four self drill locations can be used to attach the cabinet to the surface 1 Fo...

Страница 9: ...d wire Pedestal Mounting The cabinet can be mounted on a gooseneck pedestal Linear manufacturers two pedestals Model GNC 1 is for surface mounting with concrete fasteners Model GNB 1 is for burial mounting When mounting to a pedestal use the cabinet reinforcing plate to stiffen the cabinet 1 Install the pedestal at the desired location 2 Place the reinforcing plate inside the cabinet 3 Use securit...

Страница 10: ...t inputs are typically used with push bars loop sensors or pushbuttons 1 Install the pushbutton or device to signal an exit request 2 Route two wires from the device to the AE1000Plus 3 Connect the device s normally open output to the wires 4 To activate a relay channel connect the wires to the associated relay request to exit terminal RTE A RTE B RTE C or RTE D and GND terminals Sensing Inputs Th...

Страница 11: ...tery 2 Connect the Battery positive to the AE1000Plus DC terminal and the negative to the DC terminal NOTE The AE1000Plus does not supply battery charging current An external battery charger will be required to maintain the battery Earth Ground For the best ground use size 12 gauge solid wire or larger to connect the to an 8 foot copper ground rod Locate the ground rod next to the Power and Teleph...

Страница 12: ...x cable The antenna connector should be mounted on a metal surface using a 3 8 hole Two other models of antennas are compatible with the AE1000Plus The Model EXA 1000 is a non directional antenna The Model EXA 2000 is a directional antenna used in installations where transmitted signals are desired to be received only in a particular direction NOTE Up to 50 feet of type RG 59 coax can be used to c...

Страница 13: ...s designed to accept a U S Postal Service postal lock When the postal lock is engaged the programmed output relay will activate Postal Lock Installation 1 Remove the four locknuts that retain the postal lock switch plate above the speaker on the AE1000Plus faceplate 2 Remove the switch plate hole cover plate and block from the four studs The hole cover plate and block will not be used and can be d...

Страница 14: ...nputs WIEGAND A B can connect to a large variety of 26 30 and 31 bit Wiegand output accessories The Wiegand format is a common standard for access control equipment A typical application would be to add swipe card or proximity readers to the system NOTE Depending on the Wiegand accessory used the LED1 LED2 and HOLD connections may not be required LED1 output is switched to ground during non access...

Страница 15: ...1 supported AXNET network hardware configurations and associated Network Configuration Numbers After choosing a network layout that best suits the installation note the Network Configuration Number This number is required to be entered during setup of the AXNET Browser Interface in the Global Settings for Networking area NETWORK CONFIGURATION 1 SINGLE UNIT NODE RS 485 CABLE CONNECTION MODEM TELEPH...

Страница 16: ...eight networks each with eight nodes for a total of 64 units RS 485 CABLE CONNECTION NETWORK NODE 1 ALWAYS REQUIRES A MODEM FOR REMOTE PROGRAMMING MODEM UNIT NETWORK NODE FULL ACCESSBASE2000 NETWORK NODE A1 NODE A2 NODE A3 NODE A4 NODE A5 NODE A6 NODE A7 NODE A8 NETWORK A NODE B1 NODE B2 NODE B3 NODE B4 NODE B5 NODE B6 NODE B7 NODE B8 NODE C1 NODE C2 NODE C3 NODE C4 NODE C5 NODE C6 NODE C7 NODE C8...

Страница 17: ...ub or by wiring from one unit to the next in daisy chain fashion See the figures for wiring options Use Belden 9925 or Carol C0600 shielded cable or equivalent Maximum wire run distance is 4000 feet NOTE Be sure to connect the cable s shield to one of the GND terminals Network Wiring with Hub 1 Mount and install the units for the network 2 Choose one unit to be the Network Hub Usually this would b...

Страница 18: ...ear s Technical Services Department may ask the installer to use these components to diagnose the system On board Indicators 17 LED indicators are on the main circuit board Refer to the figure for the location of each indicator STATUS PROGRAM DISPLAY shows supervisory and status conditions also used for some local programming ACCESS GRANTED lights when a credential is validated and access is grant...

Страница 19: ...tion is displayed press the ENTER button to select the option NOTE In network installations a unique network address 1 8 for AccessBase2000 1 4 for AXNET must be set before communicating with network NOTE If using AXNET for programming the system select the An programming option for AccessBase2000 select Ab After the option is selected the system will restart Status Mode While the system is runnin...

Страница 20: ...numbers by pressing on the keypad Holding down the keys will scroll the display faster If the visitor already knows the resident s directory number they can enter the directory number to call the resident The system dials the resident s telephone number to establish 2 way communications NOTE The resident s telephone number will never be displayed to the visitor If the resident is using the telepho...

Страница 21: ...y charged 12 Volt DC source Outputs Relay Channels A D Form C 3 Amps 30 Volts maximum Inputs Four normally closed door sense inputs Four normally open exit request inputs Two WIEGAND reader inputs Three PBUS inputs Network Three wire network RADIO Frequency 318 MHz 500 KHz 23 C Bandwidth 300 KHz Typical Sensitivity 97 dBm Minimum 100 dBm Typical Encoding Linear MegaCode Format ENVIRONMENTAL Temper...

Страница 22: ...any incorrect attempts Wait one minute for lockout to clear and try again 3 Remote keypad wiring incorrect Resident s Telephone does not ring when a visitor calls 1 Resident s telephone number programmed incorrectly 2 Check AE1000Plus telephone line 3 Call resident from another line or cell phone to determine if the resident s telephone is working Transmitter does not activate relay 1 Transmitter ...

Страница 23: ...0 421 1587 for an RPA and other important details FCC Notice Changes or modifications not expressly described in this manual or approved by the manufacturer could void the user s authority to operate the equipment This equipment has been tested and found to comply with the limits for a Class B digital device pursuant to Part 15 of the FCC Rules These limits are designed to provide reasonable prote...

Страница 24: ...Copyright 2008 Linear LLC 227522 B ...

Отзывы: