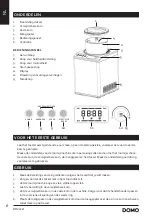
background image

7

DO9232I

www.domo-elektro.be

NL

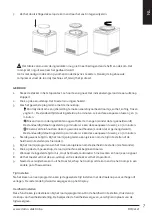
7. 

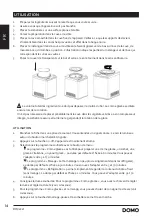
Zet het doorzichtige deksel op de kom en draai het vast in tegenwijzerzin.

 ·

!

 Het totale volume van de ingrediënten mag niet meer bedragen dan de helft van de kom. Het 

roomijs zet nog uit wanneer het gedraaid wordt. 

 · Het is niet nodig om de kom op voorhand in de diepvries te zetten. Dankzij de ingebouwde 

compressor vriest de roomijsmachine zelf, terwijl het ijs draait. 

GEBRUIK

1. 

Steek de stekker in het stopcontact. Je hoort een signaal. Het indicatielampje rond de aan-uitknop 
knippert.

2. 

Druk op de aan-uitknop. Het toestel is nu ingeschakeld.

3. 

Kies het gewenste programma met de menuknop: 

 ·

 Roomijs dient om een ijsbereiding te maken zoals bijvoorbeeld roomijs, sorbet, softijs, frozen 

yoghurt... De standaardtijd staat ingesteld op 60 minuten. Je kan deze aanpassen tussen 5 en 70 
minuten.

 ·

 Mixen dient om de ingrediënten nog wat beter te mengen (zonder dat er gekoeld wordt).  

De standaardtijd staat ingesteld op 30 minuten. Je kan deze aanpassen tussen 5 en 70 minuten.

 ·

 Koelen zal de inhoud van de kom gewoon koud houden (zonder dat er gemengd wordt).  

De standaardtijd staat ingesteld op 10 minuten. Je kan deze aanpassen tussen 5 en 70 minuten.

4. 

Stel de gewenste tijd in. Bij het roomijsprogramma kan je kiezen om de tijd in te stellen of de 
hardheid in te stellen (zie hieronder).

5. 

Bij het roomijsprogramma en het mixen kan je kiezen om de snelheid in te stellen (zie hieronder).

6. 

Druk op de start-pauzeknop, de roomijsmachine zal beginnen draaien. 

7. 

Wanneer de ingestelde tijd om is, stopt het toestel automatisch met werken en hoor je een signaal.

8. 

Zet het toestel uit met de aan-uitknop en trek de stekker uit het stopcontact.

9. 

Neem de verwijderbare kom uit het toestel, schep het roomijs uit de kom en doe het roomijs in een 
andere pot of bewaardoos. 

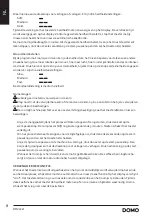
Tijd instellen

Na het kiezen van een programma kan je de gewenste tijd instellen met de draaiknop voor verhogen of 
verlagen. De resterende tijd wordt weergegeven op het display.

Hardheid instellen

Deze functie kan je enkel kiezen bij het roomijsprogramma. Om de hardheid in te stellen, druk dan op 
de knop voor hardheidsinstelling. De balkjes die de hardheid weergeven, verschijnen in plaats van de 
tijdsweergave.

Содержание DOMO DO9232I

Страница 1: ...oi Sorbetière Gebrauchsanleitung Eismaschine Instruction booklet Ice cream maker Manual de instrucciones Máquina para hacer helados Istruzioni per l uso Macchina per gelato Návod k použití Zmrzlinovač s kompresorem Návod na použitie Zmrzlinovač s kompresorom ...

Страница 2: ...detenidamente todas las instrucciones Conserve este manual para futura referencia Leggere con attenzione le istruzioni conservarle per future consultazioni Před použitím si důkladně přečtěte tento manuál manuál si uschovejte i pro případ budoucího nahlédnutí Pred použitím si dôkladne prečítajte tento manuál manuál si uschovajte aj pre prípad budúceho nahliadnutie Required for R32 R290 Refrigerant ...

Страница 3: ...in de winkel waar je het toestel hebt aangekocht De garantie op accessoires en onderdelen die onderhevig zijn aan slijtage bedraagt 6 maanden De garantie en verantwoordelijkheid aansprakelijkheid van de leverancier en fabrikant vervallen automatisch in de volgende gevallen Bij het niet naleven van de instructies in deze handleiding Bij verkeerde aansluiting vb te hoge elektrische spanning Bij verk...

Страница 4: ...or gebruik na of het voltage vermeld op het toestel overeenkomt met het voltage van het elektriciteitsnet thuis De voedingskabel moet steeds aangesloten worden op een stopcontact dat geïnstalleerd en geaard is volgens de lokale standaarden en normen Laat het snoer niet op een heet oppervlak of over de rand van een tafel of aanrecht hangen Houd het snoer uit de buurt van scherpe randen en hete onde...

Страница 5: ...t haalt klop dan niet op de kom of de rand van de kom om deze niet te beschadigen Zorg ervoor dat de kom en de mengspatel correct gemonteerd zijn voor je het toestel aanzet De temperatuur van de ingrediënten moet tussen 10 C en 20 C zijn om ongelijkmatige menging door vroege stolling van het ijs te voorkomen Verwijder het deksel en de mengspatel niet wanneer het apparaat in werking is Als je na he...

Страница 6: ...derbare kom de mengspatel en het deksel Maak de onderdelen goed droog vooraleer ze te gebruiken GEBRUIK 1 Maak de bereiding van de ingrediënten volgens het recept dat je wilt maken 2 Zorg ervoor dat de stekker niet in het stopcontact zit 3 Zet de roomijsmachine op een vlak stabiel oppervlak 4 Giet de bereiding in de verwijderbare kom 5 Zet de verwijderbare kom in de vaste kom in de machine Zorg er...

Страница 7: ...n Koelen zal de inhoud van de kom gewoon koud houden zonder dat er gemengd wordt De standaardtijd staat ingesteld op 10 minuten Je kan deze aanpassen tussen 5 en 70 minuten 4 Stel de gewenste tijd in Bij het roomijsprogramma kan je kiezen om de tijd in te stellen of de hardheid in te stellen zie hieronder 5 Bij het roomijsprogramma en het mixen kan je kiezen om de snelheid in te stellen zie hieron...

Страница 8: ...ijderen Zo zal je de kom beschadigen De roomijsmachine beschikt over een oververhittingsbeveiliging Laat het toestel afkoelen tussen 2 bereidingen Als je de mengspatel tijdens het proces wilt laten stoppen of terug starten druk dan kort op de start pauzeknop De compressor blijft nog koelen gedurende 3 minuten Nadien schakelt het toestel volledig uit Om het proces helemaal te stoppen voor de tijd a...

Страница 9: ...kking wijst erop dat dit product niet als huishoudafval mag worden behandeld Het moet naar een plaats worden gebracht waar elektrische en elektronische apparatuur wordt gerecycleerd Als je ervoor zorgt dat dit product op de correcte manier wordt verwijderd voorkom je mogelijk voor mens en milieu negatieve gevolgen die zich zouden kunnen voordoen in geval van verkeerde afvalbehandeling Voor meer de...

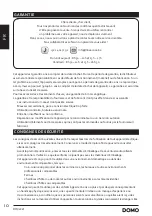
Страница 10: ...contraire brutale ou anormale Entretien insuffisant ou non conforme Réparation ou modification de l appareil par le consommateur ou un tiers non autorisé Utilisation d éléments ou d accessoires qui ne sont pas recommandés ou fournis par le fournisseur fabricant CONSIGNES DE SÉCURITÉ Les consignes de sécurité suivantes doivent être respectées lors de l utilisation de tout appareil électrique Lisez ...

Страница 11: ...ée et mise à la terre conformément aux normes et standards locaux Ne laissez pas le cordon d alimentation pendre sur une surface chaude ni sur le rebord d une table ou d un plan de travail Tenez le cordon électrique à distance de parties chaudes et ne couvrez pas l appareil Déroulez complètement le cordon d alimentation Ne laissez pas le cordon d alimentation se coincer sous l appareil ou pendre a...

Страница 12: ...nt correctement placés avant de mettre l appareil en marche La température des ingrédients doit se situer entre 10 C et 20 C afin d éviter un mélange inégal dû à une solidification prématurée de la crème glacée Ne retirez ni le couvercle ni le mélangeur lorsque l appareil fonctionne Si vous souhaitez utiliser la fonction de réfrigération après avoir préparé la crème glacée vous devez d abord arrêt...

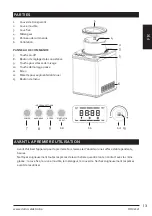
Страница 13: ...er 13 Bouton de menu AVANT LA PREMIÈRE UTILISATION Avant d utiliser l appareil pour la première fois laissez le d abord sur une surface stable pendant 4 heures Nettoyez soigneusement toutes les pièces de la sorbetière qui entreront en contact avec la crème glacée la cuve fixe la cuve amovible le mélangeur le couvercle Séchez soigneusement les pièces avant de les utiliser 1 2 3 4 5 6 7 8 9 10 11 12...

Страница 14: ...ure elle même le gel pendant la rotation de la glace UTILISATION 1 Branchez la fiche dans une prise de courant Vous entendez un signal sonore Le cercle lumineux autour du bouton marche arrêt clignote 2 Appuyez sur la touche on off L appareil est maintenant allumé 3 Sélectionnez le programme souhaité avec le bouton de menu Le programme Crème glacée est utilisé pour préparer une crème glacée un sorb...

Страница 15: ...atteinte et vous voulez arrêter le processus avant la fin de la durée prévue il vous suffira d appuyer sur la touche de démarrage pause pendant quelques secondes et l appareil s éteindra Réglage de la vitesse de mixage Pour les programmes Crème glacée et Mixage vous pouvez régler la vitesse de mixage en fonction de l expérience gustative souhaitée Plus le régime est élevé plus il y a d air moins i...

Страница 16: ...se NETTOYAGE ET ENTRETIEN N immergez jamais l appareil le câble d alimentation ou la fiche dans l eau ou tout autre liquide Retirez le câble d alimentation de la prise avant de nettoyer l appareil Nettoyez l enceinte en acier inoxydable avec un linge humide et un peu de détergent doux Lavez les différents composants à l eau chaude avec du liquide vaisselle le couvercle transparent le mélangeur et ...

Страница 17: ... beträgt 6 Monate Die Garantie und dieVerantwortung Haftung des Lieferanten und Herstellers entfallen automatisch in den folgenden Fällen Bei Nichtbeachtung der Anweisungen in dieser Bedienungsanleitung Bei falschem Anschluss z B bei einer zu hohen Stromspannung Bei falscher grober oder abnormalerVerwendung Bei unzureichender oder falscherWartung Bei vomVerbraucher oder von nicht ermächtigten Drit...

Страница 18: ...überprüfen ob die auf dem Gerät angegebene Spannung mit dem des Stromnetzes übereinstimmt Das Netzkabel muss stets an eine Steckdose angeschlossen werden die gemäß den örtlichen Standards und Normen isoliert und geerdet wurde Lassen Sie das Netzkabel nicht auf einer heißen Oberfläche oder über einenTischrand oder eine Arbeitsplatte herunter hängen Das elektrische Kabel von heißenTeilen entfernt ha...

Страница 19: ...den Schlagen Sie beim Entnehmen der Eiscreme nicht auf die Schüssel oder den Schüsselrand um diese nicht zu beschädigen Vergewissern Sie sich vor dem Einschalten des Geräts dass die Schüssel und der Rühraufsatz richtig eingesetzt sind DieTemperatur der Zutaten muss zwischen 10 C und 20 C betragen um ein ungleichmäßiges Mischen durch frühzeitiges Gefrieren des Eises zu vermeiden Nehmen Sie den Deck...

Страница 20: ...ngern Erhöhen 13 Menütaste VOR DER ERSTEN INBETRIEBNAHME Lassen Sie das Gerät vor dem ersten Gebrauch zunächst 4 Stunden stabil stehen Reinigen Sie alleTeile der Eismaschine die mit dem Eis in Berührung kommen den festen Behälter den herausnehmbaren Behälter Mischer Deckel Trocknen Sie die Einzelteile vor dem Gebrauch gut ab 1 2 3 4 5 6 7 8 9 10 11 12 13 POWER HARDNESS SPEED START STOP RESET ICE C...

Страница 21: ...zu stellen Durch den eingebauten Kompressor übernimmt die Eismaschine selbst das Gefrieren während des Rührens VERWENDUNG 1 Stecken Sie den Stecker in die Steckdose Es ertönt ein Signal Die Kontrollleuchte um die Ein Aus Taste blinkt 2 Drücken Sie die Ein Aus Taste Das Gerät ist nun eingeschaltet 3 Wählen Sie das gewünschte Programm mit der Menütaste aus Speiseeis wird für die Zubereitung von Spei...

Страница 22: ...ägt 70 Minuten Falls die gewünschte Härte erreicht ist und Sie denVorgang vor Ablauf der Zeit vollständig beenden wollen drücken Sie einige Sekunden lang die Start Pause Taste Daraufhin schaltet sich das Gerät aus Mischgeschwindigkeit einstellen Bei den Programmen für Eiscreme und Mixen können Sie die Geschwindigkeit des Mixens steuern um jeweils ein anderes Geschmackserlebnis zu erzielen Je mehr ...

Страница 23: ... Gerät das Stromkabel oder den Stecker niemals inWasser oder andere Flüssigkeiten ein Ziehen Sie den Stecker aus der Steckdose bevor Sie das Gerät reinigen Reinigen Sie das Edelstahlgehäuse mit einem feuchtenTuch und ein wenig Spülmittel Waschen Sie die einzelnenTeile in warmemWasser mit Spülmittel den durchsichtigen Deckel den Rühraufsatz und die abnehmbare Schüssel Trocknen Sie alleTeile gründli...

Страница 24: ...ity of the supplier and manufacturer lapse automatically in the following cases If the instructions in this manual have not been followed In case of incorrect connection e g electrical voltage that is too high In case of incorrect rough or abnormal use In case of insufficient or incorrect maintenance In case of repairs or alterations to the device by the consumer or non authorised third parties If...

Страница 25: ...d and grounded in accordance with all local standards and requirements Do not let the power supply cord hang over the edge of a counter or touch hot surfaces Keep the power cord away from hot parts and don t cover the appliance Unwrap the cord completely to prevent overheating of the cord Do not allow the power cord supply to run underneath or around the unit The appliance may not be used with an ...

Страница 26: ...The temperature of the ingredients should be between 10 C and 20 C to avoid uneven mixing due to early ice formation Do not remove the lid or mixing paddle when the appliance is in operation If you want to use the cooling feature after making ice cream first switch off the mixing feature This will ensure the gear wheel of the mixing motor is not damaged Only recycle the appliance at an authorised ...

Страница 27: ...ease increase 13 Menu button BEFORE THE FIRST USE Leave the appliance stable for 4 hours before using it for the first time Thoroughly clean all parts of the ice cream maker that will come into contact with the ice cream the fixed bowl the removable bowl the mixer the lid Dry the parts thoroughly before using them 1 2 3 4 5 6 7 8 9 10 11 12 13 POWER HARDNESS SPEED START STOP RESET ICE CREAM SETTIN...

Страница 28: ...e on off button will flash 2 Press the on off button The device is now switched on 3 Select the desired programme with the menu button Use the ice cream feature to prepare firm ice cream sorbet soft ice cream frozen yoghurt and so on The default time is set to 60 minutes You can adjust this to between 5 and 70 minutes The mixing feature helps blend the ingredients better without cooling The defaul...

Страница 29: ... each time The more rotations per minute the airier the mix the fewer the ice crystals and the more intense the flavour Press the mixing speed button and the speed will change each time you press the button There are three speed settings Slow Medium Fast The default setting is medium speed Notes Do not use metal objects in the bowl to avoid scratching Never knock the removable bowl or the edge of ...

Страница 30: ... a damp cloth and some mild detergent Wash the separate parts in warm water with washing up liquid i e the transparent lid mixing paddle and removable bowl Dry thoroughly ENVIRONMENTAL GUIDELINES This symbol on the product or on its packaging indicates that this product may not be treated as household waste Instead it must be brought to the applicable collection point for recycling of electrical a...

Страница 31: ...tinuación Lea detenidamente estas instrucciones Conserve este manual para consultarlo posteriormente Antes del primer uso retire todos los materiales de embalaje y etiquetas promocionales Asegúrese de que los niños no puedan jugar con el material de embalaje Este aparato es adecuado para su uso en el ámbito doméstico y entornos similares como Zona de cocina para el personal de tiendas oficinas y o...

Страница 32: ...l aparato o cuando el aparato está dañado En el caso de que el aparato esté dañado llévelo al servicio de postventa de DOMO o al centro de servicio cualificado más cercano para su inspección reparación o para realizar ajustes eléctricos mecánicos Nunca intente reparar el aparato por su cuenta I INSTALACIÓN No coloque nunca el aparato cerca de materiales inflamables gases o explosivos No utilice el...

Страница 33: ... esté en funcionamiento Si desea utilizar la función de enfriamiento después de elaborar helado desactive primero la función de mezcla De esta manera se evitarán daños en la rueda dentada del motor de mezcla Solo debe reciclar el aparato en un centro de tratamiento de residuos autorizado Su aparato utiliza isobutano R600a como refrigerante Aunque el R600a es un gas natural y respetuoso con el medi...

Страница 34: ... seque bien las piezas antes de usarlas USO 1 Haga la preparación de los ingredientes según la receta que desee 2 Asegúrese de que el enchufe está en la toma de corriente 3 Ponga la máquina heladora en una superficie plana y estable 4 Vierta el preparado en el cuenco extraíble 5 Ponga el cuenco extraíble en el cuenco sólido en la máquina Asegúrese de que los soportes de las palancas encajan en el ...

Страница 35: ...para mezclar un poco mejor los ingredientes sin enfriarlos El tiempo por defecto se ha ajustado en 30 minutos Puede ajustarlo entre 5 y 70 minutos La función de refrigeración simplemente mantendrá frío el contenido del recipiente sin mezclarlo El tiempo por defecto se ha ajustado en 10 minutos Puede ajustarlo entre 5 y 70 minutos 4 Ajuste el tiempo deseado En el programa de helado puede elegir ent...

Страница 36: ...pee el cuenco extraíble o el borde del cuenco sobre una mesa por ejemplo para eliminar el hielo Así puede prevenir daños La heladera dispone de una protección de sobrecalentamiento Deje que el aparato se enfríe entre dos preparaciones Si desea parar o reiniciar la espátula de mezcla durante el proceso pulse brevemente el botón de inicio pausa El compresor seguirá enfriando durante 3 minutos A cont...

Страница 37: ...mbalaje indica que este producto no puede ser tratado como residuo doméstico Se debe llevar a un lugar en el que se reciclan equipos eléctricos y electrónicos Si se asegura de que este producto se desecha correctamente usted ayudará a evitar posibles consecuencias negativas para las personas y el medio ambiente que serían causadospor un tratamiento de residuos inadecuado Para obtener información m...

Страница 38: ...eventuali adesivi promozionali Assicurarsi che i bambini non giochino con gli imballaggi Questo apparecchio è destinato unicamente all uso domestico e in ambienti analoghi quali angoli cottura riservati al personale nei negozi negli uffici e in altri ambienti professionali Fattorie Camere di alberghi motel e altre strutture ricettive residenziali Camere per vacanze o ambienti analoghi L apparecchi...

Страница 39: ...ionare mai l apparecchio vicino a materiali infiammabili gas o esplosivi Non utilizzare o conservare l apparecchio all aperto Utilizzare sempre l apparecchio su una superficie stabile asciutta e in piano Non posizionare mai l apparecchio sopra o vicino a un fornello a gas o elettrico oppure in luoghi in cui possa venire a contatto con apparecchi a elevate temperature I UTILIZZO Utilizzare l appare...

Страница 40: ...one In questo modo la ruota dentata del motore di miscelazione non viene danneggiata Riciclare l apparecchio solo presso un centro di smaltimento autorizzato Il liquido di raffreddamento utilizzato nell apparecchio è l isobutano R600a L R600a è un gas naturale ed ecologico ma molto infiammabile È quindi necessario prestare molta attenzione quando si sposta o si installa l apparecchio per evitare d...

Страница 41: ...lay 12 Manopola per incremento riduzione 13 Pulsante menu PRIMA DELL USO Prima di utilizzare la gelatiera per la prima volta lasciarla appoggiata per 4 ore su una superficie stabile Lavare tutti gli elementi della gelatiera che entreranno in contatto con gli alimenti il contenitore fisso quello rimovibile la spatola di miscelazione il coperchio Asciugare bene tutti gli elementi prima di utilizzarl...

Страница 42: ...e spegnimento lampeggia 2 Premere il tasto di accensione spegnimento L apparecchio è ora acceso 3 Selezionare il programma desiderato con il pulsante menu Il programma gelato consente di preparare gelati sorbetti gelati soft yogurt gelato ecc Il tempo predefinito è impostato su 60 minuti Si può regolare tra 5 e 70 minuti La miscelazione serve a mescolare ulteriormente gli ingredienti senza raffred...

Страница 43: ...elocità di miscelazione per gustare risultati sempre diversi Più sono i giri al minuto più sarà l aria e meno saranno i cristalli di ghiaccio per un gusto più intenso Per fare ciò premere il tasto per la velocità di miscelazione Ogni volta che il tasto viene premuto la velocità cambierà Sono disponibili tre impostazioni di velocità Slow Medium Fast L impostazione predefinita è la velocità media No...

Страница 44: ...ido e un detergente neutro Lavare in acqua calda con del detersivo per piatti i componenti rimovibili coperchio trasparente spatola per miscelazione e cestello estraibile Asciugare accuratamente MISURE AMBIENTALI Il simbolo sul prodotto o sulla confezione indica che esso non deve essere trattato come rifiuto domestico Deve al contrario essere conferito al punto di raccolta predisposto per il ricic...

Страница 45: ...áruční doba 24 měsíců Záruční doba počíná běžet od převzetí věci kupujícím Práva z vadného plnění uplatňuje kupující u prodávajícího na adrese jeho provozovny v níž je přijetí reklamace možné s ohledem na sortiment prodávaného zboží případně i v sídle nebo místě podnikání Za okamžik uplatnění reklamace se považuje okamžik kdy prodávající obdržel od kupujícího reklamované zboží Reklamaci lze také u...

Страница 46: ...u přívodní kabel zapojujte vždy jen do zásuvky která je bez vad a nainstalována uzemněna v souladu se všemi místními normami Elektrický kabel nenechávejte viset přes hranu stolu nebo pracovního pultu a nedovolte Nedovolte aby kabel přišel do styku s horkými plochami tak aby se nepoškodil Přívodní kabel se nesmí dotýkat horkých teplých povrchů Přístroj nikdy nezakrývejte Rozviňte kompletně celý pří...

Страница 47: ...o být alespoň 5 minut klidu Při vyndavání zmrzliny se ji nikdy nesnažte dostat ven silou ani nijak neklepejte do nádoby ani o její okraj Teplota ingrediencí které vkládáte by měla být mezi 10 C a 20 C jedině tak zabráníte nerovnoměrnému promíchání v důsledku předčasného tuhnutí zmrzliny Nikdy nesundavejte víko ani se nesnažte vyjmout metlu pokud je přístroj právě v provozu Pokud chcete hotovou zmr...

Страница 48: ...Tlačítko START pausa 11 Displej 12 Ovladač na zvýšení snížení 13 MENU tlačítko PŘED PRVNÍM POUŽITÍM Před prvním použitím nechte přístroj alespoň 4 hodiny stát v klidu na rovné ploše Očistěte všechny části stroje které přijdou do kontaktu se zmrzlinou pevnou nádobu vyjímatelnou nádobu metlu víko 1 2 3 4 5 6 7 8 9 10 11 12 13 POWER HARDNESS SPEED START STOP RESET ICE CREAM SETTINGS POWER HARDNESS SP...

Страница 49: ...plyny zahrnuté v Kjotském protokolu POUŽITÍ 1 Přístroj zapojte do el sítě Ozve se zvukový signál podsvítí se on off Podsvícení okolo hlavního spínače bude blikat 2 Stiskněte rozsvícené tlačítko zapnutí on off Přístroj je zapnutý 3 Pomocí tlačítka MENU vyberete vámi požadovaný program funkci Program ice cream zmrzlina se používá primárně k výrobě zmrzlinových variací jako je zmrzlina sorbet měkká z...

Страница 50: ...míchání můžete navolit rychlost míchání dle rychlosti se bude lišit i výsledný produkt i chuť Čím rychlejší otáčky tím více vzduchu se vmíchá do zmrzliny tím méně ledových krystalků a intenzivnější chuť Chcete li rychlost nastavit tak stiskněte tlačítko pro rychlost speed každé stisknutí tlačítka upraví rychlost Můžete volit mezi 3 rychlostmi Slow Medium Fast Automaticky přednastavená rychlost je ...

Страница 51: ...jte zástrčku z el sítě Motorovou část nerezovou můžete očistit jemným lehce navlhčeným hadříkem s přídavkem saponátu Jednotlivé díly jako je víko metlu a nádobu omyjte v teplé vodě se saponátem Důkladně osušte OHLED NA ŽÍVOTNÍ PROSTŘEDÍ Symbol na přístroji či na jeho obalu znamená že s tímto výrobkem není možno nakládat jako s běžným domovním odpadem nýbrž musí být odevzdán na místech určených ke ...

Страница 52: ... mesiacov Záručná doba začína plynúť od prevzatia veci kupujúcim Práva z chybného plnenia uplatňuje kupujúci u predávajúceho na adrese jeho prevádzky v ktorej je prijatie reklamácie možné s ohľadom na sortiment predávaného tovaru prípadne aj v sídle alebo mieste podnikania Za okamih uplatnenia reklamácie sa považuje okamih kedy predávajúci dostal od kupujúceho reklamovaný tovar Reklamáciu možno ti...

Страница 53: ...m na informatívnym štítku prístroja Zástrčku prívodný kábel zapájajte vždy len do zásuvky ktorá je bez chýb a nainštalovaná uzemnená v súlade so všetkými miestnymi normami Elektrický kábel nenechávajte visieť cez hranu stola alebo pracovného pultu a nedovoľte Nedovoľte aby kábel prišiel do styku s horúcimi plochami tak aby sa nepoškodil Prívodný kábel sa nesmie dotýkať horúcich teplých povrchov Pr...

Страница 54: ... vypnutím by malo byť aspoň 5 minút pokoja Pri vyberaní zmrzliny sa ju nikdy nesnažte dostať von silou ani nijako neklepte do nádoby ani o jej okraj Teplota ingrediencií ktoré vkladáte by mala byť medzi 10 C a 20 C jedine tak zabránite nerovnomernému premiešaniu v dôsledku predčasného tuhnutia zmrzliny Nikdy nedávajte veko ani sa nesnažte vybrať metlu pokiaľ je prístroj práve v prevádzke Pokiaľ ch...

Страница 55: ...chlosti miešania 10 Tlačidlo ŠTART pausa 11 Displej 12 Ovládač na zvýšenie zníženie 13 MENU tlačidlo PRED PRVÝM POUŽITÍM Pred prvým použitím nechajte prístroj aspoň 4 hodiny stáť na rovnej ploche Očistite všetky časti stroja ktoré prídu do kontaktu so zmrzlinou pevnú nádobu vyberateľnú nádobu metlu veko 1 2 3 4 5 6 7 8 9 10 11 12 13 POWER HARDNESS SPEED START STOP RESET ICE CREAM SETTINGS POWER HA...

Страница 56: ...č obsahuje fluórované skleníkové plyny zahrnuté v Kjótskom protokole POUŽITIE 1 Prístroj zapojte do el siete Ozve sa zvukový signál Podsvietenie okolo hlavného spínača bude blikať 2 Stlačte rozsvietené tlačidlo zapnutia on off Prístroj je zapnutý 3 Pomocou tlačidla MENU vyberiete vami požadovaný program funkciu Program ice cream zmrzlina sa používa primárne na výrobu zmrzlinových variácií ako je z...

Страница 57: ...e rýchlosti miešania Pri funkcii na zmrzlinu alebo samotného miešania môžete navoliť rýchlosť miešania podľa rýchlosti sa bude líšiť aj výsledný produkt aj chuť Čím rýchlejšie otáčky tým viac vzduchu sa vmieša do zmrzliny tým menej ľadových kryštálov a intenzívnejšia chuť Ak chcete rýchlosť nastaviť tak stlačte tlačidlo pre rýchlosť speed každé stlačenie tlačidla upraví rýchlosť Môžete voliť medzi...

Страница 58: ...ku z el siete Motorovú časť nerezovou môžete očistiť jemnou mierne navlhčenou handričkou s prídavkom saponátu Jednotlivé diely ako je veko metlu a nádobu umyte v teplej vode so saponátom Dôkladne osušte OHĽAD NA ŽIVOTNÉ PROSTREDIE Symbol na prístroji alebo na jeho obale znamená že s týmto výrobkom nie je možné nakladať ako s domovým odpadom ale musí byť odovzdaný na miestach určených na zber a lik...

Страница 59: ...59 DO9232I www domo elektro be SK ...

Страница 60: ...essoires en onderdelen online via of scan hier COMMANDEZ d authentiques accessoires et pièces Domo en ligne sur ou scannez ici BESTELLEN SIE die Domo Original Zubehör und Ersatzteile online über oder hier scannen ORDER the original Domo accessories and parts online at or scan here webshop domo elektro be Webshop ...

Отзывы: