background image

30

DO912K

EN

WARRANTY

Dear client ,

All of our products are always submitted to a strict quality control before they are sold to you. 

Should you nevertheless experience problems with your device, we sincerely regret this.

In that case, we kindly request you to contact our customer service.

Our staff will gladly assist you.

+32 14 21 71 91                  [email protected]

Monday – Thursday: 8.30 – 12.00 and 13.00 – 17.00

Friday: 8.30 – 12.00 and 13.00 – 16.30

This appliance has a two year warranty period. During this period the manufacturer is responsible for 
any failures that are the direct result of construction failure. When these failures occur the appliance will 
be repaired or replaced if necessary. The warranty will not be valid when the damage to the appliance is 
caused by wrong use, not following the instructions or repairs executed by a third party. The guarantee is 
issued with the original till receipt. All parts, which are subject to wear, are excluded from the warranty.
If your device breaks down within the 2-year warranty period, you can return the device together with 
your receipt to the shop where you purchased it.
The guarantee on accessories and components that are liable to wear-and-tear is only 6 months.

The guarantee and responsibility of the supplier and manufacturer lapse automatically in the following 
cases:

 · If the instructions in this manual have not been followed.
 · In case of incorrect connection, e.g., electrical voltage that is too high.
 · In case of incorrect, rough or abnormal use.
 · In case of insufficient or incorrect maintenance.
 · In case of repairs or alterations to the device by the consumer or non-authorised third parties.
 · If the customer used parts or accessories that are not recommended or provided by the supplier / 

manufacturer.

SAFETY INSTRUCTIONS

When using electrical appliances, basic safety precautions should always be taken, including the 
following:

 · Read all instructions carefully. Keep this manual for future reference. 
 · Make sure all packaging materials and promotional stickers have been removed before using the 

appliance for the first time. Make sure children cannot play with the packaging materials.

 · This appliance is intended to be used in household and similar applications such as:

 · staff kitchen areas in shops, offices and other working environments;
 · farm houses;
 · by clients in hotels, motels and other residential type environments;
 · bed and breakfast type environments.

 · Children should be supervised to ensure that they do not play with the appliance.
 · This appliance can be used by children aged from 16 years and above and persons with reduced 

physical, sensory or mental capabilities or lack of experience and knowledge if they have been given 

Содержание DOMO DO912K

Страница 1: ...T OF DO912K Handleiding Koelkast Mode d emploi R frig rateur Gebrauchsanleitung K hlschrank Instruction booklet Fridge Manual de instrucciones Frigor fico N vod k pou it Lednice N vod na pou itie Chla...

Страница 2: ...his instruction manual for future reference Lea detenidamente todas las instrucciones Conserve este manual para futura referencia P ed pou it m si d kladn p e t te tento manu l manu l si uschovejte i...

Страница 3: ...de winkel waar je het toestel hebt aangekocht De garantie op accessoires en onderdelen die onderhevig zijn aan slijtage bedraagt 6 maanden De garantie en verantwoordelijkheid aansprakelijkheid van de...

Страница 4: ...de stekker zelf uit het stopcontact Trek nooit aan het snoer om de stekker uit het stopcontact te trekken Zet dit toestel nooit op of in de buurt van een gasvuur of elektrisch vuur of op een plaats wa...

Страница 5: ...ant kan je reinigen met een zachte vochtige doek Plaats het toestel niet in een nauwe doorgang direct zonlicht of vocht Zorg ervoor dat de lucht vrij rond de koelkast kan circuleren De achterkant van...

Страница 6: ...at gedurende 8 uur werken zonder levensmiddelen zodat de kast tot de gepaste temperatuur afkoelt De klimaatklasse geeft de minimale en maximale omgevingstemperatuur weer voor de goede werking van een...

Страница 7: ...de bodem 6 Maak de schroeven scharnierbeugel en het stelvoetje aan de andere kant van de bodem vast Maak lichtjes vast 7 Zet de deur voorzichtig op zijn plaats Zorg dat de deur zowel horizontaal als...

Страница 8: ...and in voordat u levensmiddelen inbrengt en stel vervolgens op de medium stand in UW APPARAAT VERPLAATSEN Als het apparaat voor welke reden dan ook wordt uitgeschakeld wacht 10 minuten voordat u het o...

Страница 9: ...erkt houdbare voeding Groentelade Fruit kruiden en groenten Bewaar bananen uien aardappelen en look niet in de koelkast Middelste legger Zuivel en eieren Bovenste legger Voeding die niet gekookt moet...

Страница 10: ...op de positie 0 en haal de stekker uit het stopcontact Haal de levensmiddelen uit en berg deze in een koele ruimte op Maak het apparaat schoon met een zachte doek warm water en een mild schoonmaakmid...

Страница 11: ...l de juiste voltage krijgt Het toestel staat te kort in de buurt van een warmte bron of de zon MILIEURICHTLIJNEN Dit symbool op het product of op de verpakking wijst erop dat dit product niet als huis...

Страница 12: ...brutale ou anormale Entretien insuffisant ou non conforme R paration ou modification de l appareil par le consommateur ou un tiers non autoris Utilisation d l ments ou d accessoires qui ne sont pas re...

Страница 13: ...ectrique o il pourrait entrer en contact avec un appareil chaud N utilisez pas l appareil l ext rieur Utilisez l appareil uniquement dans le but auquel il est destin Utilisez toujours l appareil sur u...

Страница 14: ...ur ceux ci teignez d givrez et nettoyez l appareil en cas de p riode d inutilisation prolong e Laissez le s cher et laissez la porte ouverte pour viter la formation de moisissure AVERTISSEMENT Ne plac...

Страница 15: ...le et maximale pour le bon fonctionnement d un appareil Vous trouverez la classe climatique sur la plaque signal tique au dos de l appareil SN Subnormal temp rature ambiante de 10 C 32 C N Normal temp...

Страница 16: ...de resserrer la charni re up rieure assurez vous que la porte est align e horizontalement et verticalement de sorte que les joints soient scell s sur tous les c t s Ins rez la charni re et vissez la...

Страница 17: ...ttachez les dans le r frig rateur afin d viter tout risque de choc D placez l appareil jusqu son nouvel emplacement Si l appareil a t plac sur un des ses c t s durant un certain temps remettez le en p...

Страница 18: ...e de la prise de courant Nettoyez fond le r frig rateur Laissez la porte du r frig rateur ouverte pour viter la formation de moisissure et les mauvaises odeurs PANNE DE COURANT La plupart des pannes d...

Страница 19: ...ffon doux impr gn d eau chaude et de d tergent Nettoyez le joint de porte avec de l eau claire uniquement puis essuyez le soigneusement Apr s le nettoyage reconnectez l appareil et r glez la temp ratu...

Страница 20: ...e Contr lez si l appareil est aliment la tension correcte L appareil se trouve trop pr s d une source de chaleur ou sous la lumi re directe du soleil MISE AU REBUT Ce symbole sur le produit ou son emb...

Страница 21: ...Monate Die Garantie und dieVerantwortung Haftung des Lieferanten und Herstellers entfallen automatisch in den folgenden F llen Bei Nichtbeachtung der Anweisungen in dieser Bedienungsanleitung Bei fal...

Страница 22: ...schnur aus der Steckdose Lassen Sie das im Betrieb befindliche Ger t nicht unbeaufsichtigt Stellen Sie das Ger t nicht in der N he oder auf einer Gasflamme einer elektrischen Platte oder an einer Stel...

Страница 23: ...W rmequelle in Kontakt kommen k nnte An der R ckseite des Ger ts befinden sich brennbare Materialien Achten Sie auf das Symbol Brandgefahr brennbares Material das sich an der R ckseite des Ger ts befi...

Страница 24: ...n stehen lassen So kann das K hlmittel sich verteilen Lassen Sie das Ger t 8 Stunden ohne Lebensmittel in Betrieb sodass der K hlschrank auf eine angemesseneTemperatur abk hlt Die Klimaklasse gibt die...

Страница 25: ...der gegen berliegenden Seite des Bodens Schrauben Sie diese leicht an 7 Setzen Sie dieT r vorsichtig ein Achten Sie darauf dass dieT r sowohl senkrecht als auch waagerecht ausgerichtet ist sodass die...

Страница 26: ...eingelegt werden Stellen Sie den Regler anschlie end auf die Einstellung Medium VERSETZEN DES GER TS Wen Sie das Ger t unabh ngig aus welchem Grund ausschalten warten Sie 10 Minuten bis Sie es erneut...

Страница 27: ...meladen S fte Getr nke Gew rze etc Lagern Sie hier keine Lebensmittel mit begrenzter Haltbarkeit Gem se Schublade Obst Kr uter und Gem se Bananen Zwiebeln Kartoffeln und Knoblauch nicht k hl lagern Mi...

Страница 28: ...r L sungsmittel Stellen Sie dieTemperatur auf die Position 0 ein und ziehen Sie den Stecker aus der Steckdose Entnehmen Sie die Lebensmittel und bewahren Sie diese an einem k hlen Ort auf Reinigen Sie...

Страница 29: ...en ob sich der Stecker in der Steckdose befindet DieTemperatureinstellung ist zu niedrig DieT re hat zu lange oder zu oft offen gestanden Die Luftzufuhr ist blockiert Kontrollieren ob dem Ger t die ri...

Страница 30: ...ty of the supplier and manufacturer lapse automatically in the following cases If the instructions in this manual have not been followed In case of incorrect connection e g electrical voltage that is...

Страница 31: ...with a warm appliance Do not use the appliance outdoors Only use the appliance for its intended use Always use the appliance on a steady dry and level surface Only use the appliance for domestic use T...

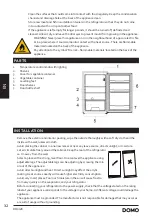
Страница 32: ...fore connecting your refrigerator to the power supply check that the voltage stated on the rating label of your appliance corresponds to the voltage in your home A different voltage could damage the a...

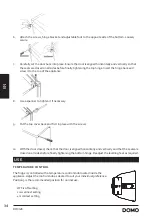
Страница 33: ...43 C DOOR CONVERSION If you need to hinge your door on the opposite side it is recommended that you call your local authorised service agent to make this conversion or ask a technician Before you rev...

Страница 34: ...n it if necessary 9 Put the top cover back and fix it in place with the screws 10 With the door closed check that the door is aligned horizontally and vertically and that the seals are closed on all s...

Страница 35: ...Therefore you should be careful during shipment and installation to prevent your appliance s cooler elements from being damaged In the event of a leak caused by damage to the cooler elements move your...

Страница 36: ...14 base bulb 3 Replace the bulb cover MOVING THE SHELVES AND DOOR RACK Empty the fridge before moving the shelves or the door racks To move a shelf raise it and pull it towards you To move a door rack...

Страница 37: ...can run out TROUBLE SHOOTING Frequently a problem is minor and a service call may not be necessary use this trouble shooting guide for a possible solution Does not work Check connection of power cord...

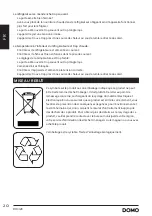
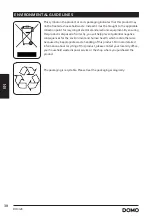
Страница 38: ...ensuring this product is disposed of correctly you will help prevent potential negative consequences for the environment and human health which could otherwise be caused by inappropriate waste handli...

Страница 39: ...uso retire todos los materiales de embalaje y etiquetas promocionales Aseg rese de que los ni os no puedan jugar con el material de embalaje Este aparato es adecuado para su uso en el mbito dom stico...

Страница 40: ...idas No utilice ning n otro aparato el ctrico en el interior del frigor fico a menos que el mismo est aprobado para este fin por el fabricante Nunca almacene materiales explosivos en el aparato como p...

Страница 41: ...Patas ajustables 6 Estantes de la puerta 7 Estante de la puerta para botellas INSTALACI N Retire todo el material de embalaje tanto del interior como del exterior Limpie el exterior del aparato con un...

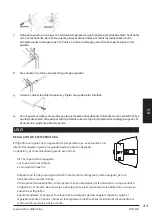
Страница 42: ...i n de giro compruebe que el enchufe se ha desconectado de la toma de corriente y que el aparato est vac o Se recomienda el uso de un destornillador Phillips y una llave ambos no incluidos 1 Retire lo...

Страница 43: ...de ajuste USO REGULACI N DE TEMPERATURA El frigor fico se regula con un regulador de temperatura que se encuentra en el interior del aparato Ajuste el regulador hasta la posici n deseada La posici n...

Страница 44: ...perecederos Conservaci n de alimentos frescos para obtener los mejores resultados Conserve solo alimentos muy frescos y de buena calidad Aseg rese de que los alimentos est n bien envasados o c bralos...

Страница 45: ...de l hacia usted NORMAS IMPORTANTES No introduzca nunca alimentos calientes en el frigor fico Las bebidas deben almacenarse en recipientes cerrados Los alimentos que deban conservarse durante mucho ti...

Страница 46: ...recto Aseg rese de insertar el enchufe en la toma de corriente Compruebe que se est utilizando el voltaje adecuado El frigor fico rebota frecuentemente Compruebe que la puerta est bien cerrada Ha intr...

Страница 47: ...amente usted ayudar a evitar posibles consecuencias negativas para las personas y el medio ambiente que ser an causadospor un tratamiento de residuos inadecuado Para obtener informaci n m s detallada...

Страница 48: ...s c Z ru n doba po n b et od p evzet v ci kupuj c m Pr va z vadn ho pln n uplat uje kupuj c u prod vaj c ho na adrese jeho provozovny v n je p ijet reklamace mo n s ohledem na sortiment prod van ho zb...

Страница 49: ...od s t Nikdy z str ku nevytahujte ze z suvky ta en m za kabel Nenech vejte p stroj b et bez dozoru Nikdy neumis ujte p stroj v bl zkosti plynov ho nebo elektrick ho spor ku i trouby nebo do bl zkosti...

Страница 50: ...mn polepy Vn j povrch d kladn ot ete jemn m such m hadrem a vnit ek m ete ot t jemn m navlh en m had kem Neumis ujte lednici do t sn bl zkosti tepeln ch zdroj ani na p m slune n z en Zadn st ledni ky...

Страница 51: ...t a b et napr zdno Takto nech te nachladit vnit n prostor Klimatick t da ur uje minim ln a maxim ln teplotu okol pro spr vnou funkci p stroje Ozna en klimatick t dy najdete na t tku na zadn stran p s...

Страница 52: ...spodn pant nasa te zp t dve e Dve e mus b t vodorovn aby jejich t sn n p il halo po cel m obvodu Pokud dve e dob e t sn m ete usadit i horn pant a p i roubovat ho 8 Pokud je pot eba panty v ce ut hnou...

Страница 53: ...ovu do provozu Po st hov n lednice ji nechte alespo 10 min v klidu st t a a potom ji zapojte Lednice pou v chladivo R600a Chladivo R600a je isobutan kter je etrn k ivotn mu prost ed ale z rove n chyln...

Страница 54: ...N POZOR P ed v m nou nejd ve vypojte lednici z el s t 1 Sundejte kryt rovky 2 Vy roubujte starou rovku a pot na roubujte novou 15W rovku z vit E14 3 Op t zakryjte krytem NASTAVEN A P EM ST N POLI EK P...

Страница 55: ...St v se e nastane probl m kter lze snadno vy e it i bez odborn pomoci Nejd ve zkontrolujte n e zda se nejedn pr v o tento typ probl mu P stroj nefunguje zkontrolujte p vod energie a zda nevypadl el p...

Страница 56: ...r en ch ke sb ru a likvidaci elektrick ch a elektronick ch za zen Dodr en m tohoto doporu en chr n te ivotn prost ed a zdrav spoluob an V ce informac o mo nostech likvidace nebezpe n ho odpadu obdr te...

Страница 57: ...doba 24 mesiacov Z ru n doba za na plyn od prevzatia veci kupuj cim Pr va z chybn ho plnenia uplat uje kupuj ci u pred vaj ceho na adrese jeho prev dzky v ktorej je prijatie reklam cie mo n s oh adom...

Страница 58: ...tr ku nevy ahujte zo z suvky ahan m za k bel Nenech vajte pr stroj be a bez dozoru Nikdy neumiest ujte pr stroj v bl zkosti plynov ho alebo elektrick ho spor ka i r ry alebo do bl zkosti in ho pr stro...

Страница 59: ...e PRED PRV M POU IT M Chladni ku rozba te vyberte v etko pr slu enstvo zvn tra pr stroja Z vonkaj ej strany odlepte ochrann a reklamn polepy Vonkaj povrch d kladne utrite suchou handrou a vn tro m et...

Страница 60: ...n torn priestor Klimatick trieda ur uje minim lnu a maxim lnu teplotu okolia pre spr vnu funkciu pr stroja Ozna enie klimatickej triedy n jdete na t tku na zadnej strane pr stroja SN subnorm lna teplo...

Страница 61: ...i dvere Pou ite skrutky ktor ste vyskrutkovali 7 Na spodnej p nt nasa te sp dvere Dvere musia by vodorovne aby ich tesnenie priliehalo po celom obvode Ak dvere dobre tesn m ete usadi aj horn p nt a pr...

Страница 62: ...novu do prev dzky Po s ahovan chladni ky ju nechajte aspo 10 min v k ude st a a potom ju zapojte Chladni ka pou va chladivo R600a Chladivo R600a je izobut n ktor je etrn k ivotn mu prostrediu ale z ro...

Страница 63: ...Pred v menou najsk r vypojte chladni ku z el siete 1 Zlo te kryt iarovky 2 Vyskrutkujte star iarovku a potom naskrutkujte nov 15W iarovku z vit E14 3 Op zakryte krytom NASTAVENIE A PREMIESTNENIA POLI...

Страница 64: ...nastane probl m ktor sa d ahko vyrie i aj bez odbornej pomoci Najsk r skontrolujte ni ie i sa nejedn pr ve o tento typ probl mu Pr stroj nefunguje skontrolujte pr vod energie a i nevypadol el pr d za...

Страница 65: ...h ur en ch na zber a likvid ciu elektrick ch a elektronick ch zariaden Dodr an m tohto odpor ania chr nite ivotn prostredie a zdravie spoluob anov Viac inform ci o mo nostiach likvid cie nebezpe n ho...

Страница 66: ...66 DO912K...

Страница 67: ...67 DO912K www domo elektro be...

Страница 68: ...essoires en onderdelen online via of scan hier COMMANDEZ d authentiques accessoires et pi ces Domo en ligne sur ou scannez ici BESTELLEN SIE die Domo Original Zubeh r und Ersatzteile online ber oder h...

Отзывы: