background image

11

DO8141

www.domo-elektro.be

FR

GARANTIE

Cher client,

Tous nos produits sont soumis à des contrôles qualité stricts avant

d’être proposés à la vente. Si vous deviez toutefois rencontrer

un problème avec votre appareil, nous le déplorons vivement.

Dans ce cas, nous vous invitons à prendre contact avec notre service clientèle.

Nos collaboratrices se feront un plaisir de vous aider !

+32 14 21 71 91                  [email protected]

Du lundi au jeudi : 8 h 30 – 12 h et 13 h – 17 h

Vendredi : 8 h 30 – 12 h et 13 h – 16 h 30

Cet appareil est garanti 2 ans à compter de la date d’achat. Durant la période de garantie, le 
distributeur assumera l’entière responsabilité en cas de défauts de fonctionnement (matériel) 
ou de fabrication. Si un tel problème survient, l’appareil sera remplacé ou réparé. La période 

de garantie de 2 ans ne reprend pas à zéro, mais se poursuit (jusqu’à 2 ans à compter de la 

date d’achat de l’appareil). La garantie est accordée sur la base du ticket de caisse. 

Pour les accessoires et les éléments d’usure, une garantie de 6 mois s’applique.
La garantie et la responsabilité du fournisseur et du fabricant n’ont plus effet dans les cas 

suivants :

 · Les instructions du manuel n’ont pas été suivies.
 ·

Mauvais raccordement, par ex. tension électrique trop forte.

 · Utilisation contraire, brutale ou anormale.
 ·

Entretien insuffisant ou non conforme.

 ·

Réparation ou modification de l’appareil par le consommateur ou un tiers non autorisé.

 ·

Utilisation d’éléments ou d’accessoires qui ne sont pas recommandés ou fournis par le 

fournisseur/fabricant.

Содержание DOMO DO8141

Страница 1: ...141 Handleiding Ventilator Mode d emploi Ventilateur Gebrauchsanleitung Ventilator Instruction booklet Fan Manual de instrucciones Ventilador N vod k pou it Stojanov ventil tor N vod na pou itie Stoja...

Страница 2: ...instructions carefully save this instruction manual for future reference Lea detenidamente todas las instrucciones Conserve este manual para futura referencia P ed pou it m si d kladn p e t te tento...

Страница 3: ...of gerepareerd worden De garantieperiode van 2 jaar zal op dit moment niet terug beginnen maar loopt verder tot 2 jaar na de aankoop van het toestel De garantie wordt verleend op basis van het kassat...

Страница 4: ...rderijen Hotel en motelkamers en andere omgevingen met een residentieel karakter Gastenkamers of gelijkaardige Opgelet het toestel mag niet gebruikt worden met een externe timer of een aparte afstands...

Страница 5: ...erste gebruik alle verpakkingsmaterialen en eventuele promotionele stickers Gebruik deze ventilator niet op natte of vochtige plaatsen Plaats het toestel niet dicht bij een badkuip of ander waterreser...

Страница 6: ...the lock nut of grill clockwise and in the meantime fix the rear grill Pull the blade to rotate after installing so as to ensure that the blade can be normally rotated 1 Align Screw Holes on the outer...

Страница 7: ...Front grill Instructions for operation of body INSTRUCTIONS FOR USE Body key Buckle Screw Press down all the Buckles to fasten the ront Guard with the Rear Guard At the crew Holes tighten the separate...

Страница 8: ...ice personnel if service is needed 1 Before cleaning and assembling fan must be unplugged 2 To ensure adequate air circulation to the motor keep vents at the rear o motor free of dust Do not disassemb...

Страница 9: ...vig vast alvorens de ventilator in werking te stellen 5 Turn counterclockwise and loosen for performing height adjustment Height Adjustment Tilt Adjustment Thorough DISPOSAL municipal w local govern a...

Страница 10: ...ct op de correcte manier wordt verwijderd voorkom je mogelijk voor mens en milieu negatieve gevolgen die zich zouden kunnen voordoen in geval van verkeerde afvalbehandeling Voor meer details in verban...

Страница 11: ...fonctionnement mat riel ou de fabrication Si un tel probl me survient l appareil sera remplac ou r par La p riode de garantie de 2 ans ne reprend pas z ro mais se poursuit jusqu 2 ans compter de la d...

Страница 12: ...utres lieux avec un caract re r sidentiel Dans les chambres d h tes ou similaires Attention l appareil ne peut pas tre utilis avec une minuterie externe ou une commande distance s par e Veuillez lire...

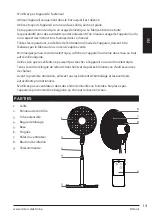
Страница 13: ...oire ou d un autre r servoir d eau PARTIES 1 Grille 2 Panneau de contr le 3 Tube extensible 4 Bague de blocage 5 Base 6 Poign e 7 Pales du ventilateur 8 Bouton d oscillation 9 T l commande OWNER S MAN...

Страница 14: ...with the Positioning Clip aligned as illustrated 2 Press down all the Front Guard with the Screw Holes tighten and nut Front and Rear Guard Installation Considerate Hint Remove parts from the compone...

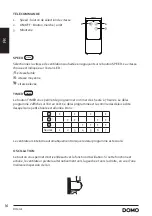
Страница 15: ...he Rear Guard At the Screw Holes tighten the separated screw and nut ar Guard Installation Speed display Timer display 4h 2h 1h SPEED TIMER ON OFF Instructions for key of remote controller Instruction...

Страница 16: ...it by yourself Refer it qualified service personnel if service is needed 1 Before cleaning and assembling fan must be unplugged 2 To ensure adequate air circulation to the motor keep vents at the rear...

Страница 17: ...ensible Fixez bien la bague de blocage avant de red marrer le ventilateur 5 Turn counterclockwise and loosen for performing height adjustment Height Adjustment Tilt Adjustment DISPOSAL municipal w loc...

Страница 18: ...est limin correctement vous favorisez la pr vention des cons quences n gatives pour l environnement et la sant humaine qui sinon seraient le r sulat d un traitement inappropri des d chets de ce produ...

Страница 19: ...onsfehler zur ckzuf hren sind Wenn derartige M ngel auftreten wird das Ger t wenn n tig ausgetauscht oder repariert Die Garantiezeit von 2 Jahren beginnt in diesem Moment nicht erneut sondern sie l uf...

Страница 20: ...in Gesch ften B ros oder anderen professionellen Umgebungen Bauernh fe Hotel Motel G stezimmer u Achtung das Ger t darf nicht mit einer externen Zeitschaltuhr oder Fernbedienung gebraucht werden Bitt...

Страница 21: ...tzen Beim ersten GebrauchVerpackungsmaterial und m glicheWerbeaufkleber komplett entfernen Verwenden Sie denVentilator nicht in Nass oder Feuchtr umen Stellen Sie denVentilator nicht in die N he der B...

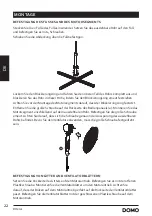
Страница 22: ...n Screw Holes on the outer ring of both the Front and Rear Guards with the Positioning Clip aligned as illustrated 2 Press down all the Front Guard with the Screw Holes tighten and nut Front and Rear...

Страница 23: ...ckwise and loosen for performing height adjustment Height Adjustment Height Adjustment Key Tilt Adjustment Manual Swing Pull knob Push down to swing Pull up for static Horizontal Swing mer display SPE...

Страница 24: ...ry to fix it by yourself Refer it qualified service personnel if service is needed 1 Before cleaning and assembling fan must be unplugged 2 To ensure adequate air circulation to the motor keep vents a...

Страница 25: ...n Blockierungsring anschlie end wieder gut bevor Sie denVentilator in Betrieb nehmen 5 Turn counterclockwise and loosen for performing height adjustment Height Adjustment Tilt Adjustment Thorough DISP...

Страница 26: ...Durch Ihren Beitrag zum korrekten Entsorgen dieses Produkts sch tzen Sie die Umwelt und die Gesundheit Ihrer Mitmenschen Umwelt und Gesundheit werden durch falsches Entsorgen gef hrdet Weitere Inform...

Страница 27: ...ng use not following the instructions or repairs executed by a third party The guarantee is issued with the original till receipt All parts which are subject to wear are excluded from the warranty If...

Страница 28: ...s Hotel or motel rooms and other surroundings with a residential character Guest rooms or similar Attention This appliance cannot be used with an external timer or a separate remote control Before use...

Страница 29: ...be on the base and fix it with 4 screws Slide the cover over the base mount OWNER S MANUAL Stand Fan Model FS40 16JR READ AND SAVE THESE INSTRUCTIONS Version 1 0 2016 Attention Pictures in the IM are...

Страница 30: ...in order to avoid ock do not immerse the ged from 8 years and sensory or mental edge if they have been use of the appliance in olved Children shall not maintenance shall not be ore cleaning unplug th...

Страница 31: ...e Control within 5 m distance and 30 degree deflection in front of Product Battery ON OFF key TIMER key SPEED key CONTROL PANEL 1 Speed control 2 Timer 3 On off button 4 Indicator light for speed 5 In...

Страница 32: ...ourself Refer it qualified service personnel if service is needed 1 Before cleaning and assembling fan must be unplugged 2 To ensure adequate air circulation to the motor keep vents at the rear o moto...

Страница 33: ...ening the telescopic tube Then tighten the clamp firmly before turning the fan on 5 Turn counterclockwise and loosen for performing height adjustment Height Adjustment Tilt Adjustment DISPOSAL municip...

Страница 34: ...ensuring this product is disposed of correctly you will help prevent potential negative consequences for the environment and human health which could otherwise be caused by inappropriate waste handli...

Страница 35: ...pra La garant a se concede sobre la base del recibo de caja La garant a de los accesorios y componentes sujetos a desgaste es de 6 meses La garant a y la responsabilidad imputabilidad del proveedor y...

Страница 36: ...s y moteles y otros entornos con un car cter residencial En los cuartos de hu spedes o similares Atenci n el aparato no puede ser utilizado con un temporizador externo o un mando a distancia separado...

Страница 37: ...ncia MONTAJE FIJACI N DE LA BASEY DE LA UNIDAD DE MOTOR Monte las 2 piernas de la base Coloque el tubo retr ctil en la base y f jelo con 4 tornillos Deslice la placa de recubrimiento sobre la fijaci n...

Страница 38: ...llustrated 2 Press down all the Front Guard with the Screw Holes tighten and nut Front and Rear Guard Installation Considerate Hint Remove parts from the component before performing installation Suppo...

Страница 39: ...or parts MAINTENANCE INSTRUCTION CLEANING Body key Turn counterclockwise and loosen for performing height adjustment Height Adjustment Height Adjustment Key Tilt Adjustment Manual Swing Pull knob Push...

Страница 40: ...r it qualified service personnel if service is needed 1 Before cleaning and assembling fan must be unplugged 2 To ensure adequate air circulation to the motor keep vents at the rear o motor free of du...

Страница 41: ...inuaci n vuelva a fijar firmemente el anillo de bloqueo antes de poner en marcha el ventilador 5 Turn counterclockwise and loosen for performing height adjustment Height Adjustment Tilt Adjustment DIS...

Страница 42: ...ed ayudar a evitar posibles consecuencias negativas para las personas y el medio ambiente que ser an causadospor un tratamiento de residuos inadecuado Para obtener informaci n m s detallada sobre el r...

Страница 43: ...rku nebo p edloze byla li jakost nebo proveden ur eno podle smluven ho vzorku nebo p edlohy zbo vyhovuje po adavk m pr vn ch p edpis Projev li se vada v pr b hu esti m s c od p evzet m se za to e zbo...

Страница 44: ...d ka d m pou it m si dn zkontrolujte parametry el s t a zda je vhodn pro zapojen p stroje Po adovan hodnoty naleznete na v robn m t tku P vodn kabel nenech vejte viset p es ostr hrany ani le et na hor...

Страница 45: ...Version 1 0 2016 Attention Pictures in the IM are for reference only Rea CA 1 I o a 2 I 3 T u 4 T abo cap give a sa play ma 5 W a 6 W t 7 d p u s d t p WA 1 N ru 2 D 3 B 4 D 5 H RU 1 Instructions for...

Страница 46: ...in order to avoid hazard ndoor use only o protect against the risk of electrical shock do not immerse the nit cord or plug in water or other liquid his appliance can be used by children aged from 8 y...

Страница 47: ...enance Do not try to fix qualified service personnel if service is needed 1 Before cleaning and assembling fan must be unp 2 To ensure adequate air circulation to the motor k motor free of dust Do not...

Страница 48: ...r n m i i t n m ventil tor v dy vypojte z el s t Ochrann m ky udr ujte po celou dobu ist bez jak chkoli n nos prachu a jin ch pevn ch stic Jedin tak zajist te spr vnou cirkulaci vzduchu Kv li odstran...

Страница 49: ...m stech ur en ch ke sb ru a likvidaci elektrick ch a elektronick ch za zen Dodr en m tohoto doporu en chr n te ivotn prost ed a zdrav spoluob an V ce informac o mo nostech likvidace nebezpe n ho odpa...

Страница 50: ...k bola akos alebo prevedenie ur en pod a dohodnut ho vzorky alebo predlohy tovar vyhovuje po iadavk m pr vnych predpisov Ak sa prejavia vada v priebehu iestich mesiacov od prevzatia m sa za to e tovar...

Страница 51: ...e n vod na pou itie Pred ka d m pou it m si riadne skontrolujte parametre el siete a i je vhodn pre zapojenie pr stroja Po adovan hodnoty n jdete na v robnom t tku Pr vodn k bel nenech vajte visie cez...

Страница 52: ...n the IM are for reference only Read CA 1 If o a 2 In 3 T u 4 T abo cap give a sa play mad 5 W a 6 W ta 7 d p u s d th p WA 1 Ne ru 2 Di 3 Be 4 DO 5 Ho RU 1 Instructions for operation of body INSTRUCT...

Страница 53: ...n Support Installation Align the Column Pipe connection plate with holes on the support and tighten screws Read Rules for Safe Operation and Instructions Carefully 1 If the supply cord is damaged it m...

Страница 54: ...ith a soft cloth so 4 Do not use any abrasive detergent or solvents to Do not use any of the following as a cleaner gas 5 Do not allow water or any other liquid into the mo MAINTENANCE INSTRUCTION CLE...

Страница 55: ...handrou V dy po isten ventil tor d kladne vysu te Na istenie nikdy nepou vajte drsn istiace prostriedky aby ste ventil tor nepo kriabali Zaistite aby sa nikdy nedostala voda ani vlhkos do motorovej a...

Страница 56: ...essoires en onderdelen online via of scan hier COMMANDEZ d authentiques accessoires et pi ces Domo en ligne sur ou scannez ici BESTELLEN SIE die Domo Original Zubeh r und Ersatzteile online ber oder h...

Отзывы: