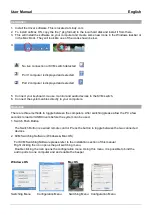
background image

User Manual 


English 


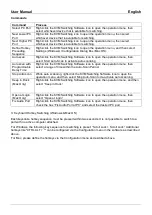
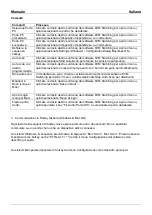
Commands 


Command 

Process 

Select PC Port 

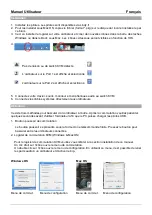
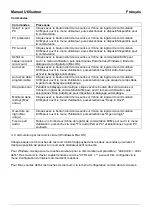
Right-click the KVM Switching Software icon to open the operation menu, then 

select whichever device that is available for switching. 

Next Lower PC 

Port 

Right-click the KVM Switching icon to open the operation menu, then select 

whichever device that is available for switching. 

Next Higher PC 

Port 

Right-click the KVM Switching icon to open the operation menu, then select 

whichever device that is available for switching. 

Define Hotkey 

Preceding 

Sequence 

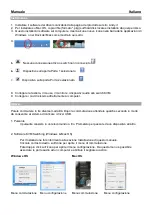
Right-click the KVM Switching icon to open the operation menu, and then select 

Settings (Windows) / Configuration Dialog Box (Mac OS). 

Auto scan 

Right-click the KVM Switching Software icon to open the operation menu, then 

select Start Auto-Scan to activate auto scanning. 

Auto scan with 

Programmable 

Delay Time 

Right-click the KVM Switching Software icon to open the operation menu, then 

select a range of time within the Auto-Scan Period. 

Stop Auto scan  While auto scanning, right-click the KVM Switching Software icon to open the 

operation menu, and then select Stop Auto-Scan to de-activate auto scanning. 

Keep in Dock 

(Mac Only) 

Right-click the KVM Switching Software icon to open the operation menu, and then 

select “Keep in Dock”. 

Open at Login 

(Mac Only) 

Right-click the KVM Switching Software icon to open the operation menu, then 

select “Open at login”. 

Fix Audio Port 

Right-click the KVM Switching Software icon to open the operation menu, then 

check the box “Fix Audio Port at PC” and select the desired PC port. 


3.  Keyboard Hotkey Switching (Windows & Mac OS) 


Each keystroke hotkey sequence must be pressed within two seconds. It is not possible to switch to a 

port with no active computer attached. 

For Windows, the following key sequence for switching is preset: “Scroll Lock + Scroll Lock”. Additional 

hotkeys like "CTRL ALT + *" can be configured via the Configuration menu in the software as described 

above. 
For Mac, please define the hotkeys via the Configuration menu as described above. 

Содержание 42340

Страница 1: ...tzerhandbuch Deutsch Manuel Utilisateur Fran ais Manuale Italiano No 42340 2 Port HDMI 10 2 USB 2 0 Audio KVM Switch 42341 2 Port DVI D Single Link USB 2 0 Audio KVM Switch 42342 2 Port VGA USB 2 0 Au...

Страница 2: ...LINDY Group FOURTH EDITION February 2021...

Страница 3: ...160 30Hz 4 4 4 8bit HDCP 1 4 compliant 42341 Console Interfaces DVI I Female USB 2 0 Type A Female 2 x 3 5mm Female PC Server Interfaces DVI D Male USB 2 0 Type A Male 2 x 3 5mm Male 0 9m integrated c...

Страница 4: ...nnect the system cables directly to your computers Operation There are three methods to toggle between the computers After switching please allow the PC a few seconds to load all USB drivers before th...

Страница 5: ...then select a range of time within the Auto Scan Period Stop Auto scan While auto scanning right click the KVM Switching Software icon to open the operation menu and then select Stop Auto Scan to de a...

Страница 6: ...840x2160 30Hz 4 4 4 8Bit kompatibel mit HDCP 1 4 42341 Konsolenschnittstellen DVI I Buchse USB 2 0 Typ A Buchse 2 x 3 5mm Buchse PC Server Schnittstellen DVI D Stecker USB 2 0 Typ A Stecker 2 x 3 5mm...

Страница 7: ...n 5 Schlie en Sie die Systemkabel direkt an Ihre Computer an Betrieb Es gibt drei M glichkeiten um zwischen den angeschlossenen Computern umzuschalten Nach dem Umschalten dauert es einige Sekunden bis...

Страница 8: ...eitspanne im Autoscan Stoppen des Autoscans Rechtsklick auf das KVM Switching Software Icon zum ffnen der Men f hrung w hrend des Autoscans dann w hlen Sie Stop Auto Scan zum Ausschalten des Autoscans...

Страница 9: ...nd en charge les r solutions jusqu 3840x2160 30Hz 4 4 4 8bit conforme HDCP 1 4 42341 Interfaces console DVI I femelle USB 2 0 Type A femelle 2 x 3 5mm femelle Interfaces PC Serveur DVI D m le USB 2 0...

Страница 10: ...bles syst mes directement aux ordinateurs Utilisation Il existe trois m thodes pour basculer d un ordinateur l autre Apr s la commutation veuillez patienter quelques secondes avant d utiliser l ordina...

Страница 11: ...ectionnez une plage de temps dans la p riode de balayage automatique Stop Auto scan Pendant le balayage automatique cliquez avec le bouton droit de la souris sur l ic ne du logiciel de commutation KVM...

Страница 12: ...soluzioni fino a 3840x2160 30Hz 4 4 4 8bit conforme a HDCP 1 4 42341 Interfacce console DVI I femmina USB 2 0 Tipo A femmina 2 x 3 5mm femmina Interfacce PC Server DVI D Maschio USB 2 0 Tipo A Maschio...

Страница 13: ...ivi audio allo switch KVM 9 Collegare i cavi di sistema direttamente ai computer Utilizzo Potete commutare in tre diverse modalit Dopo la commutazione attendete qualche secondo in modo da consentire a...

Страница 14: ...nate un lasso di tempo entro cui l Auto Scan parte automaticamente Stop Auto scan In modalit auto scan cliccate col tasto destro sull icona del software KVM Switching per aprire il menu quindi selezio...

Страница 15: ...ies with part 15 of the FCC Rules Operation is subject to the following two conditions 1 This device may not cause harmful interference and 2 This device must accept any interference received includin...

Страница 16: ...bernehmen die Ger tehersteller LINDY bietet deutschen Endverbrauchern ein kostenloses R cknahmesystem an beachten Sie bitte dass Batterien und Akkus den Produkten vor der R ckgabe an das R cknahmesys...

Отзывы: