User Manual
English
Installation
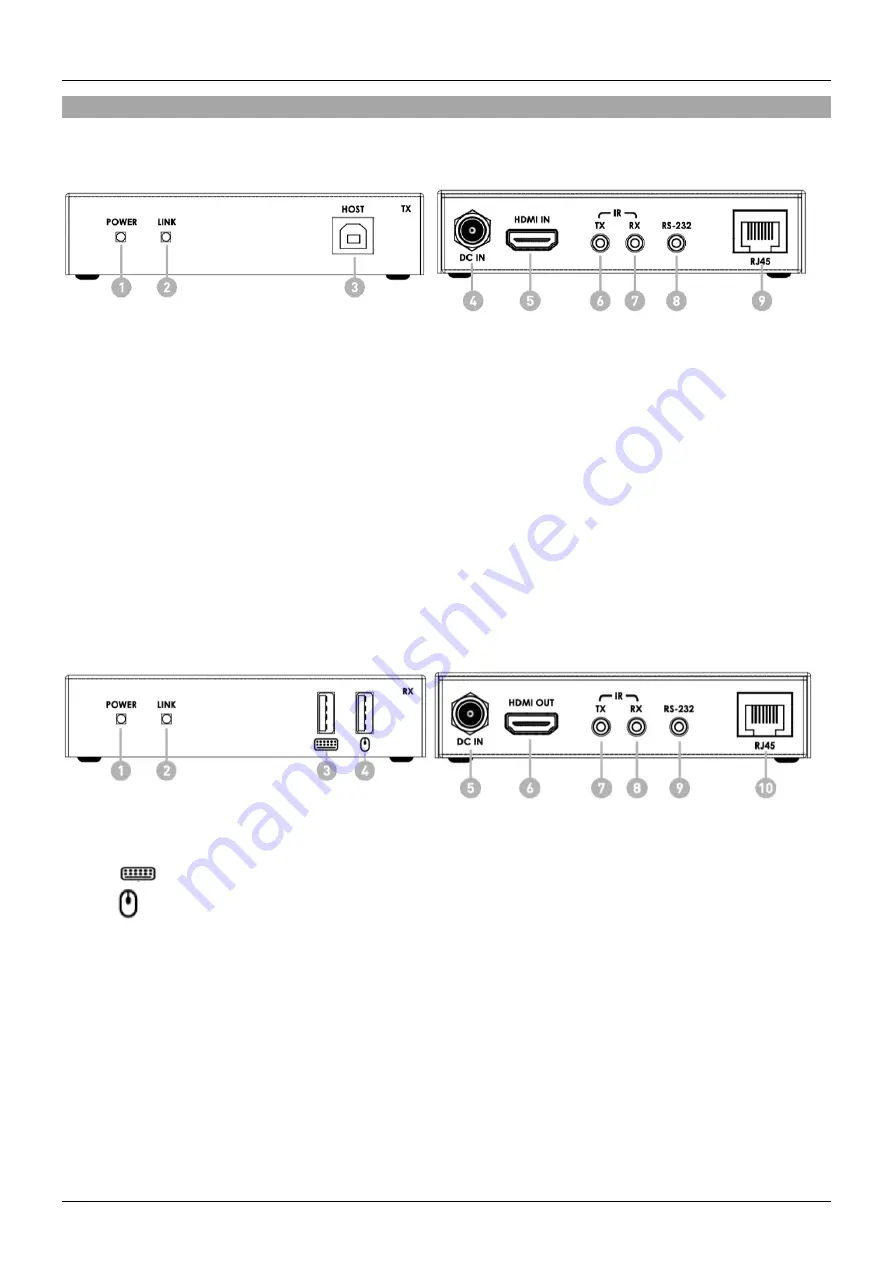
Transmitter
1. POWER LED: Illuminates when the unit is powered.
2. LINK LED: Illuminates when the connection with the receiver is established.
3. HOST: Connect to a PC using the supplied USB Type A / B cable.
4. DC IN: Connect the supplied power supply.
5. HDMI IN: Connect to a HDMI source device using an HDMI cable (not included).
6. IR TX: Connect the supplied IR Emitter cable for IR signal transmission. Place the IR Emitter in
direct line-of-sight of the equipment to be controlled.
7. IR RX: Connect the supplied IR Receiver cable for IR signal reception. Ensure the remote being
used is within the direct line-of-sight of the IR Extender.
8. RS-232: Connect to a PC or serial device using the supplied 3.5mm to RS-232 cable.
9. RJ45: Connect the receiver unit using a single Cat.6 or above cable for all data signals. Please
do not connect to a network port.
Receiver
1. POWER LED: Illuminates when the unit is powered.
2. LINK LED: Illuminates when the connection with the transmitter is established.
3.
: Connect a USB keyboard.
4.
: Connect a USB mouse.
5. DC IN: Connect the supplied power supply.
6. HDMI OUT: Connect to an HDMI display using an HDMI cable (not included).
7. IR TX: Connect the supplied IR Emitter cable for IR signal transmission. Place the IR Emitter in
direct line-of-sight of the equipment to be controlled.
8. IR RX: Connect the supplied IR Receiver cable for IR signal reception. Ensure the remote being
used is within the direct line-of-sight of the IR Extender.
9. RS-232: Connect to a PC or serial device using the supplied 3.5mm to RS-232 cable.
10. RJ45: Connect the transmitter unit using a single Cat.6 or above cable for all data signals. Please
do not connect to a network port.
Содержание 39382
Страница 2: ......


