background image

Manuale 


Italiano


Installazione 

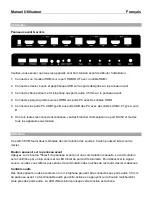
Pannello frontale e posteriore


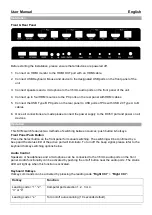
Prima di iniziare l'installazione, assicurarsi che tutti i dispositivi siano spenti. 

1.  Collegare un monitor HDMI alla porta HDMI OUT con un cavo HDMI. 

2.  Collegare la tastiera, il mouse e un dispositivo alle porte USB designate sul pannello frontale 

dell'unità. 

3.  Collegare gli altoparlanti e un microfono alle porte audio da 3.5mm sul pannello frontale dell'unità.  

4.  Collegare fino a quattro sorgenti HDMI alle porte PC sul pannello posteriore con cavi HDMI. 

5.  Collegare le porte PC USB tipo B alle porte USB dei PC con cavi USB 2.0 tipo A - B. 

6.  Una volta effettuati tutti i collegamenti, collegare l'alimentazione alla porta DC/5V e alimentare tutti i 

dispositivi. 

Utilizzo 

Questo switch KVM permette di commutare le sorgenti in due modalità: pulsante e hotkeys. 

Pulsanti tramite pannello frontale 

Premere il tasto Select sul pannello frontale per la commutazione manuale. Essa sarà confermata da un 

segnale acustico e il LED di stato della porta attiva si illuminerà. Per disattivare il segnale acustico, fare 

riferimento alle opzioni di commutazione dei tasti di scelta rapida della tastiera riportate di seguito. 

Controllo audio 

Alle porte audio da 3.5mm del pannello frontale possono essere collegati altoparlanti o cuffie e un 

microfono. L’audio può essere attivato premendo il pulsante on/off vicino alle porte audio. Il LED di stato 

si accende quando questa funzione è attivata. 

Hotkeys 

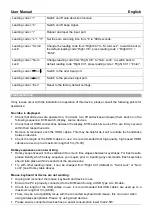
I comandi Hotkeys possono essere attivati premendo il codice guida 

“Ctrl destro”

 + 

“Ctrl destro”.


Hotkey 

Funzione 

Codice guida + “1”, “2”, 

“3” or “4” 

Selezione porta computer


1, 2, 3 o 4. 

Codice guida + “s” 

Attivare/disattivare lo scan automatico (Valore di default 10 secondi). 

Содержание 32810

Страница 1: ...LINDY Group FIRST EDITION November 2020 4 Port HDMI 18G USB 2 0 Audio KVM Switch User Manual English Benutzerhandbuch Deutsch Manuel Utilisateur Fran ais Manuale Italiano No 32810 lindy com...

Страница 2: ...LINDY Group FIRST EDITION November 2020...

Страница 3: ...secured in place and does not detach by pulling before installing into a power socket To reduce risk of fire electric shocks or damage Do not open the product nor its power supply There are no user s...

Страница 4: ...3 5mm audio ports on the front panel and the user can activate or deactivate analogue audio functionality simply by pushing a button Package Contents 4 Port HDMI 18G USB 2 0 Audio KVM Switch 5VDC 2A...

Страница 5: ...devices Operation This KVM switch features two methods of switching between sources push button hotkeys Front Panel Push Button Press the Select button on the front panel for manual switching The swit...

Страница 6: ...ay KVM switch source PCs are firmly secured within their respective ports Remove reconnect each the HDMI cables This may be helpful as it will re initiate the handshake between devices Check the lengt...

Страница 7: ...abziehen l sst bevor Sie ihn in die Steckdose stecken Um die Gefahr von Br nden Stromschl gen oder Sch den zu verringern ffnen Sie weder das Produkt noch sein Netzteil Es befinden sich keine vom Benut...

Страница 8: ...oder ein Mikrofon k nnen an die 3 5mm Audioanschl sse auf der Vorderseite des Ger ts angeschlossen werden Analoges Audio kann einfach per Knopfdruck aktiviert oder deaktiviert werden Lieferumfang 4 P...

Страница 9: ...nschl ssen des Computers 6 Nachdem alle Verbindungen hergestellt wurden schlie en Sie das Netzteil an den DC 5V Anschluss an und schalten Sie alle Ger te an Betrieb Es gibt zwei M glichkeiten um zwisc...

Страница 10: ...eustarten und zur cksetzen des Eingangs Ports Universelle Hotkey Taste s n Schaltet auf Autoscan mit Kanalzeit 8 s bis 999 s Universelle Hotkey Taste Scroll Lock ndern der universellen Hotkey Taste zu...

Страница 11: ...n werden nicht ausgef hrt wenn zwischen den Tastenanschl gen zu viel Zeit vergeht Pr fen Sie vor der Eingabe welche Hotkey Sequenz ben tigt wird Jeder Tastendruck sollte innerhalb von 2 Sekunden nach...

Страница 12: ...rant avant de l installer dans une prise lectrique Pour viter les risques d incendie de choc lectrique ou de dommages N ouvrez pas l appareil ni son alimentation lectrique Il n y a pas de pi ces r par...

Страница 13: ...hones peuvent tre connect s sur les ports audio 3 5mm situ s sur le panneau avant l utilisateur peut activer ou d sactiver les fonctions audio analogiques en appuyant simplement sur un bouton Contenu...

Страница 14: ...uillez brancher l alimentation au port DC 5V et mettez tous les appareils sous tension Utilisation Ce switch KVM fourni deux m thodes de commutation des sources bouton poussoir raccourcis clavier Bout...

Страница 15: ...la s quence d activation par d faut Ctrl droit appuyez sequ d activ Ctrl droit Enter S qu d act or Commutation vers le port d entr e suivant S qu d act or Commutation vers le port d entr e pr c dent...

Страница 16: ...Lock voir le tableau des raccourcis ci dessus Souris clavier ou p riph rique ne fonctionne pas D brancher et rebrancher la souris le clavier et l appareil utilis Assurez vous que le PC est correctemen...

Страница 17: ...si stacchi estraendolo dalla presa Per ridurre il rischio di incendi folgorazione o danni Non aprite il prodotto o l alimentatore Non esistono componenti utilizzabili all interno La riparazione o man...

Страница 18: ...ere collegati alle porte audio da 3 5mm sul pannello frontale e l utente pu attivare o disattivare il supporto audio analogico premendo semplicemente un pulsante Contenuto della confezione Switch KVM...

Страница 19: ...VM permette di commutare le sorgenti in due modalit pulsante e hotkeys Pulsanti tramite pannello frontale Premere il tasto Select sul pannello frontale per la commutazione manuale Essa sar confermata...

Страница 20: ...lo switch KVM e i PC siano saldamente fissati nelle rispettive porte Rimuovere e ricollegare ciascuno dei cavi HDMI Questo pu essere utile in quanto riattiver l accoppiamento tra i dispositivi Contro...

Страница 21: ...ies with part 15 of the FCC Rules Operation is subject to the following two conditions 1 This device may not cause harmful interference and 2 This device must accept any interference received includin...

Страница 22: ...ess bernehmen die Ger tehersteller LINDY bietet deutschen Endverbrauchern ein kostenloses R cknahmesystem an beachten Sie bitte dass Batterien und Akkus den Produkten vor der R ckgabe an das R cknahme...

Отзывы: