


B-5
OPERATION
STATIFLEX
®
6000-MS
l)
Once the last day has been entered the word
ADD
is displayed
and the two indicator bars will increase from left to right on the
display and once the program has been saved the unit will say
ADD
with no indicator bars illuminated at the bottom of the
screen
m) Press (OK) button, (will go back to the PR.XX screen the
difference this time is that the numeric values has increase by
one: example
PR.00
when you entered the first program but now
the display will read
PR.01
)
n) Press (OK) button again, (now the display reads either
CH01
or
CH02
depending on which output you entered in the last
program)
o) Choose the same output channel as before so than you can enter
a stop time for the output
p) Press (OK) button, (
Out
should be displayed on the screen just
like in step f). Press the (+PRG) or (-MAN) button to change
setting from On to OFF, then press (OK) button. This step sets the
selected channel (relay output) to be OFF (de-energized) for this
command.
q) Press (OK) button
r)
Now repeat steps H through L to enter the time of day and which
days of the week you want to turn the corresponding output off [
Note: make sure to choose the same days of the week to be ON
in step J has you did in the previous program set up]
s)
Once programming is completed and the word
ADD
is again
displayed and you are finished adding programs then hit the
(MAN 2/ESC) button twice to exit back to original run mode (the
indicator bar that goes with the corresponding output should be
illuminated at the button only on times where the output is going
to be on for that day)
3.) Repeat Cycle Mode
The repeat cycle mode works the same way as the “normal
mode” except the output cycles on and off between set times. The
output will turn on and off for what ever the predetermined time was
set in the, “
Cycle/Pulse Setting
”, section on page 12. Both the on and
off time have a range of 1 to 99 seconds each.
a) Press and hold the (+PRG) button for 3 seconds,
SEt1
is what
shows on the LCD display (also you will see
prog
in the upper
left corner of the display)
b) Press the (OK) button to enter into the programming parameters
(the word
ADD
will be shown now)
c)
Press the (OK) button, (information about the number of the new
program Pr.XX) example:
Pr
.
04
this just gives a numeric
values to the memory location of this program
d) Now press the (OK) button, (
Ch01
or
Ch02
should display)
e) You can choose weather to control output 1 or output 2 by
scrolling between them with the (+PRG) or (-MAN) buttons
f)
Press (OK) button,
Out
should be displayed on the LCD screen
g) Use the (+PRG) or (-MAN) buttons to scroll through menu options
so that the display looks like it does in step F, EXCEPT
the
sign should now be blinking in the upper right of the display
screen as well (this is how the repeat cycle mode is activated)
h) Press the (OK) button
i)
The two hours digits on the left side of the display should be
blinking, adjust the numbers using the (+PRG) or (-MAN) buttons
to set the desired hour that you want the output to come on and
than press the (OK) button
j)
Now the two minutes digits are blinking on the right side of the
display, adjust the numbers using the (+PRG) or (-MAN) buttons
to the desired minute time that you want the output to come on
and than press the (OK) button k)
k) Now it is time to select which days of the week this program will
be on for by pressing the (OK) button on either on or off along
with the corresponding number in the top of the display that
represents the days of the week,
On
l)
Choose
ON
or
OFF
by using (+PRG) or (-MAN) to scroll between
the two chooses and (OK) to enter the choose (the numbers at
the top represent the days of the week by the number
1 = Monday
and the
7 = Sunday
)
m) Once the last day has been entered the word
ADD
is displayed
and the two indicator bars will increase from left to right on the
display and once the program has been saved the unit will say
ADD
with no indicator bars illuminated at the bottom of the
screen
n) Press (OK) button, (will go back to the PR.XX screen the
difference this time is that the numeric values has increase by
one: example
PR.01
when you entered the first program but now
the display will read
PR.02
)
o) Press (OK) button again, (now the display reads either
CH01
or
CH02
depending on which output you entered in the last
program)
p) Choose the same output as before so then you can enter a stop
time for the output
q) Press (OK) button, (
Out
should be displayed on the screen just
like in step f except the word
OFF
should show up in the upper
left corner, [Note - If the screen doesn’t look like this than scroll
with (+PRG) or (-MAN) buttons until it does and also sign will not
be illuminated]
r)
Press (OK) button
s)
Now repeat steps I through M to enter the time of day and which
days of the week you want to turn the corresponding output off (
Note: make sure to choose the same days of the week to be
ON
in step J has you did in the previous program set up)
t)
Once programming is complete and the word
ADD
is again
displayed and you are finished adding programs than just hit the
(MAN 2/ESC) button twice to exit back to original run mode, (the
indicator bar that goes with the corresponding output should be
illuminated at the button only on times where the output it to be
on for that day)
Содержание Statiflex 6000-MS
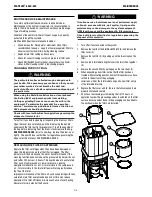
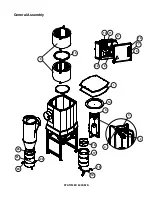
Страница 25: ...STATIFLEX 6000 MS General Assembly 15 14 3 1 4 3 2 9 6 7 13 10 11 8 12 18 19 21 20 5 16 17 22 23 ...
Страница 27: ......
Страница 28: ......
Страница 29: ......


