Lincoln Electric Square Wave TIG 275 Скачать руководство пользователя страница 12

A-5

INSTALLATION   

SQUARE WAVE TIG 275

A-5

Fuse the input circuit with the recommended super lag
fuses or delay type

1

circuit breakers. Choose an input

and grounding wire size according to local or national
codes or refer to the 

Technical Specifications

page at

the beginning of this section. Using fuses or circuit
breakers smaller than recommended may result in
"nuisance" tripping from welder inrush currents even if
not welding at high currents.

Unbalanced AC TIG welding draws higher input cur-
rents than those for Stick, DC TIG, or Balanced AC TIG
welding. The welder is designed for these higher input
currents. However, where unbalanced AC TIG welding
above 180 amps is planned, the higher input currents
require larger input wire sizes and fuses per the

Technical Specifications

page at the beginning of

this section.

INPUT RECONNECT PROCEDURE

On multiple input voltage welders, be sure the recon-
nect panel is connected per the following instructions
for the voltage being supplied to the welder.

FAILURE  TO  FOLLOW  THESE  INSTRUCTIONS
CAN  CAUSE IMMEDIATE  FAILURE  OF  COMPO-
NENTS  WITHIN  THE  WELDER.

------------------------------------------------------------------------

Welders are shipped connected for the highest input
voltage as listed on the rating plate. To change this con-
nection, refer to the following instructions:

1. Remove the right case side to reveal the reconnect

panel.

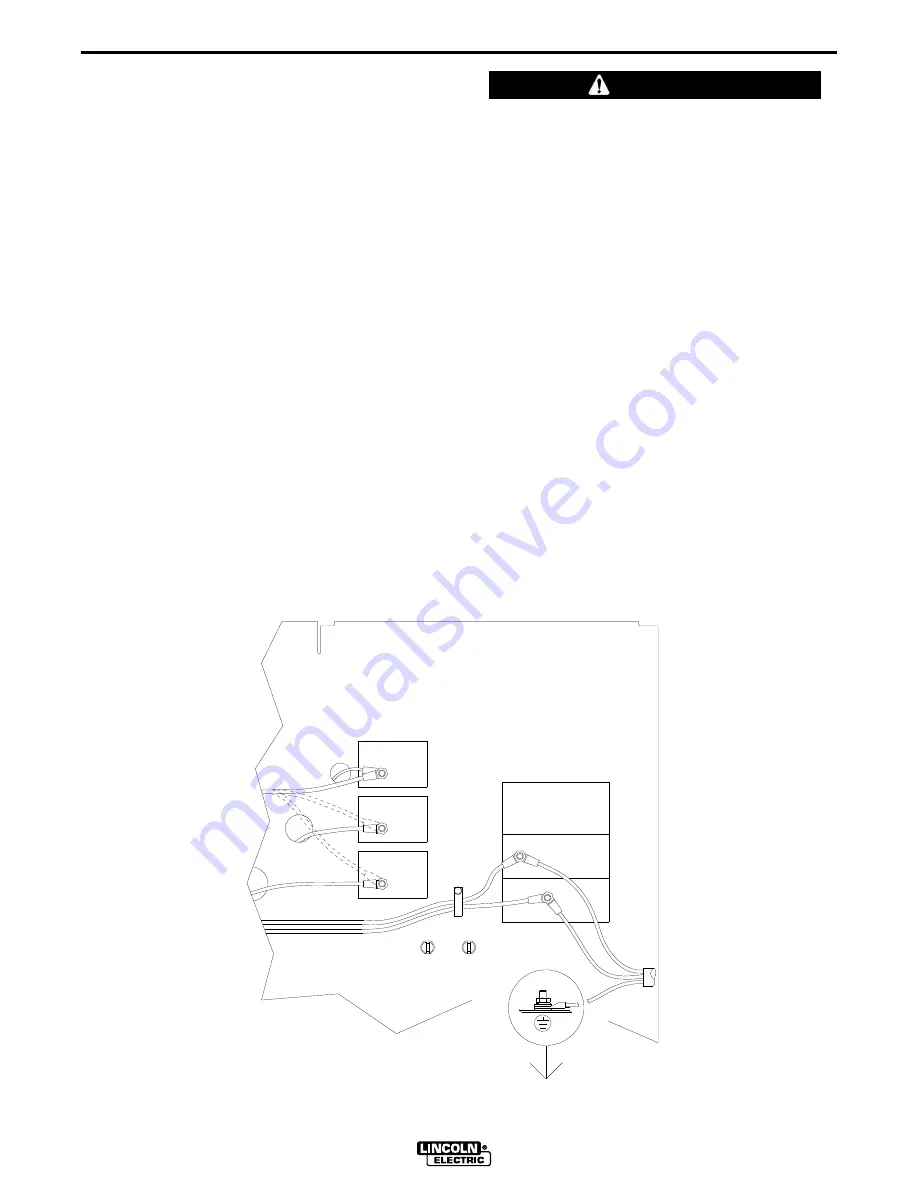
2. Reconnect the lead marked  A  to  the terminal stud

corresponding to the input voltage used. Refer to
the figure representing the model being reconnect-
ed:

Figure A.2  208/230/460/1/60  Domestic Model
Figure A.3  460/575/1/60  Domestic/Canadian Model
Figure A.4  220/380/415/1/50/60  European Model 

(Con’t)

460V

3 (MID)

4 (HIGH)

230V

power at the disconnect switch or fuse box before making any connections.  Use 
input and grounding lead sizes as specified in the operating manual.  Failure to follow
instructions below can cause immediate failure of components within the welder.

Powered by high voltage which can kill.  Turn off all input

5.

208V

2.

L1 (U)

4.

3.

2 (LOW)

1. Connect the input power leads to the input terminals, L1 (U) and L2 (V), at the right

below.  Connect the input power leads with the hardware provided.  Completely
tighten all fasteners.

Connect a grounding lead to the ground stud located on the machine base near
the input terminals.

Welders are shipped connected for the highest rated single phase input voltage
with the lead marked "A" connected to the stud marked "4 (HIGH)".

For middle range input, reconnect the lead marked "A" to the stud marked "3 (MID)".

For low range input, reconnect the lead marked "A" to the stud marked "2 (LOW)".

SINGLE PHASE INPUT POWER SUPPLY CONNECTION INSTRUCTIONS:

SINGLE

PHASE

INPUT

L2 (V)

POWER FACTOR CAPACITORS

LEADS FOR OPTIONAL

208/230/460 DOMESTIC MODEL

WARNING:

Figure A.2

Reconnect Panel Instructions for 208/230/460 Domestic Model

1

Also called "inverse time" or "thermal/magnetic" circuit breakers; circuit

breakers which have a delay in tripping action that decreases as the magni-
tude of the current increases.

CAUTION

Содержание Square Wave TIG 275

Страница 1: ...WITHOUT READING THIS MANUAL AND THE SAFETY PRECAUTIONS CONTAINED THROUGHOUT And most importantly think before you act and be careful For use with machines having Code Numbers 10523 10524 10525 10605 1...

Страница 2: ...Y PACEMAKER WEARERS SHOULD CONSULT WITH THEIR DOCTOR BEFORE OPERATING Read and understand the following safety highlights For additional safety information it is strongly recommended that you pur chas...

Страница 3: ...ical earth ground 3 f Maintain the electrode holder work clamp welding cable and welding machine in good safe operating condition Replace damaged insulation 3 g Never dip the electrode in water for co...

Страница 4: ...vent the welding sparks from starting a fire Remember that welding sparks and hot materials from welding can easily go through small cracks and openings to adjacent areas Avoid welding near hydraulic...

Страница 5: ...pri s et non inflammables 4 Des gouttes de laitier en fusion sont mises de l arc de soudage Se prot ger avec des v tements de protection libres de l huile tels que les gants en cuir chemise paisse pan...

Страница 6: ...e information must be followed to avoid minor personal injury or damage to this equipment CAUTION Please Examine Carton and Equipment For Damage Immediately When this equipment is shipped title passes...

Страница 7: ...Section B Safety Precautions B 1 Graphic Symbol Definitions B 2 General Description B 4 Recommended Processes and Equipment B 4 Design Features and Advantages B 4 Limitations B 5 Duty Cycle and Time P...

Страница 8: ...Hook add 3 57 91 mm Power Source 33 40 in 27 65 in 40 65 in Approx 375 lbs on 848 mm 702 mm 1033 mm 170 kg Undercarriage PHYSICAL DIMENSIONS Fuse Super Lag or Breaker Size 1 150 150 70 60 1 Also calle...

Страница 9: ...19 15 in 28 00 in Approx 340 lbs Source 611 mm 486 mm 711 mm 154 kg Lift Hook add 3 57 91 mm Power Source 33 40 in 27 65 in 40 65 in Approx 385 lbs on 848 mm 702 mm 1033 mm 175 kg Undercarriage PHYSI...

Страница 10: ...Wave TIG 275 power source carries an IP21 environmental rating It may be used in normal industrial and commercial environments It is rated for use in damp dirty rain sheltered environments MACHINE GRO...

Страница 11: ...not suitable 8 When the welder is enclosed in a metal building the metal building should be connected to several good earth driven electrical grounds as in 5 b above around the periphery of the buildi...

Страница 12: ...nding to the input voltage used Refer to the figure representing the model being reconnect ed Figure A 2 208 230 460 1 60 Domestic Model Figure A 3 460 575 1 60 Domestic Canadian Model Figure A 4 220...

Страница 13: ...GH INPUT PHASE SINGLE 1 460 575 CANADIAN MODEL Figure A 3 Reconnect Panel Instructions for 460 575 Canadian Model 415V 380V 220V 1 Connect the input power leads to the input terminals L1 U and L2 V at...

Страница 14: ...e Table A 1 and A 2 for rec ommended sizes and corresponding hardware Assemble the correct Twist Mate adapter plug to the work cable as follows 1 Skin the cable jacket to 1 00 in 25 4 mm for a 2 thru...

Страница 15: ...e system Otherwise flow passages could become obstructed or clogged causing torch overheating or failure The optional water solenoid valve may also malfunction When the water solenoid valve option is...

Страница 16: ...ections to the electrode terminal of the Square Wave TIG 275 The Twist Mate adapter and strain relief boot needed to connect an LW 18 or LW 20 torch or any equivalent water cooled TIG torch with the f...

Страница 17: ...rec ommended sizes and corresponding hardware Assemble the correct Twist Mate adapter plug to the stick electrode cable as detailed in Work Cable Connection DO NOT CONNECT A TIG TORCH AND STICK ELECT...

Страница 18: ...tions such as welding in wet areas or on or in the workpiece FUMES AND GASES can be dangerous Keep your head out of fumes Use ventilation or exhaust to remove fumes from breathing zone WELDING SPARKS...

Страница 19: ...UTPUT OFF INPUT POWER OVER TEMPERATURE AC WAVE BALANCE CONTROL SYMBOL MEANING AC WAVE BALANCE CLEAN INCREASING POSITIVE POLARITY PENETRATE INCREASING NEGATIVE POLARITY MODE SWITCH SYMBOL MEANING TIG 2...

Страница 20: ...ID CONNECTIONS SYMBOL MEANING WATER COOLANT INPUT OUTPUT CONNECTIONS SYMBOL MEANING WORK CONNECTION ELECTRODE CONNECTION WATER COOLANT OUTPUT ADDITIONAL SYMBOLS SYMBOL MEANING REMOTE CONTROL DO NOT SW...

Страница 21: ...FAN circuit turns ON the fan only when cooling is needed FAN minimizes the amount of dust dirt and other foreign material drawn into the machine A build up of these materials can cause excessive oper...

Страница 22: ...uropean Model Only Low Voltage Trigger Circuit 18 VAC for maximum operator safety Remote Receptacle for Amptrol or Arc Start Switch connection Gas Valve Inlet fitting conforms to Compressed Gas Associ...

Страница 23: ...three position toggle switch used to select the welding mode Refer to the WELDING OPERATION section for more information on how the machine functions in each of the following modes Stick This mode is...

Страница 24: ...ectrode Connection makes the gas and current connec tions for the TIG torch at the same time Adapter plugs are provided with the machine 14 Remote Receptacle For Amptrol Arc Start Switch or Robotic In...

Страница 25: ...ure Tungsten 1 2 Thoriated Tungsten Zirconiated Aluminum Stainless Steel Tungsten Electrode Diameter in mm TIG Torch Nozzle Size 4 5 DCEN DCEP Unbalanced Wave Balanced Wave AC Approximate Argon Gas Fl...

Страница 26: ...Second Press The output current ramps down to 5 Amps or 25 10 of the preset current whichever is greater The time it takes to ramp down can be adjusted from approximately 0 5 to 10 seconds with the Do...

Страница 27: ...to weld at 5 amps At the Amptrol s maximum position the output will be near 200 amps It is important to note that for many applications the tungsten will not start an arc at only 5 amps Refer to the...

Страница 28: ...ithin the 10 amp rating Note that some types of equipment especially pumps and large motors have starting currents which are significantly higher than their running current These higher starting curre...

Страница 29: ...n the undercarriage is properly installed the Square Wave TIG 275 lift bale is nonfunctional Do not attempt to lift the power source with the undercarriage attached The undercarriage is designed for h...

Страница 30: ...ndition will be indicated by the illumination of the yel low Thermostatic Protection Light on the case front see Figure 3 The fan will continue to run to cool the power source No welding is possible u...

Страница 31: ...ver or other suitable tool The main rectifier is mounted to the main transformer in front of the cooling fan SPARK GAP ADJUSTMENT The spark gap is set at the factory to a gap of 0 015 inches 0 4 mm Th...

Страница 32: ...S The second column labeled POSSIBLE AREAS OF MISADJUSTMENT S lists the obvious external possibilities that may con tribute to the machine symptom Perform these tests checks in the order listed In gen...

Страница 33: ...machine output Allow machine to cool and ther mostat will close The yellow thermal light TL1 should be lit in this condition 3 If the machine is not hot i e you have not been welding and the thermosta...

Страница 34: ...ose connections at Control PC Board P4 and at the Display PC Board 20 21 The Display 2 The Display PC Board may be faulty See PC Board Troubleshooting Procedures 1 Is accessory defective Plug it into...

Страница 35: ...ariable or sluggish welding arc 1 Diode D1 may be shorted Check and replace 2 One of the main SCR s may be shorted Check and replace 1 Check and replace 5 Amp Fuse F1 located below the Control PC Boar...

Страница 36: ...on cable connector when Arc Start Switch or Amptrol is pressed 2 The Control PC Board may be faulty See PC Board Troubleshooting Procedures 1 Gas supply is empty or not turned on 2 Pinched disconnect...

Страница 37: ...eak to ground Use good quality cables preferably those with a high natural rubber content and as short as possi ble 3 No shielding gas Adjust gas flow for a flow of 10 to 30 CFH 4 7 to 14 1 1 min for...

Страница 38: ...st be securely grounded by means of its ground and mounting screws to the case front The quick connect terminals from the line switch must be fully seated Failures of this board should be very rare BY...

Страница 39: ...NECT A TO MID H3 7 24 98 C L2 SV1 235A 234A F S BALANCE CONTROL X5 L4 C5 T2 F E D C X2 X1 T1 78VAC S W 204 A C D E B F B D C E A F G H G DC 211 DC C6 277B 245 254 J2 J1 255 AT MINIMUM D F J7 J8 PC BOA...

Страница 40: ...ID S1 FUSE 5A FAST BLOW R4 R2 TOROID L5 F1 D F D1 F 10K A B R6 252 J4 246 J3 312 2 STEP TIG BRASS TERMINAL S2A 316 A R1 220 220A 277 DOWNSLOPE CONTROL POTENTIOMETER 100K PHASE SHIFT RESISTOR 200 100 2...

Страница 41: ...COLORING CODE B BLACK 2 1 8 X5 L4 L3 L4 C5 T2 F E D C X2 X1 T1 78VAC S W 204 A C D E B F B D C E A F G H G C8 DC 211 REAR GANG DC 115VAC R6 S2A TL1 G GREEN O ORANGE R RED CONNECTOR PIN NUMBERS C6 277...

Страница 42: ...DIMENSION PRINT SQUARE WAVE TIG 275 20 00 40 65 4 00 24 06 3 57 71 15 37 28 00 3 57 17 50 A M19118 9 57 19 15 22 89 33 40 27 65 F 4 F 4...

Страница 43: ...6 383 2259 and ask for the Welding School Registrar Lincoln Welding School BASIC COURSE 700 00 5 weeks of fundamentals There is a 10 discount on all orders of 50 00 or more for shipment at one time to...

Страница 44: ...electrically live parts or electrode with skin or wet clothing Insulate yourself from work and ground No toque las partes o los electrodos bajo carga con la piel o ropa moja da Aislese del trabajo y...

Страница 45: ...e Be und Entl ftung des Arbeitsplatzes Mantenha seu rosto da fuma a Use ventila o e exhaust o para remover fumo da zona respirat ria Turn power off before servicing Desconectar el cable de ali mentaci...

Страница 46: ...and Service through Subsidiaries and Distributors Worldwide Cleveland Ohio 44117 1199 U S A TEL 216 481 8100 FAX 216 486 1751 WEB SITE www lincolnelectric com World s Leader in Welding and Cutting Pr...

Отзывы: