background image

English 8 English 

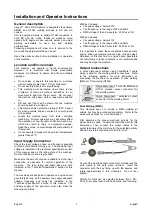
TIG Welding (GTAW) 

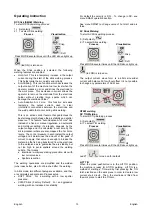
This machine does not include a TIG torch necessary for 
TIG welding, but one may be purchased separately.  
Refer to the accessories section for more information. 


Connect the torch cable to 
the torch terminal of the 
machine and the work 
clamp to the work piece 
terminal.  Insert the 
connector with the key 
lining up with the keyway 
and rotate approximately ¼ turn clockwise.  Do not over 
tighten.  Finally, connect the gas hose from the TIG torch 
to the gas connector (B) on the front of the machine.  If 
necessary, an extra gas connector for the fitting on the 
front of the machine is included in the package.  Next, 
connect the fitting on the back of the machine to a gas 
regulator on the cylinder of gas to be used.  The required 
fittings are included in the package.  Connect the TIG 
torch trigger to the trigger connector (A) on the front of 
the machine. 
 

TIG Welding with a Water Cooled Torch 

A cooling unit can be applied to the Machine: 

 COOLARC 

46. 

If a Coolarc unit listed above is connected to the 
Machine, it will be automatically turned ON and OFF in 
order to ensure the torch cooling.  When Stick welding 
mode is used the cooler will be OFF. 
 
This machine does not include a cooled TIG torch, but 
one may be purchased separately.  Refer to the 
accessories section for more information. 
 

 WARNING 

The Machine is provided with an electrical connection for 
the Coolarc unit on its rear side.  This socket is ONLY for 
the connection of the Coolarc unit listed above. 
 

 WARNING 

Before connecting the cooler unit to the Machine and 
operate, read and understand the Instruction Manual 
supplied with the cooling unit. 
 

 WARNING 

Connect and disconnect the cooler with the unit switched 
OFF. 
 

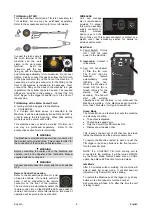
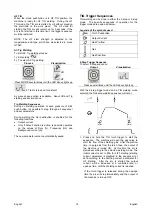
Remote Control Connection 

Refer to the accessories section for a list 
of remote controls.  If a remote control is 
used, it will be connected to the remote 
connector on the front of the machine.  
The machine will automatically detect the 
remote control, turn on the REMOTE LED, and switch to 
remote control mode.  More information on this mode of 
operation will be given in the next section. 

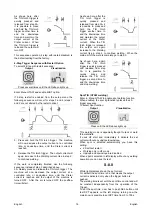
WIRELESS 

Unit can manage 
also a remote device 
wireless. To accept 
this part an auxiliary 
supply connector to 
supply wireless 
device is put on the 
front of the unit. This supply connector is protect by a 
plastic cover. See accessory section for details on 
wireless part number. 
 

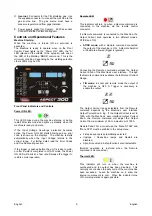
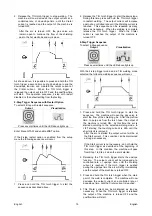
Rear Panel 

A.  Power Switch:  It turns 

ON / OFF the input 
power to the machine. 

 
B.  Input cable:  Connect it 

to the mains. 

 
C. Fan:  Do not obstruct 

or filter the fan inlet.  
The “F.A.N.” (Fan As 
Needed) feature 
automatically turns 
OFF/ON the fan. 


When the Machine is 
turned ON the fan is 
turned ON only for the 
startup time (few 
seconds).  The fan will 
start with welding 
operations and will continue to run whenever the 
Machine is welding.  If the Machine doesn’t weld for 
more than 10minutes, it will go in Green Mode. 


Green Mode 

The Green Mode is a feature that puts the machine 
in a stand-by condition: 

  The output is disabled 

  The fans are speed down 

  Only the Power ON LED remains ON. 

  Display show the dash char 


This reduces the amount of dirt that can be drawn 
inside the Machine and the power consumption. 


To restore the Machine restart to weld or push the 
TIG trigger or push any buttons in the front panel or 
turn the encoder knob. 


NOTE: If a COOLARC TIG torch cooling unit is 
connected to the machine, it will be turned ON/OFF 
by the Green Mode feature based also on COOL 
option. See Menu SYS section for more details. 


Idle Mode 

After 30 minutes without welding the machine will 
enter a deep low power mode.  It will shut down all 
indicators: only Power ON Led is blinking. 


To restore the Machine push the trigger or push any 
buttons in the front panel or turn the encoder. 
Exit procedure will take 6-7s: after this time the unit 
is ready to weld. 

Содержание ASPECT 300

Страница 1: ...IM2065 10 2020 REV07 ASPECT 300 OPERATOR S MANUAL ENGLISH Lincoln Electric Bester Sp z o o ul Jana III Sobieskiego 19A 58 263 Bielawa Poland www lincolnelectric eu...

Страница 2: ...in the table below your equipment identification information Model Name Code Serial Number can be found on the machine rating plate Model Name Code Serial number Date Where Purchased ENGLISH INDEX Te...

Страница 3: ...10 min period Output Voltage U2 Duty Cycle at based on a 10 min period Input Line Mode 35 60 100 35 60 100 230Vac 400Vac 3ph STICK DC 270A 240A 200A 30 8V 29 6V 28V TIG DC 300A 240A 200A 22V 19 6V 18...

Страница 4: ...X STICK mode X After 30 minutes of non working X Fan off X The value of efficiency and consumption in idle state have been measured by method and conditions defined in the product standard EN 60974 1...

Страница 5: ...process gas usage depends on cross sectional area of the nozzle For commonly used torches Helium 14 24 l min Argon 7 16 l min Notice Excessive flow rates causes turbulence in the gas stream which may...

Страница 6: ...bles and telephone cables that are in or adjacent to the work area and the machine Radio and or television transmitters and receivers Computers or computer controlled equipment Safety and control equi...

Страница 7: ...electrical regulations ELECTRICALLY POWERED EQUIPMENT Regularly inspect the input electrode and work clamp cables If any insulation damage exists replace the cable immediately Do not place the electr...

Страница 8: ...ght position securely chained to a fixed support Do not move or transport gas cylinders with the protection cap removed Do not allow the electrode electrode holder work clamp or any other electrically...

Страница 9: ...available from the input connection is adequate for normal operation of the machine The fuse rating and cable sizes are both indicated in the Technical Specification section of this manual The machine...

Страница 10: ...remote control is used it will be connected to the remote connector on the front of the machine The machine will automatically detect the remote control turn on the REMOTE LED and switch to remote co...

Страница 11: ...This indicator will turn on when a Remote command is connected to the machine via the remote control connector If a Remote command is connected to the Machine the Output Current knob operates in two d...

Страница 12: ...ON no trigger required to start Pressing the button assigned to OUTPUT selection will toggle the illumination of the icon from left to right AC Wave Shape These icons allow the operator to customize t...

Страница 13: ...rage of the pulse waveform Background amperage is set as a percentage of the peak current Main Amperage Control The main amperage control button is intended to be a quick selection method to adjust th...

Страница 14: ...on 2 Turn Control Knob to Select memory location 3 Press and hold memory button for 3 seconds Recalling Memory Settings In order to recall process settings it is first necessary to press the memory bu...

Страница 15: ...urrent to apply that value is enough to breaks the metal drop that is being transferred from the electrode to the workpiece as to guarantee the arc stability but not too high to avoid spatters around...

Страница 16: ...ackground current A The new parameter value is automatically saved TIG Trigger Sequences TIG welding can be done in either the 2 step or 4 step mode The specific sequences of operation for the trigger...

Страница 17: ...urrent is reached the output of the machine is turned OFF 4 Step Trigger Sequence To select 4 Step sequence Output Visualization Press several times until the LED above lights up With the 4 step trigg...

Страница 18: ...trigger is quickly pressed and released from step 3A it is possible to press and hold the TIG torch trigger another time to end the downslope time and maintain the output current at the Crater curren...

Страница 19: ...part of the weld is complete The machine will now decrease the output current at a controlled rate or downslope time until the Crater current is reached This Crater current can be maintained as long...

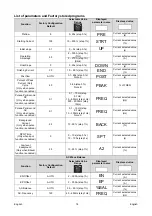
Страница 20: ...Second DC Only when pulse function is enabled 0 1 0 1 10 Hz step 0 1Hz 10 500Hz step 1Hz 500 2000Hz step 10Hz FREQ Current selected value Hz Pulses Per Second AC Only when pulse function is enabled 0...

Страница 21: ...or frequency value higher than 500Hz PEAK is locked to 50 Note C In AC polarity the pulse frequency is limited to of the AC frequency if AC frequency is 120Hz that means the max pulse frequency is 30H...

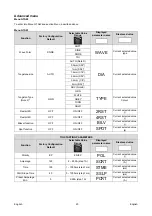
Страница 22: ...lue Colour WHTE GREY TURQ GOLD Restart 2S OFF ON OFF 2RST Current selected value Restart 4S OFF ON OFF 4RST Current selected value Bilevel function OFF ON OFF BILV Current selected value Spot function...

Страница 23: ...mode a good are striking For AC welding advanced users is present the possibility to modify the AC starting parameters Tig AC starting parameters The unit is delivered not allowing to the user to chan...

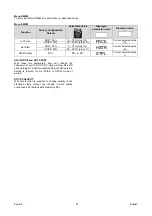
Страница 24: ...HSTR Current selected value CRISP 50 50 200 step 1 Stick Polarity DC DC or DC STPL Current selected value ARC FORCE and HOT START With those two parameters user can change the behaviour of unit in ST...

Страница 25: ...ON OFF VRD LED Brightness Intensity LOW LED X MED HIGH TIG Remote Options AMP FOOT RMTE Current selected value type AMP Cooler option AUTO AUTO COOL Current selected value type ON Control firmware re...

Страница 26: ...onds then turn ON again If the error remains a maintenance is required Please contact the nearest technical service center or Lincoln Electric and report the error code displayed on the meter of the F...

Страница 27: ...fter each repair perform proper tests to ensure safety Customer Assistance Policy The business of The Lincoln Electric Company is manufacturing and selling high quality welding equipment consumables a...

Страница 28: ...ing First read the Part List reading instructions above then refer to the Spare Part manual supplied with the machine that contains a picture descriptive part number cross reference REACh 11 19 Commun...

Страница 29: ...M W000382719 2 PROTIGIIIS 30RL C5B S 5M W000382720 2 PROTIGIIIS 30RL C5B S 8M W000382721 2 PROTIGIIIS 40RL C5B S 5M W000382722 2 PROTIGIIIS 40RL C5B S 8M W000382723 2 PROTIGIIIS 10W C5B S 5M W00038272...

Отзывы: