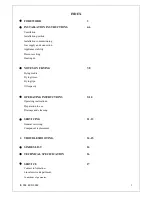
Lincat Silverlink 600 J10 Скачать руководство пользователя страница 15

15 


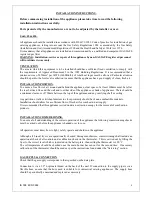
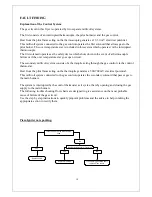
FAULT FINDING (cont’)


Pilot burner will not light or stay lit.


High limit thermostat operates.


Are the thermocouple/Interrupter 

connections secure.

Check supply.

Yes.

Is there gas at the pilot when 

holding control knob in the 

pilot position.

No.

Tighten connection.

No

Yes.

Very little.

Check overtemperature 

stat for open circuit. 

If all of the above are OK the 

control valve may be faulty.

Check pilot jet for 

blockage and clean where 

necessary.

Check supply.

Check thermocouple 

voltage (minium 15mV).

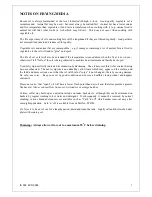
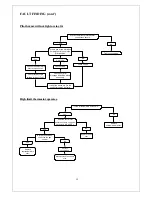
Is the oil temperature over 220

o

C.

Replace control 

stat.

Yes.

Does the control stat 

operate on temp. rise when 

set point is low (100

o

C).

No.

Replace 

overtemperature stat.

No

Yes.

Are the connections 

correct on the gas 

control.

Manually reset overtemp 

stat.

No.

Yes.

Correct 

connections.

Replace 

overtemperature 

stat.

Содержание Silverlink 600 J10

Страница 1: ...IS 358 ECN 3592 User and Installation Instructions Silverlink 600 Gas Fryer J5 and J10 Utensils Direct 01903 823888 Click here to order Lincat Gas Fryers...

Страница 2: ...etting Heat input NOTES ON FRYING 7 8 Frying media Frying times Frying tips Oil capacity OPERATING INSTRUCTIONS 9 10 Operating instructions Preparation fo use Drainage and cleaning SERVICING 11 13 Gen...

Страница 3: ...m us before you make your decision IMPORTANT Please read this page carefully before initially using the equipment WARNING This appliance must be installed and serviced by a registered engineer Whilst...

Страница 4: ...de of the appliance or bank of appliances There should be a minimum clearance of 750mm between the top of the appliance and any overlying shelf or ceiling Any partitions walls or kitchen furniture in...

Страница 5: ...its intended position whilst complying with the instructions as detailed in the User Document 2 Fit the upper brackets to the bottom of the unit using the screws provided 3 Loosely fit the lower brac...

Страница 6: ...3 Adjustment is made via the valve s onboard governor which is situated centrally on the valve Fig 1 C 4 Remove the governor cap and turn the screw clockwise to increase the outlet pressure and anticl...

Страница 7: ...d Used oil symptoms firstly indicate discolouration by darkening The oil becomes thin its fat content having become exhausted The next symptom is an unhealthy yellow foam which may appear on the surfa...

Страница 8: ...is not placed into the oil FRYING TIPS 1 Always use a good quality oil or fat preferably oil which has a high breakdown temperature e g pure vegetable oil 2 Do not exceed the recommended cooking temp...

Страница 9: ...in the off position Fig 3 1 Push in and turn anti clockwise to the Pilot position Fig 3 2 The knob will now depress further 4 Keeping the pilot control knob depressed press the piezo ignition button...

Страница 10: ...er and provide the base of the tank with a coating of oil 5 Close the drain valve DRAINAGE 1 Always allow the oil to cool to a maximum 55 o C before draining 2 Remove the blanking nut Fig 2 e from the...

Страница 11: ...ctions 3 Visually check the burner operation closely observing the flame picture and look for evidence of any debris or damage Remove burner and clean or replace as necessary 4 Visually check the inje...

Страница 12: ...e pilot bracket and pull down 2 Undo the nut holding the thermocouple into the rear of the valve 3 Disconnect the wires from the interrupter terminal block 4 Replace the thermocouple 5 Reversal of the...

Страница 13: ...afety Thermostat 1 Drain oil from fryer tank 2 Remove the thermostat housing and locate the thermostat 3 Remove the brass nut holding the thermostat to the housing 4 Disconnect the wires from the ther...

Страница 14: ...lt system consists of a thermopile acting through the gas control via the control thermostat Heat from the pilot flame acting on the thermopile generates a 500 700 mV electrical potential This millivo...

Страница 15: ...re stat for open circuit If all of the above are OK the control valve may be faulty Check pilot jet for blockage and clean where necessary Check supply Check thermocouple voltage minium 15mV Is the oi...

Страница 16: ...Control Valve Technical Data Models J5 and J10 Dimensions J5 H1060 x W300 x D700 J10 H1060 x W600 x D700 Weight J5 34 8kg J10 69 5kg Inlet connection 1 2 BSP Natural Gas G20 Heat Input Gross 11 5 kWh...

Страница 17: ...persons Note that for safe and efficient operation appliances need regular servicing Please quote both the model and serial numbers from the data plate attached to the unit Give brief details of the...

Отзывы: